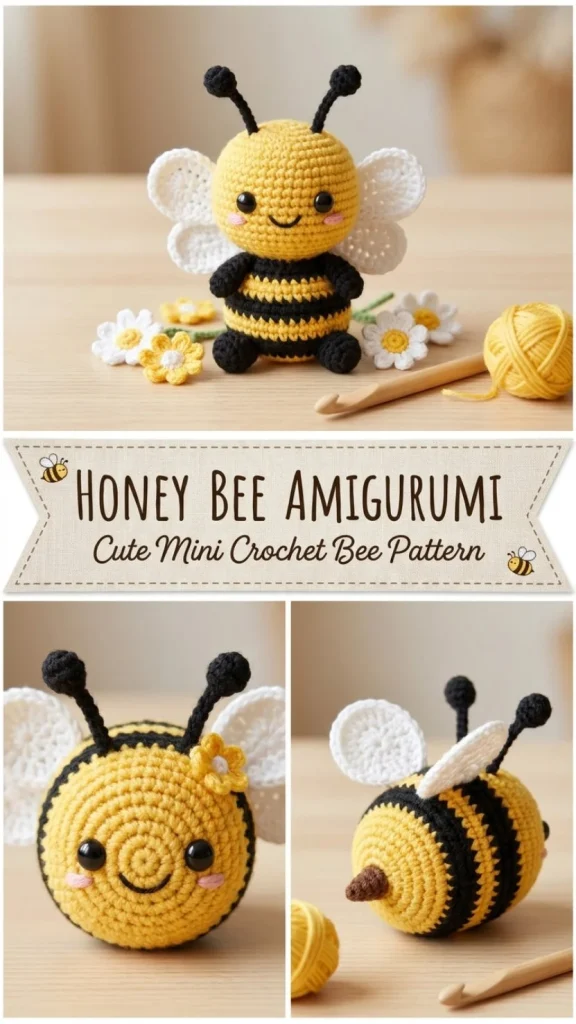
This Honey Bee Amigurumi is a charming and compact crochet project perfect for crafters looking to create a cute, giftable item that’s both fun to make and delightful to display. Working in simple rounds with basic stitches, this pattern is friendly to beginners while still engaging those with intermediate skills. The alternating yellow and black stripes add the classic honey bee look, and the delicate wings and antennae give it a playful, lifelike appeal that stands out in any amigurumi collection. With just a few materials and straightforward steps, you can quickly crochet a sweet bee that’s perfect as a small toy, decoration, or an adorable gift. Personal touches like soft pink embroidered cheeks or a tiny smile add personality, making it feel truly handmade. If you enjoy projects that combine simplicity with a little detail—a bit like crafting a stylish piece like the Pink Lily Bell Anklet—this honey bee will fit right into your crochet repertoire.
Why You’ll Love This Crochet Pattern
- Designed for easy-to-follow rounds with clear stitch counts, ideal for beginners and intermediate crocheters.
- The compact size means a quick project with satisfying results—great for gifting or quick decor.
- Color changes add visual interest without complicated techniques.
- Detailed finishing instructions help your bee keep its shape and charm.
- You can customize with embroidered features or color variations for unique personalities.
- Creates a durable, well-structured amigurumi perfect for holiday decorations or as a playful accent piece.
Finished Size
The finished honey bee measures approximately 3 inches tall (7.5 cm), but this may vary slightly depending on your yarn choice, hook size, and personal tension. Using a DK cotton yarn and a 3.0 mm hook keeps the stitches neat and the shape consistent.
Skill Level
This pattern is suitable for advanced beginners comfortable with basic crochet stitches and familiar with working in rounds. It includes simple increases and decreases as well as neat color changes, making it a lovely progression piece without overwhelming complexity.
Materials Needed
- DK or light worsted (#3/#4) cotton yarn in golden yellow, black, white, and pink (optional for cheeks)
- 3.0 mm crochet hook
- Fiberfill stuffing
- 8 mm safety eyes or black embroidery thread if you prefer stitched eyes
- Tapestry needle for sewing and weaving ends
- Stitch marker to keep track of rounds
- Scissors
Stitches and Abbreviations
- sc = single crochet: Insert hook, yarn over, pull through loop, yarn over, pull through two loops on hook.
- inc = increase: 2 single crochets in one stitch.
- dec = decrease: single crochet two stitches together, resulting in one stitch.
- hdc = half double crochet: yarn over, insert hook, pull through, yarn over, pull through all three loops.
- dc = double crochet: yarn over, insert hook, pull through, yarn over, pull through two loops twice.
- sl st = slip stitch: Insert hook, yarn over, pull loop through stitch and hook.
- ch = chain stitch.
Gauge and Tension Notes
Gauge is not critical, but maintaining consistent tension is important for a smooth, firm fabric while stuffing. Aim for stitches tight enough to avoid stuffing showing through but not so tight that it distorts your hook size or twists the work. Using a stitch marker helps keep your rounds even.
Pattern Notes Before You Start
This bee is worked entirely in continuous rounds, beginning with a magic ring for a seamless start. Color changes alternate between yellow and black bands on the body for the signature bee stripes. Wings, antennae, and stinger are crocheted separately and sewn on, ensuring neat shaping and durable assembly. Safety eyes are positioned between rounds 5 and 6—about six stitches apart—though you may opt for embroidery instead. Tailoring the stitch count during decreases shapes a tapered end for a realistic body form.
Step-by-Step Crochet Instructions
Body (Yellow and Black Stripes)
- R1: Magic ring, 6 sc (6)
- R2: inc around (12)
- R3: (sc, inc) x6 (18)
- R4: (2 sc, inc) x6 (24)
5-6. R5-6: sc around (24) - Change to black yarn
7-8. R7-8: sc around (24) - Change to yellow
9-10. R9-10: sc around (24) - Change to black
- R11: sc around (24); place safety eyes between R5 and R6 spaced 6 stitches apart; embroider pink cheeks if desired
- R12: (2 sc, dec) x6 (18); begin stuffing firmly but not overstuffed
- R13: (sc, dec) x6 (12)
- R14: dec around (6); fasten off and close hole tightly
Wings (Make 2 in White)
- Ch 7
- In 2nd ch from hook: sc, hdc, dc, 3 dc in next ch, continue on opposite side of chain with dc, hdc, sc
- Fasten off leaving a long tail for sewing
Antennae (Make 2 in Black)
- Ch 5
- Sl st in 2nd ch from hook and next 3 ch
- Fasten off, leaving a tail for sewing
Stinger (Black)
- Ch 4
- Sl st in 2nd ch and next 2 ch
- Fasten off with a long tail
Assembly and Finishing
Sew the wings to the top center of the bee’s body, angling them slightly outward for a natural look. Attach the antennae between rounds 2 and 3, positioning them evenly at the front. Sew the stinger securely to the back center of the body. Add an embroidered tiny curved smile using black thread to give your bee extra personality. Finally, weave in all tails carefully and shape the body evenly by adjusting stuffing if needed. Use a tapestry needle to hide ends inside to maintain a neat finish.
Helpful Tips
- Use a stitch marker to keep track of the beginning of each round; it’s easy to lose your place in continuous rounds.
- When stuffing, add fiberfill gradually to maintain even shaping without lumps.
- Switch colors by pulling the new yarn through the last loop of the previous stitch for smoother transitions.
- Embroider cheeks or smiles before sewing pieces together for easier access.
- For cleaner seams, sew parts with matching yarn and tighten stitches gently without pulling too hard.
- If you like, explore adding light wire inside wings for sturdiness and shaping.
Common Mistakes to Avoid
- Forgetting to count stitches at the end of each round can lead to uneven shaping; count often.
- Tight stuffing may distort stitches; aim for firm but flexible filling.
- Incorrect placement of safety eyes can throw off facial balance; double-check spacing.
- Skipping color change tension checks can cause puckering; change colors loosely yet neatly.
- Neglecting to weave in ends properly risks unraveling later; tuck them deep inside.
Customization Ideas
- Try using variegated yarn for a whimsical twist on classic bee stripes.
- Add tiny crochet flowers or leaves, similar to the style seen in the Rose Vine Bracelet, to decorate wings or base.
- Make a larger or smaller bee by adjusting yarn thickness and hook size.
- Experiment with fuzzy or textured yarns for a soft, plush vibe.
How to Use or Display This Crochet Project
This amigurumi bee is the perfect size for a keychain, a cute desk buddy, or a charming addition to nursery décor. Make several and group them as a seasonal display or gift them as thoughtful tokens for bee lovers. They are also ideal lightweight decorations that won’t take up much space but add a handcrafted touch to any room.
Care Instructions
Hand wash gently with mild detergent and lukewarm water to preserve shape and fiber integrity. Lay flat to dry away from direct sunlight. Avoid machine washing or drying to prevent felting or damage to safety eyes.
Frequently Asked Questions
Q: Can I substitute yarn weights or hooks?
A: Yes, but know your bee’s size and tension will vary. Adjust stuffing accordingly for best shape.
Q: How do I avoid gaps when changing colors?
A: Always complete the last stitch of the old color until the final yarn over, then join new color yarn to pull through.
Q: What if I don’t have safety eyes?
A: Embroider eyes with black thread or use small beads securely sewn on for a more decorative look.
Q: Can this pattern be adapted for other insects?
A: Absolutely! Change color schemes and antenna shapes to create ladybugs, butterflies, or other critters.
Q: How do I fix a crooked wing or antenna?
A: Remove gently with scissors if sewn on loosely, re-stuff if needed, and resew securely in the right position.
Final Thoughts
Creating this honey bee amigurumi is both rewarding and enjoyable, whether you’re crafting for the first time or adding to a polished collection. Its simple but thoughtful design invites personalization and care, making it a sweet, handmade charmer to treasure or share.
Conclusion
For those interested in crafting other adorable crochet critters, this Little honey bee free amigurumi pattern offers a lovely alternative with a different style to explore and enjoy.



