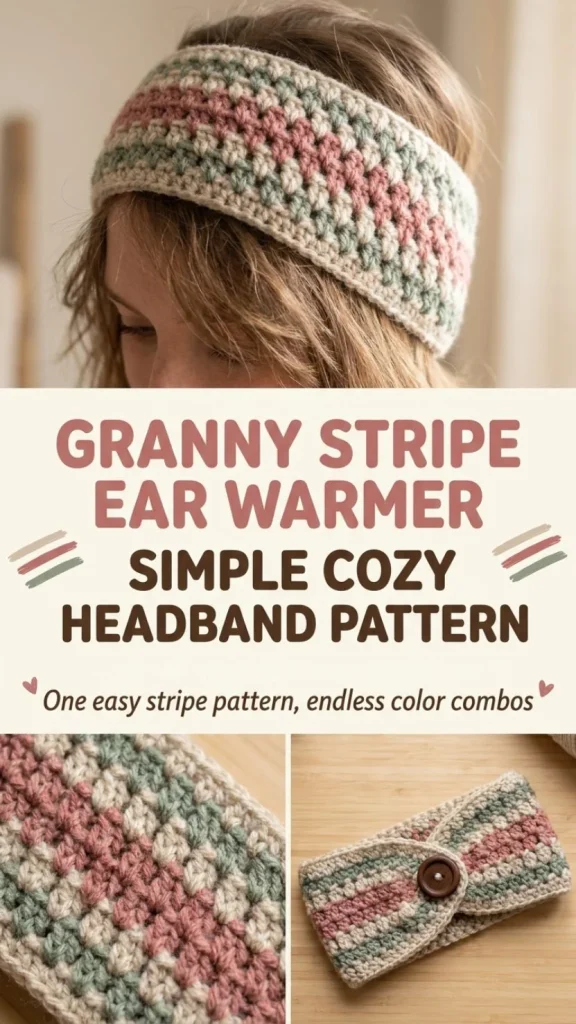
The Granny Stripe Ear Warmer Headband is a delightful crochet project that combines practicality with a cozy aesthetic. This headband is perfect for keeping your ears warm during chilly days while adding a stylish touch to your outfit. Whether you are a beginner or looking for a quick project, the simplicity of this pattern makes it accessible. The alternating color stripes not only provide a beautiful visual appeal but also ensure that you can easily customize this piece to suit your taste. A little insight to keep in mind: rather than just crocheting the stripes flat, this technique can give the finished headband a lovely texture and depth.
Why You’ll Love This Crochet Pattern
- It’s a quick and enjoyable project ideal for beginners and intermediates alike.
- The alternating colors create a warm and inviting design that can be matched with various outfits.
- This headband uses basic stitches, making it easy to master while enhancing your crochet skills.
- It’s a fantastic gift for friends and family, bringing both warmth and style to any winter wardrobe.
- Craft using your favorite worsted-weight yarn for a cozy, personalized touch.
Finished Size
The finished size of the headband is approximately 20 inches in length and 3 inches in width. However, this may vary depending on the yarn, hook, and tension used.
Skill Level
This pattern is classified as beginner-friendly. It uses simple stitches and a straightforward color rotation, making it perfect for those who are new to crochet.
Materials Needed
- Worsted-weight yarn in oatmeal, dusty rose, and sage
- 5mm crochet hook
- 1 button
- Tapestry needle
- Scissors
Stitches and Abbreviations
- sc: single crochet
- ch: chain
Gauge and Tension Notes
While achieving gauge is not crucial for this project, maintaining an even tension will ensure a neat appearance. It’s recommended to practice a few stitches before diving into your headband if you’re unsure about your tension.
Pattern Notes Before You Start
The headband is worked in rows, utilizing a simple two-row color rotation that makes it straightforward to follow. Remember to leave a tail for the button closure, and don’t worry if it takes a few tries to get your edges looking neat!
Step-by-Step Crochet Instructions
- Chain 10 (adjust the width as desired).
- Row 1: Sc into the 2nd chain from the hook and across (9 sc).
- Rows 2-3: Ch 1, turn, sc across.
- Rows 4-5: Change to dusty rose: Ch 1, turn, sc across.
- Rows 6-7: Change to sage: Ch 1, turn, sc across.
- Repeat the two-row color rotation until the strip measures the appropriate length to wrap around your head with a small overlap.
- Fasten off, leaving a tail for sewing the button.
- Create a buttonhole by skipping 1-2 stitches near one short end in the last row, and sew the button onto the opposite end.
- Weave in all ends for a polished finish.
Assembly and Finishing
To complete your headband, ensure all ends are woven in and the button is securely attached. This little finishing touch will not only help secure the headband but also add a lovely detail to your project.
Helpful Tips
- Use a stitch marker to keep track of color changes, ensuring an even distribution of your yarn colors.
- Always check your stitches for tightness; even tension will help the edges stay straight.
- If experiencing difficulty with the buttonhole, simply create a few extra stitches to ensure it holds securely.
- Before fastening off, try the headband on to verify the fit around your head.
Common Mistakes to Avoid
- Skipping stitches during the transition between colors can lead to uneven edges.
- Not adjusting tension may cause the headband to stretch or bunch, so check regularly as you work.
- Leaving too short a tail when fastening off can complicate sewing the button on later.
Customization Ideas
- Experiment with different yarn textures or weights for a unique look.
- Change the button to match a specific season or personal style.
- Adjust the width by changing the foundation chain to make a wider or narrower version.
- Try different color combinations for a bold statement piece or a classic look.
How to Use or Display This Crochet Project
The Granny Stripe Ear Warmer Headband can be worn daily during cold months or given as a heartfelt gift to friends and family. Its versatility means it can complement any outfit, from casual wear to more festive attire.
Care Instructions
To keep your headband looking its best, hand wash it in cold water and lay it flat to dry. This will help maintain the integrity of the yarn and ensure that the colors remain vibrant.
Frequently Asked Questions
-
Can I use different yarn weights for this project?
Yes, but adjustments may need to be made to the chain length and stitch counts to achieve a proper fit. -
How do I adjust the size of the headband?
Simply adjust the foundation chain to make the headband wider or narrower according to your preference. -
What if my edges look uneven?
Ensuring even tension and checking your stitch counts can help correct this issue. You can also block the finished piece to improve its shape. -
Can I gift this project?
Absolutely! This headband makes a perfect handmade gift for anyone who appreciates cozy and stylish accessories.
The Granny Stripe Ear Warmer Headband is a must-try project for both beginners and seasoned crocheters. Embrace the joy of creating something warm and cozy! If you’re keen on exploring more patterns, consider checking out the bold stripe chunky statement ring crochet pattern for another enjoyable project! For those looking for an adorable bookmark, the cozy owl bookmark crochet pattern could be your next crafting adventure!



