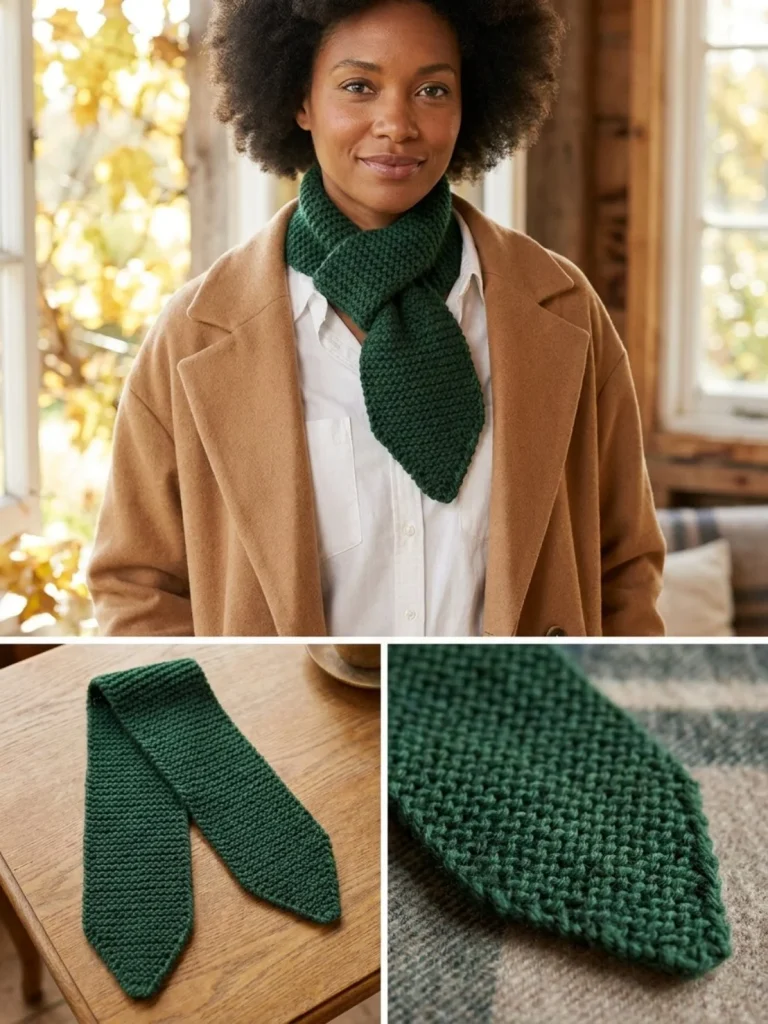
The Forest Green Pointed Mini Scarf is a delightful knitting project that combines simplicity with charm, making it perfect for both beginner and intermediate knitters. This scarf features a pointed design created by a combination of increases and decreases, resulting in a visually appealing accessory that’s both functional and stylish. Not only does it provide warmth during chilly weather, but it also adds a trendy touch to your outfit. As you work on this project, you’ll notice how the garter stitch gives it a lovely texture, ensuring that your finished piece looks neat and professional. For those who enjoy experimenting, this pattern lends itself well to variations in color and yarn weight, allowing for personalization.
Why You’ll Love This Crochet Pattern
- The pointed design is unique and eye-catching.
- It’s an excellent project for developing your knitting skills.
- The use of garter stitch makes it a relaxing and enjoyable knit.
- Ideal for gifting, adding a personal touch to any occasion.
- The pattern is adaptable, so you can create different versions with varying yarns.
Finished Size
The estimated finished size of the scarf is approximately 24 inches (61 cm) from the cast-on tip, but this may vary depending on the yarn, hook, and your individual tension.
Skill Level
This project is suitable for beginner to intermediate knitters. The straightforward increases and decreases provide a great learning experience while still being achievable for those newer to the craft.
Materials Needed
- Approx. 110–140 yards DK yarn in deep forest green
- Knitting needles size US 6 (4.0 mm)
- Tapestry needle
- Scissors
- Measuring tape
Stitches and Abbreviations
- Knit (K)
- Make 1 (M1)
- Knit two together (K2tog)
Gauge and Tension Notes
Gauge is not crucial for this project, but maintaining a consistent tension will produce a better-looking scarf. Aim for a relaxed stitch tension that allows the fabric to drape nicely.
Pattern Notes Before You Start
This scarf is worked in rows, starting with a few stitches and gradually increasing until the desired width is achieved. The pointed ends are formed through strategically placed increases and decreases, giving the scarf its distinctive shape.
Step-by-Step Crochet Instructions
- Cast On: Cast on 3 stitches.
- Increase Section:
- Row 1: Knit all stitches.
- Row 2: K1, M1, knit to the end.
- Repeat Row 2 every right-side row, knitting all wrong-side rows until you have 18 stitches.
- Body Section: Work in garter stitch on the 18 stitches until the scarf measures 24 inches from the cast-on tip.
- Decrease Section:
- Row 1: K1, K2tog, knit to the end.
- Repeat this decrease row every right-side row, knitting all wrong-side rows until 3 stitches remain.
- Bind Off: Bind off and leave a long enough tail to weave in ends.
- Finishing: Weave in ends and block lightly to ensure the scarf has a polished finish.
Assembly and Finishing
After binding off, it’s essential to weave in all ends carefully to avoid any pesky threads sticking out. Lightly blocking the scarf will help the garter stitch pattern open up and give the scarf a refined look. To wear, tie it once around the neck for a cozy fit.
Helpful Tips
- Keep Your Tension Even: This will help create a uniform texture throughout the scarf.
- Try a Different Yarn: If you want a softer feel, consider using a merino or alpaca blend.
- Practice Increases and Decreases: This is a good way to become more comfortable with shaping your projects.
- Use a Stitch Marker: This can help keep track of your row count during increases.
Common Mistakes to Avoid
- Not Counting Stitches: It’s easy to miscalculate increases, leading to uneven sides. Regularly check your stitch count.
- Inconsistent Tension: Switching your grip mid-project can lead to an uneven appearance; try to maintain the same tension throughout.
- Rushing to Finish: Take your time to avoid errors in shaping; a careful pace will yield the best results.
Customization Ideas
- Change the yarn color to suit the recipient’s taste or match their winter wardrobe.
- Experiment with different yarn textures for unique finishes.
- Adjust the size of the scarf by modifying the number of stitches cast on or the number of rows in the body section.
How to Use or Display This Crochet Project
The Forest Green Pointed Mini Scarf is a versatile accessory that can be worn with various outfits. You can wrap it around your neck or drape it over your shoulders as a stylish addition to your winter attire. It also makes for a thoughtful gift for friends or family.
Care Instructions
To keep your scarf looking great, gently hand wash it in cool water with a mild detergent, and lay it flat to dry. Avoid harsh chemicals and prolonged exposure to warm water, as this can warp the fibers.
Frequently Asked Questions
1. Can I use a different yarn weight?
Yes! Just be aware that changing the yarn weight may affect the size and drape of your finished scarf.
2. How do I block my scarf?
You can lightly dampen the fabric with water, gently reshape it to the desired size, and let it air dry flat.
3. What if I’m having trouble with the increases?
Practice your M1 technique separately on scrap yarn if you’re unsure; it will help you feel more comfortable before tackling it on your project.
4. Can I make this scarf longer?
Absolutely! Just continue working in the body section until you reach your preferred length.
Using the techniques from this charming pattern, knitters can create a beautiful scarf that not only showcases their skills but also serves as a cozy accessory. If you’re looking for more inspirations, consider exploring similar patterns like the Horizontal Ridge Mini Scarf or the Easy 4 Row Lace Shoulder Scarf for your next projects.



