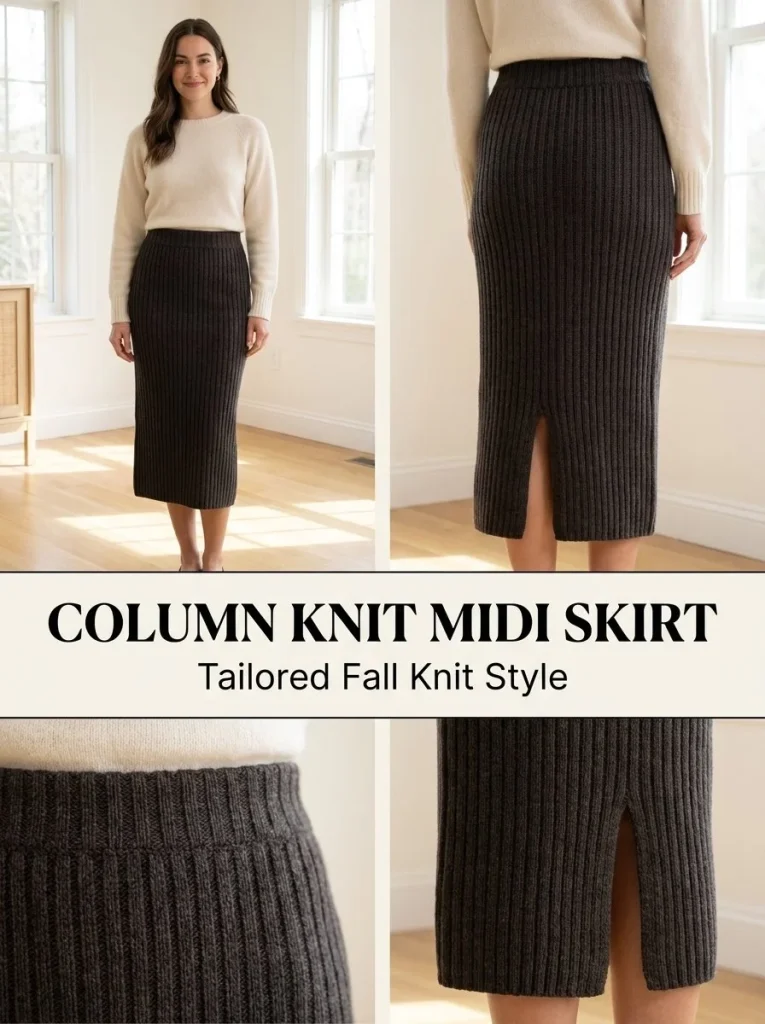
The Column Rib Knit Midi Skirt is a stylish and versatile garment that can elevate any wardrobe. With its beautiful ribbing and comfortable fit, this knitted skirt is great for both casual and dressy occasions. Whether you’re a seasoned knitter or just starting out, this project will challenge your skills while providing a satisfying end result. If you’re looking for more projects to complement this skirt, consider exploring fingerless opera gloves that can pair wonderfully with it.
Skill Level
Intermediate. This pattern requires a basic understanding of knitting techniques such as ribbing and working in the round, along with the ability to follow stitch instructions.
Materials
- Yarn: 1,050–1,250 yd / 960–1,143 m DK merino blend
- Needles: US 6 / 4.0 mm circular needle, US 4 / 3.5 mm circular needle
- Elastic: 1.25 in / 3 cm wide
- Stitch markers
- Tapestry needle
- Sewing needle/thread
Abbreviations — US Terms
- st(s) – stitch(es)
- K – knit
- P – purl
Special Stitches
No special stitches are used in this pattern. The techniques involve standard knits and purls.
Gauge
Gauge is not specified, but maintaining consistent tension is important to ensure the skirt fits well.
Finished Size
The finished length of the skirt is approximately 26 in / 66 cm from the waistband fold, adjusted to personal preference.
Pattern Notes
This skirt is worked in the round until the back slit, then turned into flat rows for the slit section. The waistband is meant to fold inwards over the elastic, creating a neat finish. Be sure to mark the center back to maintain your stitch count and orientation properly throughout the project.
Crochet Instructions
Part 1 – Waistband
Round 1
With the smaller circular needle, cast on 160 stitches. Join in the round carefully to avoid twisting the stitches, and place a stitch marker at the center back.
Round 2
Work in stockinette stitch for 1.5 in / 4 cm.
Round 3
Purl 1 stitch to create a turning round, then continue in stockinette stitch for another 1.5 in / 4 cm. This will create a fold for the elastic casing.
Part 2 – Body
Round 4
Change to the larger needle. Begin working K2, P2 ribbing. On this round, increase by 8 stitches evenly distributed throughout. You should now have a total of 168 stitches.
Rounds 5-25
Continue working in K2, P2 ribbing. Every 10 rounds, increase by 8 stitches again, four more times, until you reach a total of 200 stitches. Work evenly in rib until the skirt measures 26 in / 66 cm from the top of the waistband fold.
Part 3 – Back Slit
Round 26
At the center-back marker, stop working in the round. Divide your stitches so that you have 100 stitches on each side of the slit opening.
Row 1
You will now work back and forth in established ribbing. For the first row, slip the first stitch to create a neat edge.
Rows 2-12
Continue working back and forth for 5-6 in / 13-15 cm, maintaining the established ribbing. Be sure to keep slipping the first stitch on each row for a clean edge.
Part 4 – Hem
Row 1
Work 4 rows in K1, P1 ribbing across each half of the skirt separately. After the fourth row, you’ll begin to bind off.
Binding Off
Bind off in pattern, ensuring that the stitches are stretched to maintain the elasticity of the hem.
Part 5 – Elastic Waist
Fold the waistband inward along the purl turning round. Insert the elastic band and make sure to overlap the ends by approximately 1 in / 2.5 cm. Sew the ends securely to ensure they don’t come loose.
Sew the waistband casing closed without catching the elastic inside. This will ensure the elastic can move freely and maintain its tension.
Part 6 – Finishing
After sewing up the waistband, weave in all loose ends using a tapestry needle. Once all the ends are secured, wet-block the skirt vertically. Make sure to support the weight of the skirt so that it does not over-lengthen during blocking. Shape the back slit carefully for a polished final look.
Tips for the Best Result
- When working the ribbing, ensure you’re consistent with your knit and purl placement to avoid any inadvertent increases or decreases.
- For a more dramatic look, consider a contrast color for your elastic casing; this can add an unexpected pop to the interior of the waistband.
- If you’re new to ribbing, practice on a swatch to ensure you are comfortable with the stitch before starting the main project.
Common Mistakes
Uneven Stitch Count
It’s easy to lose a stitch when transitioning from rounds to flat rows. Use a stitch marker to help keep track of your stitches.
Slit Appearing Ragged
If the back slit looks uneven, ensure that you’re slipping the first stitch on each row correctly for a neat edge.
Project Ideas or Variations
This column rib knit midi skirt serves as a fantastic base for further experimentation. You might want to explore altering the length or adding color-blocking techniques. You can also create matching accessories, such as a cozy blanket; check out this plush lavender rib blanket knitting pattern for inspiration.
Care
When washing your finished skirt, always refer to the yarn label for care instructions. Generally, gentle hand washing and laying flat to dry is recommended for knitted garments, especially those made from a merino blend.
By following these detailed instructions and tips, you should successfully create your own beautiful Column Rib Knit Midi Skirt, perfect for adding style to any outfit. Enjoy your knitting, and don’t hesitate to explore related projects as you hone your skills!



