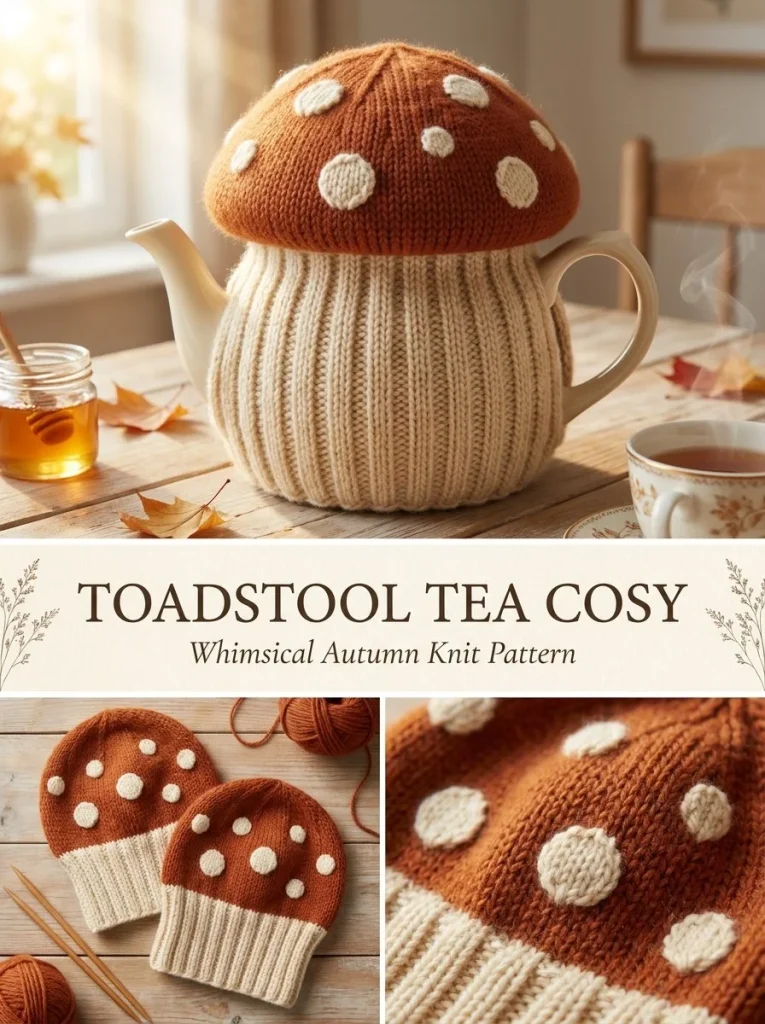
Making a tea cosy is a delightful way to incorporate creativity into your tea-drinking experience. The Cinnamon Toadstool Tea Cosy is a charming project that not only adds a warm touch to your teapot but also showcases your knitting skills. This cosy is designed to fit a typical 4-6 cup teapot and features a sweet mushroom cap design that will surely impress your guests. The combination of warm cream and cinnamon colors evokes the essence of autumn, making it a perfect accessory for cozy gatherings or quiet moments with a cup of your favorite tea.
Pattern at a Glance
- Skill level: Intermediate
- Terminology: Standard knitting terminology
- Construction: Knitted panels seamed together
- Finished size: Approximately 12 in / 30 cm wide and 10 in / 25 cm high
- Yarn weight: Worsted weight
- Needles: US 7 (4.5 mm)
- Main stitch: Stockinette with ribbing
- Gauge: 18 sts x 24 rows = 4 in / 10 cm in stockinette
- Motifs: None
- Joining: Seaming with openings for handle and spout
- Finishing: Blocking and weaving in ends
Materials
To create your Cinnamon Toadstool Tea Cosy, gather the following materials:
- Worsted-weight wool: approx. 220 yd warm cream and 180 yd cinnamon/rust; small amount of cream for spots
- US 7 (4.5 mm) needles
- Tapestry needle
- Removable stitch markers
- A blocking mat (optional for finishing)
These materials ensure that the cosy is not only visually appealing but also functional, protecting your teapot while keeping your tea warm.
Yarn and Color Notes
Choosing the right yarn is crucial for this project. Worsted-weight wool is ideal, as it replicates the structure needed for both warmth and durability. The warm cream and cinnamon/rust colors together provide a rustic yet cozy visual that resembles a mushroom cap and stem, bringing a touch of nature to your kitchen.
For additional flair or personal preference, you can consider using variegated yarns or even a gradient style. However, solid color choices will emphasize the shape and design of the tea cosy more effectively.
Finished Measurements
When completed, your tea cosy will measure approximately 12 in (30 cm) in width and 10 in (25 cm) in height when laid flat. These dimensions are perfect for standard 4-6 cup teapots, but remember that the final size might vary based on your knitting tension and stitch gauge.
Gauge
Achieving the correct gauge is essential for ensuring that your tea cosy fits perfectly. The gauge for this project is 18 stitches x 24 rows over 4 in (10 cm) in stockinette stitch.
To check your gauge, knit a swatch of about 20 stitches and 30 rows in stockinette. If your swatch is smaller or larger than the specified gauge, adjust your needle size accordingly. A tighter gauge may mean switching to larger needles, while a looser gauge may require smaller needles. Getting the right gauge ensures a snug fit for your teapot.
Abbreviations
- sts – stitches
- K – knit
- P – purl
- RS – right side
- WS – wrong side
- K2tog – knit two together
Important Pattern Notes
- Ribbing: The first six rows of the project will be made with K1, P1 ribbing. This creates a nice textured edge.
- Side markings: It’s helpful to use removable stitch markers to keep track of your handle and spout openings while seaming.
- Seaming: Ensure to leave openings on the correct sides for the handle and spout — measure twice and sew once!
Special Stitches and Techniques
The tea cosy project primarily utilizes standard knitting techniques, including stockinette stitch and ribbing.
- Stockinette stitch: This is achieved by knitting one row and purling the next. This alternating method produces a smooth fabric that is pleasing to the eye.
- Ribbing: This technique provides elasticity and a neat edge that helps the cosy maintain its shape.
Understanding the Construction
The Cinnamon Toadstool Tea Cosy is constructed from two identical panels, allowing for a fully knitted design that resembles the top of a mushroom and its stem. Each panel is knitted separately and seamed together, leaving openings for the teapot’s handle and spout.
This design approach enhances the visual appeal and functionality, as both panels will create a snug fit around your teapot.
Full Pattern Instructions
Foundation
- Cast On: With warm cream yarn, cast on 48 stitches to start your first panel.
Panel (make 2)
- Ribbing: Work ribbing by alternating between K1, P1 for 6 rows.
- Stockinette Body: Continue in stockinette stitch (knitting every row) for 24 rows.
- Begin Mushroom Cap: On Row 31, change to cinnamon yarn and knit, increasing 1 stitch at each edge. You will have 50 stitches.
- Continuing Increases: Repeat the edge increase every other right side row 6 times total to reach 60 stitches.
- Straight Work: Work 18 rows straight in cinnamon.
- Shape the Dome:
- Decrease 1 stitch at each edge every right side row for 6 times until you have 48 stitches.
- For the next 8 right side rows, work evenly spaced K2tog decreases, reducing approximately 6 stitches each decrease row until 8-10 stitches remain.
- Finishing Cap: Cut the yarn, leaving a tail. Thread the tail through the remaining stitches, draw closed, and secure.
Cream Spots
Using the duplicate stitch method, add 7-9 irregular cream round spots across each cinnamon cap. Ensure the spots vary in size and are spaced apart to mimic natural mushroom patterns.
Finishing
-
Block Both Panels: Block both panels to match the desired shape.
-
Seaming:
- Place the wrong sides together.
- Seam one side from the lower edge upward about 2.5 in (6 cm), leaving a 3.5 in (9 cm) opening for the handle. Continue seaming to the top.
- On the opposite side, seam 3 in (7.5 cm), leaving a 3 in (7.5 cm) opening for the spout, then seam to the top.
-
Join the Top Dome: Ensure you join the top neatly, allowing the lower cream section to resemble a mushroom stem while the cinnamon section forms the rounded cap.
-
Finish Off: Weave in all ends and steam lightly to smooth any creases.
Checkpoints
- After completing the ribbing, confirm that your piece measures approximately 1 in (2.5 cm) tall.
- You should still have 60 stitches after completing all increases.
- The panels should match in size and shape upon completion of each.
Assembly
To select the best method for seaming, consider using the mattress stitch or a simple whip stitch for a clean finish. Pay attention to the alignment of the panels to ensure they fit snugly around your teapot. Leaving correct openings for the handle and spout will enhance usability.
Resizing
If you wish to resize the cosy for a larger or smaller teapot:
- Adjust your cast on: Increase or decrease the number of stitches cast on while maintaining the same gauge.
- Add or remove rows: Modify the height by adding or removing rows in the stockinette section as needed, keeping in mind that each panel must remain identical.
Variations
- Color Variations: Consider using different colors to create themes for different seasons or occasions.
- Size Modifications: Create a smaller version for teacups instead of teapots or a larger size for family gatherings.
- Design Alterations: Experiment with different shapes by rounding the edges or adding decorative bands.
Troubleshooting
-
Why is my tea cosy too loose?
Check your gauge. You may have used larger needles or knit too loosely. -
Why does my cosy curl up at the edges?
Ensure that you are consistently knitting the same tension, and consider blocking to flatten the edges. -
Why do my edges look messy?
It could be due to misplaced stitches; ensure to follow the pattern for increases and decreases closely.
Frequently Asked Questions
Can I use a different yarn weight?
While the pattern is designed for worsted-weight yarn, you can experiment with other weights, but adjust your stitches accordingly.
Can I make it larger?
Yes! You can resize the cast-on amount and add rows to accommodate a larger teapot.
How should I block it?
Lay it flat on a blocking mat, shaping it to the rough finished size while damp, and allow it to dry completely.
Final Thoughts
The Cinnamon Toadstool Tea Cosy combines functional design with whimsical aesthetics, making it a delightful project for any knitting enthusiast. The process involves simple yet effective techniques that yield a charming result suitable for enhancing any tea time. Embrace the joy of crafting this unique piece, and let it be a conversation starter during your next tea gathering! For more creative crochet endeavors, explore other projects like the Espresso Crochet Makeup Brush Roll or the Sage Crochet Plant Pot Cover for additional inspiration.



