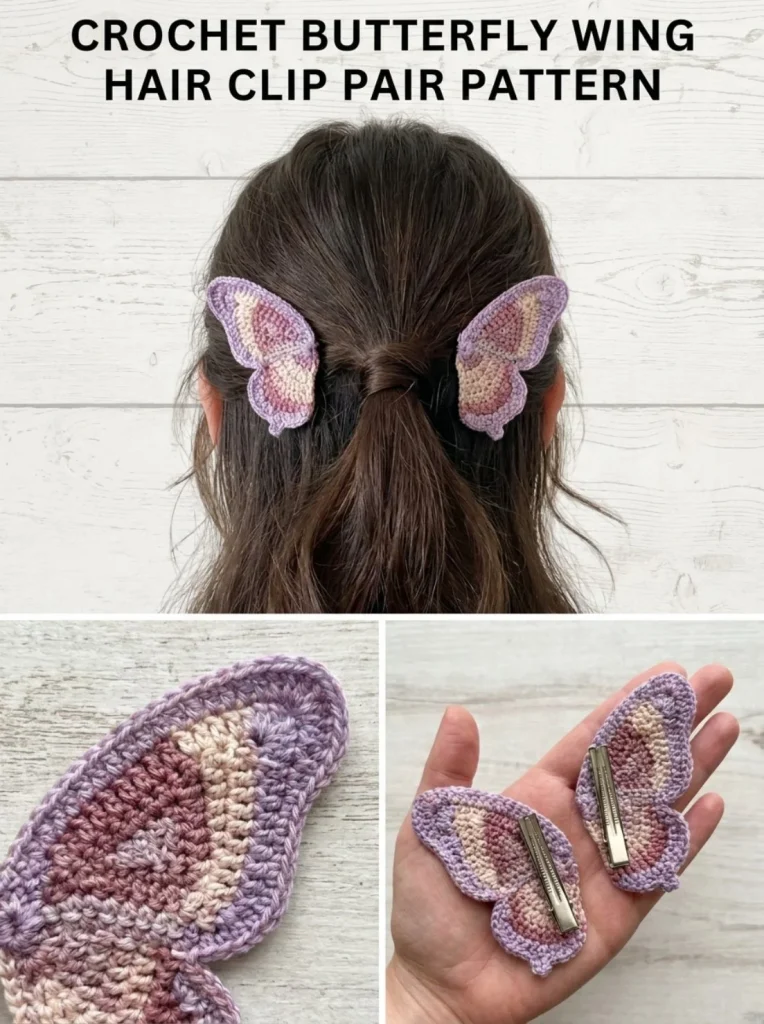
Get ready to bring some charm to your hair accessories with this adorable butterfly wing hair clip pair! This crochet project is perfect for adding a touch of whimsy to any hairstyle, making it a delightful gift or personal treat. The beauty of this pattern lies in its simplicity, as it uses basic crochet stitches, making it accessible for beginners while still offering enough creative freedom for those with more experience. One helpful tip is to experiment with different color combinations in the variegated thread to give each butterfly a unique personality. You may also find Wisteria Hair Pin Pair useful.
Why You’ll Love This Crochet Pattern
- The wings are small and quick to make, making it ideal for short crafting sessions.
- This pattern allows for customization in colors and finishes, perfect for personalizing gifts.
- It’s suitable for all skill levels, with straightforward instructions that guide every step.
- You can easily use up leftover yarn from other projects.
- A practical enhancement to your accessory collection, these clips are perfect for daily wear or special occasions.
Finished Size
The estimated size of each completed clip is roughly 3 inches wide and 2 inches tall, although this may vary depending on your yarn and tension.
Skill Level
This pattern is suitable for beginners. The stitches used are simple and the instructions are clear, allowing even novice crocheters to successfully complete the project.
Materials Needed
- Variegated lavender-pink cotton thread
- 2mm crochet hook
- 2 mini alligator hair clips
- Fabric stiffening spray or diluted fabric glue
- Fabric glue for final assembly
- Tapestry needle
- Scissors
Stitches and Abbreviations
- sc = single crochet
- st = stitch
- sc2tog = single crochet two together (decrease)
Gauge and Tension Notes
While gauge is not critical for this project, maintaining even tension will help your wings look consistent and neat. It’s beneficial to check your stitches frequently.
Pattern Notes Before You Start
Each butterfly wing is worked in rows, with tapering at the tips for a more realistic shape. The assembly requires gluing the completed wings to alligator clips, so be sure to align them symmetrically for a polished look.
Step-by-Step Crochet Instructions
-
Wing (make 4 total — 2 per clip):
- Chain 8.
- Row 1: sc in the 2nd ch from hook and across (7 sc).
- Row 2: 2 sc in the first st, sc across to last st, 2 sc in last st (9 sc).
- Row 3: repeat Row 2 shaping (11 sc).
- Row 4: sc even across (11 sc).
- Row 5: sc2tog at the beginning and the end of the row (9 sc).
- Row 6: sc2tog at the beginning and end again (7 sc).
- Fasten off.
Repeat these steps to make 4 matching wings.
-
Finishing: Dip each wing lightly in stiffening spray or diluted glue, and allow them to dry flat over a slight curve to hold their shape.
-
Assembly:
- Glue 2 wings to the top bar of one alligator clip, angling them slightly upward and outward from the center hinge to mirror a butterfly’s wingspan.
- Repeat this step with the second clip.
- Let everything dry fully before using.
Assembly and Finishing
Once your wings have dried and are shaped nicely, position them carefully on clips. Ensure the glue is thoroughly set to avoid any accidents when wearing your new accessory.
Helpful Tips
- Use a light hand when applying stiffening spray for a soft, natural texture.
- Check that the tension on your wings is consistent for a harmonious look.
- If you’re using a variegated yarn, make sure the color transitions go well together.
- Consider adding embellishments like beads for an extra touch of sparkle.
Common Mistakes to Avoid
- Skipping the Stiffening: Not stiffening the wings can lead to droopiness. Always take this step for the proper shape.
- Incorrect Wing Assembly: Ensure that the wings are mirrored correctly on the clips—take your time with positioning.
- Uneven Tension: Not maintaining even tension throughout will result in wings that do not look consistent or professional.
- Rushing Drying Time: Don’t skip the drying step. If you use them too soon, the wings may lose shape.
Customization Ideas
- Play with different color combinations to create unique butterfly designs.
- Use larger or smaller clips depending on your style preference.
- Experiment with different yarn textures for a varying look and feel.
- Add embellishments like sequins or beads to personalize your hair clips even further.
How to Use or Display This Crochet Project
These charming butterfly clips can be worn in various hairstyles, from casual ponytails to more intricate updos. They also make thoughtful gifts for friends or family, adding a playful touch to any outfit.
Care Instructions
To clean your butterfly clips, gently wipe them with a damp cloth. Depending on the yarn, keep them out of direct sunlight to prevent fading, and store them in a cool, dry place.
Frequently Asked Questions
1. Can I use a different yarn type?
Yes, just be aware that the finished size and look may change based on the yarn weight.
2. What if I don’t have fabric stiffening spray?
Diluted white glue can be used as an alternative to stiffen your wings.
3. Are these clips suitable for kids?
Absolutely, but do supervise small children to avoid risk of choking on small parts.
4. How can I ensure my wings stay perfectly shaped?
Proper drying technique and using stiffening agents will help maintain the desired shape.
These butterfly wing hair clips are not just a fantastic project; they are also a beautiful addition to your hair accessory collection. For more delightful hair accessories, check out this butterfly hair clip collection. Happy crocheting!



