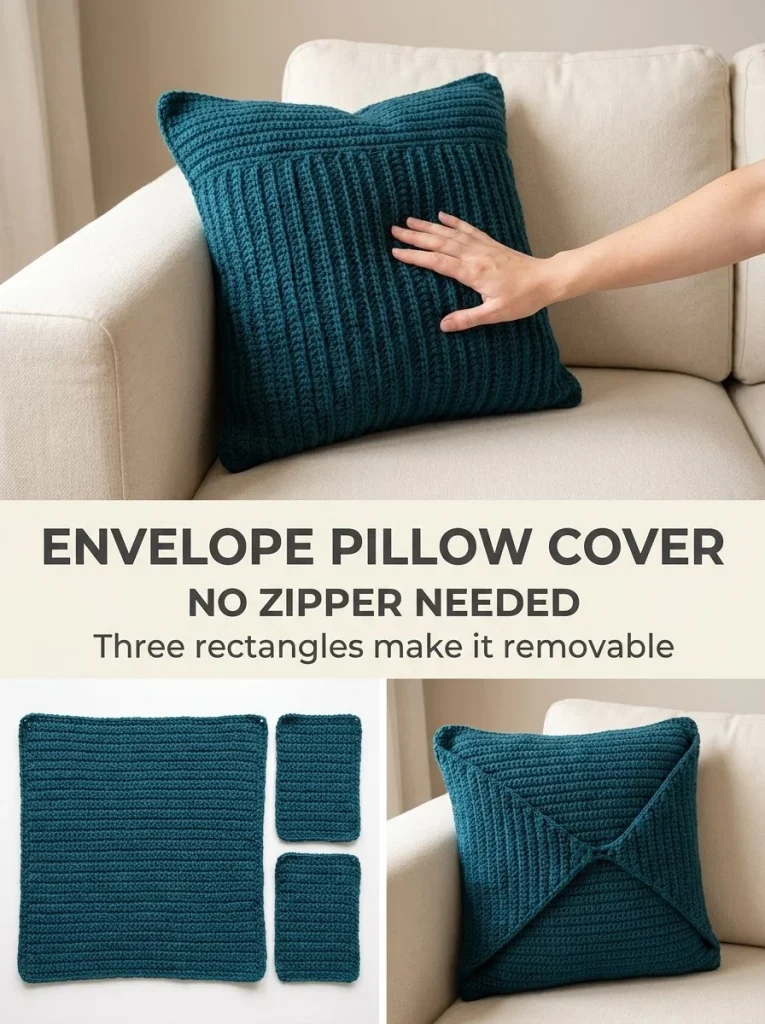
This deep teal envelope crochet pillow cover is not only a practical addition to your home decor but also a delightful project for crochet enthusiasts. The beautiful deep teal hue adds a pop of color to any space, while the simple envelope design makes it easy to remove and wash. This pattern utilizes worsted-weight yarn, creating a soft and sturdy cover that fits an 18-inch pillow insert perfectly. As you progress through the project, you’ll find the construction is straightforward, employing basic crochet stitches that are perfect for both beginners and experienced crocheters alike. You may also find Blue Crochet Bun Cover Easy Mesh Hair Accessory useful.
The pattern includes two primary components: a front panel that is a square and two back pieces that overlap, allowing for easy insertion of the pillow insert. Not only can this pillow cover enhance your living space, but finishing it will also give you a sense of accomplishment. If you’re feeling inspired and want to explore more crochet ideas, the sage crochet plant pot cover is another charming project to consider.
Pattern at a Glance
Skill level: Intermediate
Terminology: US terms
Construction: Flat piece assembly
Finished size: 18 x 18 inches
Yarn weight: Worsted-weight #4
Hook: 5mm
Main stitch: Half double crochet (hdc)
Gauge: Established with the starting chain and rows.
Motifs: None
Layout: One square front panel and two back pieces
Joining: Single crochet (sc)
Border: No additional border
Materials
To create your deep teal envelope crochet pillow cover, gather the following materials:
- Worsted-weight #4 yarn in deep teal (enough to make a square approx. 18 x 18 inches)
- Small amount of cream yarn (for the sc joining)
- 5mm crochet hook
- Tapestry needle (for weaving in ends)
- 18 x 18 inch pillow insert
Each material plays a crucial role in the overall design. The worsted-weight yarn provides the structure needed for durability, while the contrasting cream yarn gives a charming edge to your finished project.
Yarn and Color Notes
Choosing the right yarn is pivotal for achieving the desired look and feel of your pillow cover. Worsted-weight #4 yarn is an excellent choice for this project due to its versatility and availability in various colors. The deep teal is perfect for a cozy atmosphere and pairs beautifully with the cream yarn for a sophisticated touch.
When selecting colors, consider the existing decor in your space. A solid color scheme can create a bold statement, while variegated yarn might offer a more dynamic appearance. As you gain experience, experiment with color combinations to capture different moods and aesthetics.
Finished Measurements
The final measurements of your project will be approximately 18 x 18 inches. This size is ideal for standard throw pillows, ensuring a snug fit that will enhance your couch or bed styling. If you’d like to adjust the size, it’s essential to take note of the yarn and hook size as this can affect the dimensions.
Gauge
It’s important to achieve the correct gauge for your project to ensure the final size is as intended. For this pattern, gauge will be dependent on working a chain to 18 inches in width and confirming that your tension allows for approximately 4 rows tall up to 18 inches.
To measure your gauge:
- Make a small swatch using your yarn and hook.
- Measure a section of your swatch:
- Ensure it measures 18 inches wide.
- Count the number of rows tall.
If your gauge is larger or smaller, adjust your yarn size or crochet tighter or looser to maintain the proper fit for the pillow insert.
Abbreviations
- Ch – Chain
- Hdc – Half double crochet
- Sc – Single crochet
- St(s) – Stitch(es)
Important Pattern Notes
- When beginning each row, the ch-1 does not count as a stitch in this pattern.
- Ensure that you’re making your initial chain long enough to reach the desired width.
- Pay attention to the right side vs. wrong side; since this project is an envelope style, it’s essential to lay the pieces correctly for assembly.
- Use stitch markers if necessary, especially when working on the back panels for assistance in aligning pieces.
Special Stitches and Techniques
For this pattern, the primary stitch used is the half double crochet (hdc), which is ideal for creating a fabric that has both softness and stability. Here’s a brief refresher on how to work a half double crochet:
- Yarn over and insert your hook into the stitch where you want to work.
- Yarn over again and pull up a loop.
- You will have three loops on your hook. Yarn over and pull through all three loops at once.
This stitch will be the foundation for both the front square and the back panels.
Understanding the Construction
The construction of this pillow cover is quite straightforward. You start by creating a large square for the front using hdc stitches, then make two smaller back pieces that will overlap to form the envelope closure. This design allows for easy insertion of the pillow insert and maintains a clean, modern look.
Full Pattern Instructions
Foundation
Start with a foundation chain that measures 18 inches wide to accommodate the finished dimensions of the pillow cover.
Row 1
- Ch to 18 inches width.
- Work hdc in the 2nd ch from hook and across.
Row 2
- Ch 1 and turn your work.
- Hdc in the back loop only across the row.
- Repeat this row until the square reaches approximately 18 inches in height.
Back Pieces
You will need two back pieces, each measuring 18 inches wide x 12 inches tall. Follow the same process as the front panel, making sure to maintain consistent tension and stitch formation.
Checkpoints
- After completing the front panel: Measure it to ensure it is approximately 18 x 18 inches.
- After the back panels: Each should measure roughly 18 x 12 inches.
Assembly
- Lay the front panel right side down.
- Align the first back panel with the top edge and the second back panel with the bottom edge, allowing approximately 6 inches of overlap in the center.
- Pin the layers together to secure.
Now, you will join the pieces:
- Join the cream yarn at any corner.
- Work sc evenly through both layers around all four outer edges.
- Ensure to place 3 sc at each corner for a clean finish.
- Once complete, fasten off and weave in the ends.
Finishing
After your piece is fastened off, turn it right-side out through the envelope opening. Insert the 18-inch pillow form into the cover, fluffing the pillow adequately for a nice finish.
How to Resize
To resize this pillow cover, consider increasing or decreasing the foundation chain in multiples that align with stitch tension. For example, if you prefer a smaller pillow, you can reduce the starting chain by 4 inches, making it suitable for a 16-inch pillow.
Useful Variations
- One-Color Version: Simply use deep teal yarn throughout without the cream accents for a uniform look.
- Scrap Yarn Version: Utilize leftover yarns for a fun, colorful take.
- Smaller Size: Adjust the dimensions of the panels for smaller pillows or decorative cushions.
Troubleshooting
Why Is My Project Getting Wider?
This may indicate that you are inadvertently adding extra stitches, particularly at the edges. Check your tension and ensure you’re not working stitches into the turning chain.
Why Is My Edge Wavy?
Wavy edges often result from inconsistent tension. Make sure you’re applying the same amount of yarn pressure throughout each stitch.
Why Don’t My Panels Match?
This can occur if the beginning rows of each panel are not consistent in gauge. Always measure your foundation chain to ensure it meets the intended dimensions.
Frequently Asked Questions
Can I use a different yarn weight?
Yes, just ensure the new yarn weight aligns closely with worsted-weight #4 to maintain proper dimensions.
Can I use cotton?
Cotton yarn can be used for a lighter feel but make sure to adjust the gauge accordingly.
Is the pattern reversible?
The envelope style makes it somewhat reversible, but the back panel’s seam may show when turned.
How should I block it?
This particular project may not require blocking, but if needed, steam blocking can help settle your stitches.
With careful attention to the pattern, you can create a beautiful deep teal envelope crochet pillow cover that showcases your crochet skills while adding charm to your living space. Happy crocheting!



