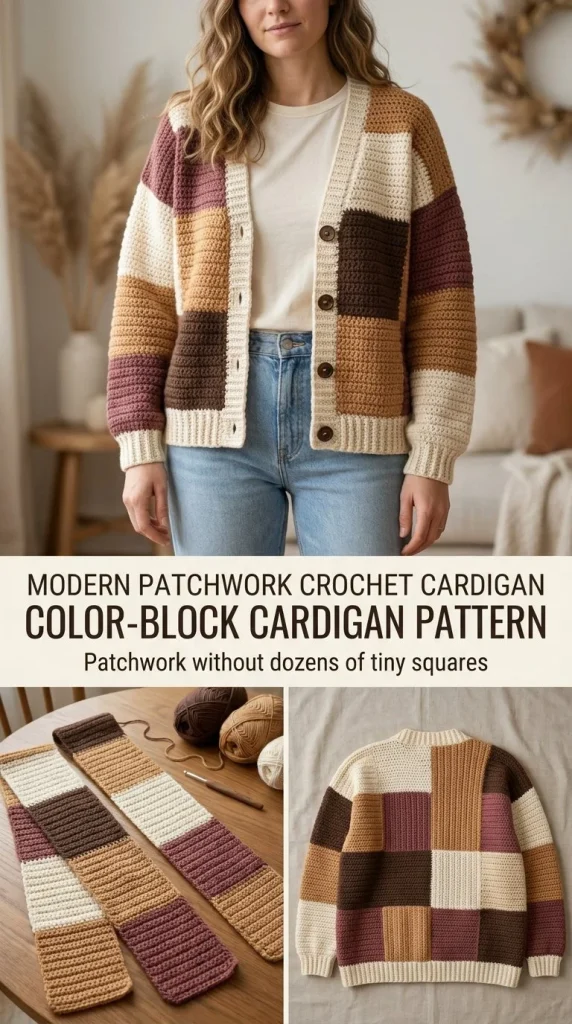
The Modern Patchwork Button Cardigan is a delightful piece that combines comfort and style through its unique color block design. This cardigan is perfect for layering during the cooler seasons, and its straightforward construction makes it suitable for crocheters of varying skill levels. Whether you’re relaxing at home or heading out, this cardigan can be customized to match your personal style. For those interested in creating similar vibrant projects, consider exploring color block knitting patterns that can complement your crochet wardrobe.
Skill Level
Confident Beginner – This project is ideal for those who have a basic understanding of crochet techniques and are ready to advance their skills with simple color changes and shaping.
Materials
- Worsted-weight #4 yarn in cream, camel, chocolate, and muted burgundy
- 5mm crochet hook
- 5 buttons
- Tapestry needle
- Stitch markers
- Measuring tape
- Gauge: approximately 14 hdc = 4 in/10 cm
Abbreviations — US Terms
- ch – chain
- sl st – slip stitch
- sc – single crochet
- hdc – half double crochet
- dc – double crochet
- st(s) – stitch(es)
- sp – space
- ch-sp – chain space
- BLO – back loop only
Special Stitches
Half Double Crochet (hdc)
To work a half double crochet, yarn over, insert the hook into the stitch, yarn over again, pull up a loop (three loops on the hook), yarn over and pull through all three loops to complete the stitch.
Gauge
Gauge is approximately 14 hdc = 4 in/10 cm. It is crucial to achieve this gauge for the proper fit of your cardigan.
Finished Size
The finished size of the cardigan will be customized based on the chosen bust measurement, taking into account a positive ease of 4-8 inches.
Pattern Notes
- The cardigan is constructed in panels, using vertical strips for the back and front.
- Each strip leverages color changes every 4-8 inches, with a variance in change positions for a unique look.
- Keep track of your stitches and rows with stitch markers to ensure precision in your work.
Crochet Instructions
Part 1 – Back Panel
- Choose Finished Bust Size: Measure your bust and add 4-8 inches for ease.
- Calculate Back Width: Divide the finished bust size by 2 to obtain the width for the back panel.
- Divide Width Into Strips: Determine if you want 3 or 4 vertical strips. For example, if your back width measures 36 inches, you would create strips measuring 12 inches each (if using 3 strips).
- Start Strips: For each strip, chain the width and work in hdc rows.
Example Instructions for First Strip:
Row 1
- Chain to desired width (e.g., 12 inches).
- Work 1 hdc in each chain across.
- Turn.
- Total: X hdc (count your total hdc).
Row 2
- Ch 2 (this does not count as a stitch).
- Work hdc across.
- Turn.
- Total: X hdc.
Repeat Rows
- Repeat Row 2 until the strip measures 18-24 inches in length, depending on your preference.
-
Change Colors: Every 4-8 inches, switch to a new color while working hdc. For instance, if your last 6 inches were camel, transition to chocolate.
-
Make Adjacent Strips: Repeat the same process for the other strips, ensuring varying color-change positions for visual interest.
-
Join Strips: Once all strips are complete, join them vertically to form the back panel. Ensure you are working in the back loops for a cleaner finish.
Part 2 – Front Panels
Using the same method as the back panel, create two narrower strips (each about 6 inches wide). These strips will also have color blocks and will incorporate V-neck shaping.
V-Neck Shaping for Front Strips
- Work for 8-10 inches in hdc.
- At the inner edge of the front, decrease 1 stitch every second row for cleaner shaping.
Part 3 – Sleeves
- Make Two Sleeve Panels: Use the same color block strip method as before, but make the strips narrower (about 4-6 inches wide).
- Join the shoulder seams, then attach sleeves.
Part 4 – Seaming and Assembly
- Join the shoulders first, then attach the sleeves.
- Seam the sides of the body and sleeves together.
Part 5 – Cuff and Hem
- For cuffs and bottom hem, add back-loop single crochet (sc) ribbing.
- Create a simple ribbing by working in a mix of sc and hdc alternately, usually about 3-5 rows.
Part 6 – Button Band
- Work 3-5 rows of sc around the front openings and neckline for a button band.
- Create exactly 5 evenly spaced buttonholes on one side.
- Attach 5 buttons opposite the buttonholes.
Color Variations
This project is versatile in terms of color combinations; experiment with different yarn colors to create a unique look, such as using pastels for a soft appearance or bright, bold hues for a statement piece.
Yarn and Hook Tips
When selecting yarn, opt for a smooth worsted-weight #4 to ensure easy stitch definition and comfortable crochet experience. A 5mm hook is ideal for this yarn weight, providing the right balance of drape and structure.
Tips for the Best Result
- Use stitch markers to track your color changes and seams to help with alignment.
- Keep an eye on tension, especially during color changes, to avoid uneven patches.
- Consider blocking your finished cardigan for a more polished look.
Common Mistakes
Uneven Color Blocks
This often happens when changing colors; ensure you’re consistent with the length of color sections.
Seams Not Aligned
Check your stitches closely as you seam; using a stitch marker can help maintain straight lines.
Finishing
- Weave in all ends securely.
- Block the finished cardigan if necessary to achieve the desired shape and size.
- Enjoy your new cardigan and consider making matching accessories; a blue bow bag charm could be a lovely accessory!
Care
Refer to the yarn label for specific washing instructions, but hand washing and lying flat to dry is often a safe bet for preserving your finished work.
In conclusion, this cardigan is not just wearable art but a project that allows for creative expression. Enjoy the process of making this stunning piece, and don’t hesitate to share your creations with others!



