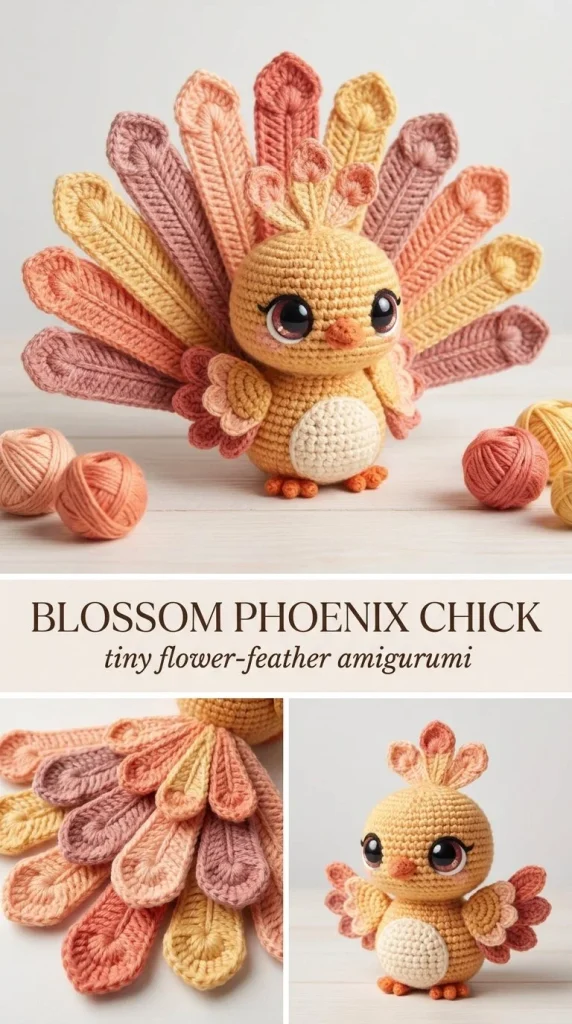
This charming Blossom Phoenix Chick amigurumi is a delightful free crochet pattern perfect for anyone looking to create a cute, decorative piece that’s both cozy and giftable. Designed with beginner-friendly instructions in US terms, this little chick features a soft, rounded body with dainty wings and a colorful, layered tail that captures the fiery essence of a phoenix in an adorable way. I’ve found that using DK cotton yarn gives the perfect stitch definition and keeps the shape nicely rounded without being too stiff or floppy. In my experience, placing the safety eyes evenly six stitches apart makes the face instantly endearing, but you can also use embroidery thread if you prefer a softer look. This pattern is not only a sweet addition to your amigurumi collection but also an excellent project if you’re eager to improve your skills with basic shaping techniques. If you enjoy playful patterns like this, you might also appreciate the beginner-friendly cherry blossom crochet hair comb pattern for another fun, wearable craft.
Why You’ll Love This Crochet Pattern
- Easy shaping with a simple, worked-as-one body and head for smooth continuity.
- Uses basic stitches like single crochet and increases/decreases, perfect for strengthening amigurumi skills.
- The layering technique for the tail feathers introduces gentle color blending and texture contrast.
- Small, manageable size makes it a quick project that fits well as a desk companion or shelf decoration.
- The neutral, warm colors and whimsical shape appeal to both kids and adults, making it a thoughtful handmade gift.
- Practical assembly tips included to ensure neat construction and durable seaming.
Finished Size
The finished chick measures approximately 4 inches tall (10 cm), though this can vary depending on your yarn brand, hook size, and personal tension. Using a 2.5 mm hook with DK cotton yarn, as suggested, yields a compact yet softly stuffed shape that holds well.
Skill Level
Advanced beginner. This pattern suits crocheters with a basic grasp of single crochet (sc), increases (inc), and decreases (dec). You’ll learn to work in continuous rounds and construct small components like wings and crest petals, making it a fantastic next step after simple amigurumi.
Materials Needed
- DK weight cotton yarn in peach (approx. 25 g), coral pink (15 g), butter yellow (10 g), cream (10 g), dusty rose (10 g)
- 2.5 mm crochet hook
- 7 mm safety eyes or embroidery thread for features
- Fiberfill stuffing
- Tapestry needle for sewing and weaving ends
- Stitch marker to mark round beginnings
- Scissors
Stitches and Abbreviations
- sc: Single crochet – insert hook, yarn over, pull through, yarn over, pull through two loops.
- inc: Increase – 2 single crochet in the same stitch.
- dec: Decrease – single crochet two stitches together.
- ch: Chain – yarn over, pull through loop.
- hdc: Half double crochet – yarn over, insert hook, yarn over, pull through, yarn over, pull through all three loops.
- dc: Double crochet – yarn over, insert hook, yarn over, pull through, yarn over, pull through two loops, yarn over, pull through remaining loops.
- sl st: Slip stitch – insert hook, yarn over, pull through stitch and loop on hook.
Gauge and Tension Notes
Gauge isn’t critical for amigurumi since shape and firmness matter more than exact size. However, aim for a tight tension to avoid gaps between stitches, which can show the stuffing. If your stitches feel loose, try slipping down a hook size or work a bit tighter. Using DK cotton yarn with a 2.5 mm hook helps maintain a neat, dense fabric.
Pattern Notes Before You Start
This chick is worked in continuous rounds (no joining at the end), starting with the body and head as one piece to maintain a smooth shape. You’ll add the wings, crest, tail feathers, beak, and feet as separate pieces then sew them on. No color changes during rounds except assembling different yarn tones in petals for the tail to create a subtle layered effect. Safety eyes go between rounds 6 and 7, six stitches apart — mark your spots carefully for a symmetrical face.
Step-by-Step Crochet Instructions
- BODY/HEAD (worked as one piece in continuous rounds):
- R1: 6 sc in magic ring (MR) (6)
- R2: inc around (12)
- R3: (sc, inc) x6 (18)
- R4: (2 sc, inc) x6 (24)
- R5–8: sc around (24) — place safety eyes between R6–7, 6 sts apart
- R9: (2 sc, dec) x6 (18)
- R10: (sc, inc) x9 (27) — widen chest area for shape
- R11–14: sc around (27)
- R15: (sc, dec) x9 (18)
- R16: (sc, dec) x6 (12)
- Stuff firmly with fiberfill.
- R17: dec x6 (6), close the opening securely.
- BEAK:
- ch3, in 2nd ch from hook: sc, hdc, fasten off. Sew as a tiny triangle beneath eyes.
- WINGS (make 2):
- ch9; from 2nd ch: sc, hdc, dc in next 3, hdc, sc, sl st.
- Add a second shorter petal layer with ch6 sewn over each wing to provide a fuller look.
- CREST (make 3 petals):
- ch5, work: sc, hdc, dc, hdc going back along chain.
- TAIL FEATHERS:
- Make 7 petals in mixed colors with varying lengths:
- Long feather (3 pieces): ch14; from 2nd ch: sc, hdc, dc in next 7, hdc, sc, sl st; work 3 sc in last chain and mirror back down.
- Medium feathers (2 pieces): start ch11, same stitch sequence.
- Short feathers (2 pieces): start ch8, same stitch sequence.
- Use cream or yellow yarn to surface-slip-stitch center lines on feathers for extra detail.
- FEET (make 2):
- ch4, sl st back; repeat two more chains from same base for three tiny toes.
Assembly and Finishing
Begin by sewing the wings low on the body’s sides, making sure they’re symmetrical. Attach the crest petals evenly spaced across the head for a lively flick of feathers. Sew the feet directly beneath the body base to give stability for standing. Finally, arrange the tail feathers into a layered fan shape: position the three longest feathers in the center, the medium feathers beside them, and the shortest on the outsides. Fan them slightly upward to mimic the iconic phoenix silhouette. Weave in all ends securely with your tapestry needle and trim any excess yarn for a tidy finish.
Helpful Tips
- Use a stitch marker to keep track of rounds and stitch counts, especially for shaping rounds with increases and decreases.
- Stuff firmly but avoid overstuffing to keep the chick soft and cuddly without stressing the stitches.
- When assembling small parts like feet and crest petals, use fine, matching yarn to sew so stitches blend in and stay strong.
- For an extra polished look, block the finished amigurumi gently by misting with water and shaping, then letting it dry flat.
- If working eyes with embroidery thread, embroider after stuffing but before final closing for easy access and symmetry.
- Experiment with color gradients for the tail feathers to enhance the flame-like effect, inspired by patterns like the pastel jellyfish keychain amigurumi crochet pattern, which uses beautiful soft layering.
Common Mistakes to Avoid
- Skipping stitch markers and losing count mid-round, which can distort the shape. Always double-check your stitch count after each round.
- Stuffing too tightly or unevenly, leading to lumps or a misshapen body. Stuff uniformly and in small increments.
- Sewing on parts unevenly, causing the chick to lean or appear unbalanced — pin pieces first to check placement.
- Combining different yarn weights or hook sizes, which affects sizing and tension — keep materials consistent.
- Overlooking security of safety eyes or embroidery features, which could loosen with handling. Reinforce stitches for durability.
Customization Ideas
- Substitute variegated or hand-dyed DK cotton yarn for a unique color blend on body and feathers.
- Use a smaller hook and finer yarn to create a miniature version perfect for keychains or ornaments.
- Add tiny embroidered details like freckles or blush on the cheeks for personality.
- Replace the tail petals with ruffled or fringed yarn strips for a different texture and movement.
How to Use or Display This Crochet Project
This Blossom Phoenix Chick makes a lovely decorative piece for shelves, desks, or nursery corners. Its compact size means it’s perfect as a gift or keepsake for children or bird lovers. You can also attach it to a keyring or bag as a unique charm. Creating a small collection of colorful amigurumi, including seasonal designs, brightens any space and sparks joy for handmade home accents.
Care Instructions
To clean, gently hand wash the amigurumi in lukewarm water with mild soap to protect the cotton yarn’s softness and color vibrancy. Avoid wringing; press water out and dry flat in shade to keep shape intact. Store in a dust-free container to preserve cleanliness, especially if displayed for long periods.
Frequently Asked Questions
Q: Can I use acrylic yarn instead of cotton?
A: Yes, acrylic works fine but will result in a softer fabric with less stitch definition. Adjust hook size accordingly if needed.
Q: How do I keep the eyes aligned properly?
A: Mark the positions between rounds 6 and 7, six stitches apart using stitch markers or pins before inserting safety eyes or embroidering.
Q: Could I make this pattern larger?
A: Increasing hook size and using bulkier yarn can enlarge the chick but be mindful of stuffing gaps and stitch tension.
Q: What if I don’t have a 2.5 mm hook?
A: A 3.0 mm hook can work but the fabric may be looser and need firmer stuffing to hold shape.
Q: How do I make the tail feathers colorful without a complicated color change?
A: Crochet separate petals in different colors and sew them on as layered elements, rather than trying to switch colors mid-round.
Final Thoughts
This Blossom Phoenix Chick amigurumi is a sweet, manageable project that balances simple techniques with charming details. Whether you’re adding to your amigurumi collection or gifting to someone special, the finished piece brings warmth and personality. I always enjoy how the layered tail feathers add just the right fiery flourish, turning a cute chick into a little phoenix with flair. With clear instructions and careful assembly, your own handcrafted phoenix chick will be a delightful treasure.



