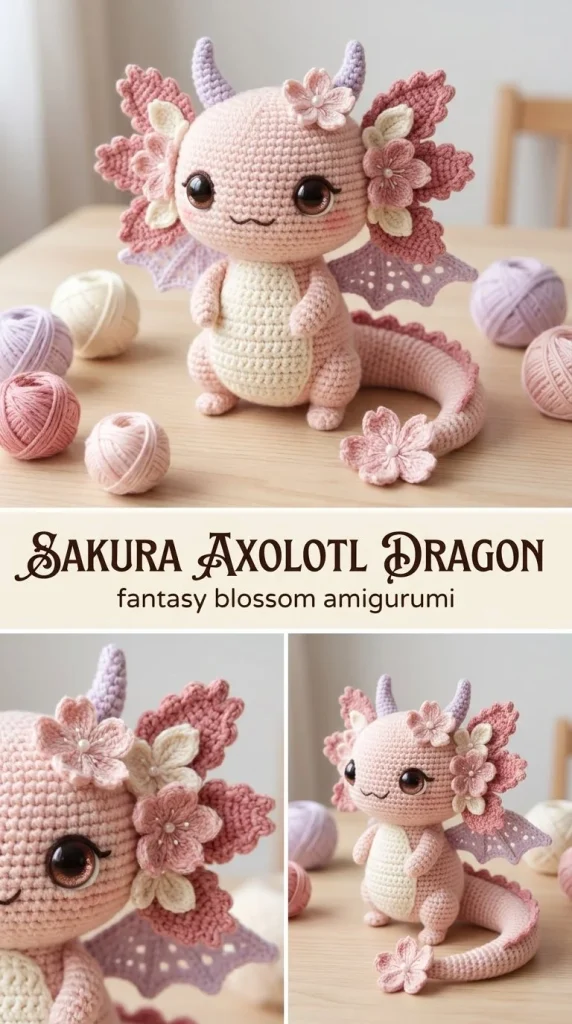
This Sakura Axolotl Dragon Amigurumi is a delicate and enchanting crochet project perfect for anyone who loves cute, fantasy-inspired creatures. With soft pastel shades and charming sakura gill petals, this amigurumi stands out as a delightful décor piece or a unique handmade gift. It’s crafted mainly with simple stitches and worked in rounds, making it beginner-friendly while offering enough shaping and detailing to keep intermediate crocheters engaged. If you enjoy adding whimsical touches to your crochet collection, you might also appreciate the gentle shaping techniques used here, similar to how I refined the curves on the wings for a natural lift. This project resembles the subtle charm found in patterns like the pastel jellyfish amigurumi, where small playful details bring the piece to life.
Why You’ll Love This Crochet Pattern
- The pattern uses accessible stitches, great for early intermediate or confident beginners.
- Soft DK cotton yarn and a small hook create a firm but cuddly texture.
- The sakura gill petals and mint-stitched wings add a unique decorative flair.
- Assembling separate pieces allows for customizing body placement and shape.
- Practical shaping tips help improve amigurumi stuffing stability and neat edges.
- Lightweight, small size makes it easy to display or gift without bulk.
Finished Size
The finished amigurumi measures approximately 6 inches tall. Keep in mind size may vary based on your yarn choice, hook size, and crochet tension. A tighter gauge gives better shape, while looser stitches might create a softer, delicate look.
Skill Level
Easy to intermediate beginner. The pattern builds confidence with working in rounds, increases, decreases, and shaping through stitch count changes. Although the assembly involves sewing multiple small parts, clear instructions and stitch markers help keep everything tidy and aligned.
Materials Needed
- DK weight cotton yarn in blush pink (35 g), sakura pink (15 g), cream (10 g), and pale mint (5 g)
- 2.5 mm crochet hook
- 8 mm safety eyes or embroidery thread for eyes
- Fiberfill stuffing
- Tapestry needle for sewing pieces and weaving ends
- Stitch marker for round tracking
- Scissors
- Optional: embroidery thread for facial details and mint star accents on wings
Stitches and Abbreviations
- sc (single crochet): Insert hook, yarn over, pull through, yarn over, pull through both loops.
- inc (increase): 2 single crochet stitches in the same stitch.
- dec (decrease): Single crochet two stitches together.
- hdc (half double crochet): Yarn over, insert hook, yarn over, pull through, yarn over, pull through all loops.
- dc (double crochet): Yarn over, insert hook, yarn over, pull through, yarn over, pull through two loops, yarn over, pull through last two loops.
- tr (treble crochet): Yarn over twice, insert hook, yarn over, pull through, yarn over, pull through two loops, yarn over, pull through two loops, yarn over, pull through remaining loops.
- sl st (slip stitch): Insert hook, yarn over, pull through stitch and loop on hook.
Gauge and Tension Notes
Gauge is not critical but important for shape consistency and neat assembly. Aim for tight stitches to keep stuffing from showing through and maintain firm structure. Tension should allow flexibility for shaping the curves, especially on the tail and wings, which benefit from a lightly stuffed and slightly flattened appearance.
Pattern Notes Before You Start
This project is worked entirely in the round, starting with magic rings (MR) for each piece. Pieces are crocheted separately and sewn together at the end, making the assembly stage essential for the final shape. Color changes are not part of this pattern; use yarn color changes only in finishing embroidery if desired. Pay special attention to stitch counts each round to ensure even shaping.
Step-by-Step Crochet Instructions
Head
- R1: 6 sc in magic ring (6)
- R2: inc around (12)
- R3: (sc 1, inc) x 6 (18)
- R4: (sc 2, inc) x 6 (24)
- R5: (sc 3, inc) x 6 (30)
- R6–9: sc around (30)
- Place eyes between rounds 7–8, 7 stitches apart
- R10: (sc 3, dec) x 6 (24)
- R11: (sc 2, dec) x 6 (18) – Stuff firmly
- R12: (sc 1, dec) x 6 (12) – Close the round and fasten off
Body
- R1: 6 sc in magic ring (6)
- R2: inc around (12)
- R3: (sc 1, inc) x 6 (18)
- R4–8: sc around (18)
- R9: (sc 1, dec) x 6 (12)
- R10–11: sc around (12) – Stuff lightly and close
Tail
- R1: 6 sc in magic ring (6)
- R2–3: sc around (6)
- R4: (sc 2, inc) x 2 (8)
- R5–8: sc around (8) – Stuff lightly, flatten base, curve upward with hidden shaping stitches, and sew to back lower body
Gill Petals (Make 6)
- Chain 6, from second chain: sc, hdc, dc, tr, 5 tr in last chain, rotate and work back dc, hdc, sc, slip stitch
- Arrange three petals on each side of the head
Small Wings (Make 2)
- Chain 7, sc in 2nd chain, hdc, dc, 3 tr in next chain, dc, hdc, ch 2, slip stitch back to base for pointed tip; work sc around the outer edge for a finished look
- Position on upper back centered
Legs (Make 4)
- R1: 6 sc in magic ring (6)
- R2–4: sc around (6) – Stuff lightly and flatten before sewing low on the body
Assembly and Finishing
Begin by sewing the head securely onto the body, ensuring the seam is neat and centered. Attach the tail at the lower back, curving it upward and securing it with two small hidden stitches to add natural movement. Sew the legs low on the sides for a balanced stance. Arrange and sew the sakura gill petals evenly, three on each side of the head, giving that signature fantasy detail. Center the wings on the upper back and embroider a small cream mouth with a tapestry needle. Optional mint star stitches on the wings add a subtle sparkle that elegantly finishes the look. Weave in all ends tightly to avoid loose threads that could unravel with use.
Helpful Tips
- Use a stitch marker to track rounds, especially when doing increases and decreases, to maintain shape accuracy.
- Stuff firmly but not overly tight; this prevents distortion and keeps the fabric smooth.
- When sewing parts together, use small, even stitches so seams aren’t visible.
- For neatly shaped wings and tail, apply light shaping stitches after stuffing to form natural curves.
- If unsure about safety eyes placement, secure with a small stitch before attaching eyes fully to avoid uneven spacing. Beginners might find similar tips useful in the beginner-friendly cherry blossom crochet hair comb pattern, which also focuses on careful placement for best results.
Common Mistakes to Avoid
- Skipping stitch counts during rounds can lead to uneven shaping; always count stitches before continuing.
- Overstuffing can warp the shape, especially around the face and wings.
- Sewing parts asymmetrically can affect balance and overall appearance; lay pieces flat before stitching.
- Pulling yarn tails too tightly during assembly can pucker fabric edges.
- Neglecting to weave in ends securely can result in loose threads or unraveling over time.
Customization Ideas
- Experiment with yarn colors: try soft blues or purples for an aquatic-themed axolotl dragon.
- Use a different yarn texture like a cotton-blend or bamboo to alter the finish feel and drape.
- Add small beads or sequins on the wings for a sparkling effect.
- Size adjustments can be made by switching to thicker yarn and larger hooks for a statement piece or smaller for a keychain charm.
How to Use or Display This Crochet Project
This amigurumi is a charming decorative item perfect for shelves, desks, or nurseries. It makes a thoughtful handmade gift for kids or friends who enjoy whimsical creatures. Because it’s lightweight and small, you can also attach it to bags or use it as a decorative item in gift wrapping. Placed next to other soft décor, it creates a cozy, playful atmosphere.
Care Instructions
Hand wash gently with cool water and mild detergent to maintain softness and color vibrancy. Lay flat to dry to preserve shape. Avoid machine washing or drying to prevent distortion and color bleeding. Store in a dry, dust-free environment when not in use.
Frequently Asked Questions
Q: Can I substitute yarn weight for this pattern?
A: Yes, but be mindful that heavier yarn will increase the size. Adjust hook size accordingly for best tension.
Q: Is it okay to embroider the eyes instead of using safety eyes?
A: Definitely! Embroidered eyes are safer for children and can give a softer look.
Q: How many petals are made for each side of the head?
A: Three gill petals per side, totaling six.
Q: Can I work this pattern in rows instead of rounds?
A: This pattern is designed for continuous rounds for smooth shaping, so rows would change the structure significantly.
Q: How do I keep the wings upright?
A: Light stuffing plus small hidden shaping stitches help maintain an upright wing position.
Final Thoughts
This Sakura Axolotl Dragon Amigurumi blends soft pastels with whimsical detail, making it a delightful addition to any crochet lover’s collection. The step-by-step instructions balance straightforward construction with charming finishing touches, offering a rewarding project for those ready to expand their amigurumi skills. Enjoy stitching this gentle creature that brings a touch of magic and springtime beauty to your handmade creations.



