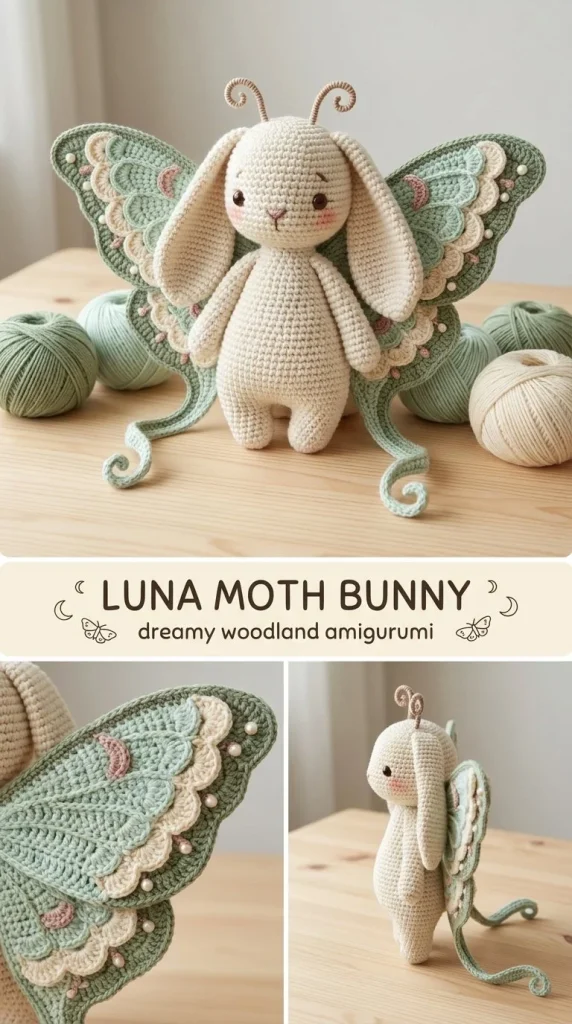
This delicate Celestial Luna Moth Bunny amigurumi combines the charm of a soft bunny with the ethereal beauty of luna moth wings, making it a truly magical crochet project. Perfect for adding a whimsical touch to your home décor or gifting to someone special, this pattern is friendly enough for adventurous beginners who enjoy working in continuous rounds. The wings add a lovely creative flourish without complicating the construction, and the subtle color palette of dusty lavender, ivory, powder blue, and sage creates a soothing, sophisticated look. If you appreciate projects that balance cute shapes with elegant details, this amigurumi offers just that, and the assembly process brings all the elements together into a cuddly, display-worthy piece. For those easing into amigurumi, referencing a beginner pattern like the Pastel Jellyfish Keychain Amigurumi can be a helpful warm-up before diving into the wings and shaping here.
Why You’ll Love This Crochet Pattern
- Combines creative wing details with a classic amigurumi bunny body for a unique finished look.
- Uses DK cotton yarn and a small hook, resulting in a firm, well-shaped plush ideal for display or gentle play.
- Clear, continuous round construction helps maintain consistent shaping with easy stitch counts.
- Practical shaping tips provided to help even newer crocheters achieve neat ears, wings, and body proportions.
- Soft color palette and optional embellishments allow for elegant customization.
- Encourages learning how to add textured picot borders and surface stitch embroidery, enhancing crochet skills.
Finished Size
The finished Celestial Luna Moth Bunny measures approximately 5 to 6 inches tall, including the ears and wings. The exact size will vary depending on your yarn, hook choice, and personal tension. For a firmer feel and smaller size, use a tighter tension with the recommended 2.5 mm hook.
Skill Level
This pattern is suitable for an intermediate beginner. While the body and head are worked in simple continuous rounds with common stitches, the wings require basic shaping and picot border techniques that might be new to some. If you are confident with increases, decreases, and simple borders, this is a lovely step up to develop skills. You might also find it helpful to review easy project structures like the Beginner-Friendly Cherry Blossom Crochet Hair Comb Pattern as part of building your crochet confidence.
Materials Needed
- DK weight cotton yarn in ivory (35 g), dusty lavender (15 g), powder blue (10 g), and soft sage (5 g)
- 2.5 mm crochet hook (or size needed to obtain a firm gauge)
- 8 mm safety eyes or black yarn for embroidered eyes
- Polyester fiberfill stuffing
- Tapestry needle for sewing and weaving in ends
- Stitch marker to mark rounds
- Scissors
- Optional pale pearl beads for decorative wing tips (for display pieces only)
Stitches and Abbreviations
- ch – chain stitch
- sc – single crochet
- hdc – half double crochet
- dc – double crochet
- sl st – slip stitch
- inc – increase (2 sc in one stitch)
- dec – decrease (single crochet two stitches together)
- MR – magic ring
Gauge and Tension Notes
Gauge is not critical but maintaining consistent tension is important to ensure the amigurumi holds its shape well. The fabric should be firm enough to keep stuffing from showing through. If your stitches are loose, try tightening your tension or dropping down a hook size. Using cotton yarn helps keep stitches defined, which benefits the wing embroidery and picot edging.
Pattern Notes Before You Start
This project is worked mostly in continuous rounds (spirals) for the head and body to avoid unsightly seams. The ears and wings are worked in rows/chains and later attached. The wings receive a decorative picot border and simple vein stitch embroidery with contrasting yarn colors to evoke a luna moth’s delicate veining. Pieces are sewn together at assembly — no joining as you go — allowing flexibility in positioning wings and ears for the best symmetry. This separation also helps beginners manage smaller parts before the final build.
Step-by-Step Crochet Instructions
Head
- R1: Make 6 sc in magic ring (6)
- R2: Inc around (12)
- R3: (Sc 1, inc) x6 (18)
- R4: (Sc 2, inc) x6 (24)
- R5: (Sc 3, inc) x6 (30)
- R6–10: Sc around (30)
- Place eyes between rounds 8 and 9, about 6 stitches apart.
- R11: (Sc 3, dec) x6 (24)
- R12: (Sc 2, dec) x6 (18); stuff firmly
- R13: (Sc 1, dec) x6 (12)
- R14: Dec x6 (6), finish off and close hole.
Body
- R1: 6 sc in magic ring (6)
- R2: Inc around (12)
- R3: (Sc 1, inc) x6 (18)
- R4: (Sc 2, inc) x6 (24)
- R5–8: Sc around (24)
- R9: (Sc 2, dec) x6 (18)
- R10–11: Sc around (18)
- R12: (Sc 1, dec) x6 (12); stuff firmly and close, leaving yarn tail for sewing
Ears (make 2)
- Ch 11
- From 2nd ch: sl st, sc, hdc, dc in next 5 sts, hdc, sc (10 sts)
- Work 3 sc into last ch, then continue down opposite side: sc, hdc, dc in next 5 sts, hdc, sc, sl st
- Fasten off
Upper Wings (make 2)
- Ch 13
- Row 1: Sc in 2nd ch and across (12)
- Row 2: Ch 1, turn, dec, 8 sc, dec (10)
- Row 3: Dec, 6 sc, dec (8)
- Row 4: Dec, 4 sc, dec (6)
- Border: Work sc evenly around wing edges with (ch 2, sl st in 2nd ch) picot points at three outer edges.
Lower Wings (make 2)
- Ch 10
- Row 1: Sc across (9)
- Row 2: Dec, 5 sc, dec (7)
- Row 3: Dec, 3 sc, dec (5)
- Add same picot border as upper wings.
Embroidery
Using powder blue and sage yarns, embroider simple vein lines on upper and lower wings using surface slip stitches or embroidery stitches.
Assembly and Finishing
Sew the body securely below the head using the long yarn tails and tapestry needle, ensuring the seams are tight but not bulky. Attach the ears at the top of the head symmetrically. Position the upper wings high on the back and sew securely, then attach the lower wings beneath the upper wings, keeping all wings flat and symmetrical. Embroider a tiny nose and optional blush on cheeks with soft yarn. If adding pearl beads for decoration, sew these carefully and only on pieces meant for adult display to avoid choking hazards. Weave in all ends neatly.
Helpful Tips
- Use a stitch marker to track rounds, especially in head and body rounds, to avoid losing your place.
- Stuff firmly but don’t overstuff to keep the shape nice without stretching stitches.
- When sewing ears and wings on, pin pieces temporarily to find the best symmetrical placement before stitching permanently.
- Block wings lightly after embroidery to flatten and shape the picot border.
- Keep your tension firm on picot border stitches to maintain defined points around the wings.
Common Mistakes to Avoid
- Skipping the stitch marker can cause counting mistakes in rounds, which throw off shaping.
- Stuffing too loosely will cause a floppy, less tidy finished shape.
- Sewing wings asymmetrically can make the final piece look unbalanced—take your time aligning carefully.
- Pulling yarn tails too tight when joining parts can pucker seams.
- Using beads on toys meant for kids may pose safety risks; reserve decorations for display pieces only.
Customization Ideas
- Try a gradient of dusty purples and greens on wings for a more vibrant luna moth look.
- Use different yarn fibers like soft acrylic or a wool blend for varied texture.
- Add tiny embroidery stars or moons on wings for a night-sky theme.
- Make a larger or smaller version by adjusting hook size and yarn weight to fit different display needs or gifting purposes.
How to Use or Display This Crochet Project
This enchanting bunny makes a cozy decorative accent on shelves, desks, or nursery spaces. It’s a thoughtful handmade gift for nature lovers or collectors of unique amigurumi. Avoid rough play if safety eyes are used, reserving for display or gentle handling. You can also create seasonal “forest fairy” decor by styling with natural elements like moss or branches.
Care Instructions
Hand wash your Celestial Luna Moth Bunny gently in cool water with mild soap. Avoid wringing to maintain shape; instead, press softly between towels and air dry flat. Store away from direct sunlight to prevent yarn color fading and keep it dust-free with a display case or sealed box.
Frequently Asked Questions
Q: Can I substitute yarn weight or hook size?
A: Yes, but results may vary. Use tighter tension for larger hooks or thicker yarns to keep firmness.
Q: Are safety eyes necessary?
A: No, you can embroider eyes instead for safety, especially for gifts intended for children.
Q: How do I embroider the veins on wings?
A: Use surface slip stitch or simple backstitches with contrasting yarn colors following the wing shape for subtle detailing.
Q: Can this pattern be adapted for a different animal?
A: Possibly, but ear and wing shapes are specialized; you’d need to adjust pattern parts accordingly.
Q: Is the picot border difficult?
A: It’s simply a repeating (ch 2, sl st in 2nd ch) pattern, adding a lovely decorative edge once you’re comfortable with basic border techniques.
Final Thoughts
This Celestial Luna Moth Bunny offers a delightful combination of sweet amigurumi charm with artistic wing details, perfect for makers seeking a project that’s soothing to crochet and beautiful to display. Taking your time with assembly and embroidery truly brings out the personality of this piece, rewarding your effort with a treasured handmade keepsake. Whether gifting or keeping, enjoy the meditative joy of crafting this lovely crochet companion.



