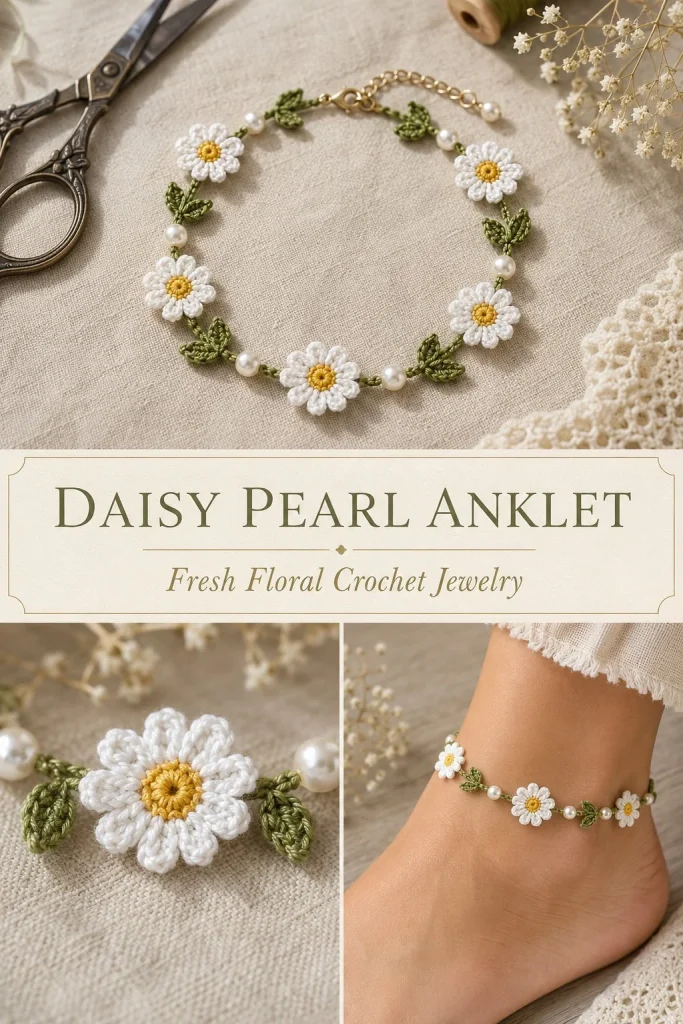
This delicate Daisy Pearl Anklet is a charming handmade accessory perfect for adding a subtle touch of nature-inspired elegance to your summer or spring outfits. Designed with beginner-friendly ease in mind, it features a simple olive green cord adorned with five dainty daisies, accented by pearl beads and tiny green leaves. The combination of cotton thread and dainty flowers lends a fresh, lightweight feel that’s comfortable enough for daily wear or as a thoughtful gift for friends who love unique, handmade jewelry. From my experience, leaving the petals free and natural when sewing really helps the flowers maintain their airy, lively appearance, adding to the anklet’s delicate charm without stiffening the motifs.
Why You’ll Love This Crochet Pattern
- Creates a light, wearable floral anklet that’s both pretty and practical.
- Uses beginner-friendly stitches and straightforward assembly steps.
- Small project size suitable for a quick but satisfying crochet session.
- Can be customized easily with yarn colors and beads to suit your style.
- Provides hands-on practice with motif crochet and simple finishing techniques.
- Real maker tip: blocking daisies flat while keeping leaves curved highlights their natural shapes beautifully.
Finished Size
The anklet is designed to fit around the ankle with five daisies arranged in approximately a 14-16 cm span across the front. Adjust the initial cord length to match the wearer’s ankle circumference minus 1.5 cm allowance for the clasp. Note that finished size may vary depending on your thread, hook, and tension.
Skill Level
Advanced beginner. This pattern involves working in rounds, chaining, and sewing separate motifs together. It doesn’t require complex stitches but does call for careful assembly and finishing, making it perfect for makers who have some basic stitch experience and are ready to take the next step.
Materials Needed
- Size 10 crochet cotton thread in olive green, white, and golden yellow
- 1.00 mm steel crochet hook (or appropriate size to match your thread and tension)
- Four small 3 mm pearl beads
- One metal lobster clasp and two jump rings (or alternatively, a crochet loop and pearl button closure)
- Fine tapestry needle (for sewing motifs and weaving in ends)
- Stitch marker (to mark center front of cord)
- Sharp scissors
- Jewelry pliers (only if using lobster clasp and jump rings)
Stitches and Abbreviations
- ch – chain: make a chain stitch
- sl st – slip stitch: insert hook, yarn over, pull through loop on hook and stitch
- sc – single crochet: insert hook, yarn over, pull through stitch, yarn over, pull through both loops on hook
- hdc – half double crochet: yarn over, insert hook, yarn over, pull through stitch, yarn over, pull through all 3 loops
- dc – double crochet: yarn over, insert hook, yarn over, pull through stitch, yarn over, pull through 2 loops, yarn over, pull through remaining 2 loops
Gauge and Tension Notes
Gauge is not critical for this accessory but maintaining an even, firm tension will keep the motifs neat and durable. Too loose stitches may make the daisies floppy, and too tight may cause stiffness or difficulty in sewing motifs flat. Aim for a balanced tension that feels comfortable for your hand and allows the motifs to hold shape but remain flexible.
Pattern Notes Before You Start
The anklet is made from three main components worked separately: the anklet cord, five daisy motifs, and leaves. They are then sewn together along the marked center front of the cord, with pearl beads placed in between daisies. Color changes happen between rounds and motifs. Be sure to mark the anklet cord’s center front with a stitch marker before attaching flowers to ensure even placement. When sewing petals, stitch only through the yellow centers, letting petals remain free and natural. Finishing includes weaving ends neatly and blocking flowers flat on a soft surface.
Step-by-Step Crochet Instructions
Anklet Cord
- Using olive green thread, chain to the wearer’s ankle circumference minus 1.5 cm to allow for the clasp. For example, if the ankle circumference is 22 cm, chain enough stitches to reach approximately 20.5 cm.
- Beginning in the 2nd chain from hook, work slip stitches (sl st) evenly across all chains.
- Fasten off, leaving tails for sewing the clasp.
Daisy Motifs (Make 5)
- With golden yellow thread, create a magic ring (MR).
- Round 1: Work 8 single crochet (sc) stitches into the ring. Pull the ring closed and join with a slip stitch (sl st) to the first sc – total 8 stitches.
- Join white yarn in any stitch.
- For each of the 8 yellow stitches, work one petal as follows: sl st, ch 2, half double crochet (hdc), double crochet (dc), hdc, ch 2, sl st – all in the same stitch.
- Join with a sl st to the base of the first petal, fasten off leaving a 15 cm tail for sewing.
Leaves (Make 10)
- Chain 6 with green thread.
- Starting in the 2nd chain from hook, work: sl st, sc, hdc, dc, sc.
- Work 3 single crochets (sc) in the last chain.
- Working along the opposite side of the chain foundation, work: sc, dc, hdc, sc, sl st.
- Fasten off leaving tails for sewing.
Assembly and Finishing
- Mark the center front of your anklet cord with a stitch marker.
- Arrange the five daisies evenly spaced in a straight line across the front of the curve, spanning about 14-16 cm.
- Sew each daisy onto the cord through the yellow center using the tail left for sewing. Be careful to only stitch the base of the petals so they remain free and natural.
- Place one leaf angled upward on each side of every daisy base and sew securely.
- Sew one pearl bead between each pair of daisies (four pearls total).
- Attach the metal lobster clasp using jump rings on the ends of the cord, or crochet an 8-chain loop at one end and sew a pearl button on the other, depending on your closure preference.
- Weave all tails neatly through the dense center stitches of the flowers and the cord.
- Lightly block the daisies flat on a soft surface using pins or a blocking mat, pinning petals loosely flat and allowing leaves to keep their natural curve.
Helpful Tips
- Use a fine tapestry needle to avoid damaging the delicate thread during sewing.
- Marking the center front of the anklet cord before assembly keeps your flowers evenly spaced.
- Blocking petals flat really elevates the appearance and helps the daisies keep their iconic shape.
- Test the anklet fit before attaching the clasp or button to ensure comfort and correct length.
- Use stitch markers while sewing to keep petals aligned and prevent shifting.
Common Mistakes to Avoid
- Don’t sew through petals—only stitch through the flower’s yellow centers to allow petals to move freely.
- Avoid chaining too loosely on the anklet cord; inconsistent tension will make the anklet floppy or uneven.
- Not marking the center front can cause uneven flower placement.
- Skipping blocking may result in flowers that look misshapen or bulky.
- Failing to leave long enough tails for sewing can make assembly frustrating.
Customization Ideas
- Choose cotton threads in other colors, like soft lilac, blush pink, or sky blue for the daisies.
- Swap pearl beads for tiny crystal or metallic beads for a different shimmer effect.
- Use a slightly thicker thread and an appropriate hook to create a more substantial anklet for cooler weather.
- Add extra leaves or swap pearl beads with small fabric flowers for a more textured look.
How to Use or Display This Crochet Project
Wear this anklet as a unique accessory to brighten casual outfits or add a subtle boho vibe to a beach or festival look. It also makes a thoughtful, handmade gift for friends and family who appreciate handcrafted jewelry. Display the anklet on a jewelry stand or in a small decorative box when not worn, keeping it safe from dust and tangling.
Care Instructions
Hand wash gently in cool water with mild soap to preserve the cotton thread’s colors and delicate shape. Avoid wringing or twisting. Lay flat to dry on a towel, reshaping flowers and leaves gently if needed. Store in a dry place away from direct sunlight to maintain softness and color vibrancy.
Frequently Asked Questions
Q: Can I use different yarn instead of size 10 thread?
A: Yes, but choose a fine cotton or lace-weight yarn and a matching hook for best results. Adjust your initial chain length accordingly.
Q: How do I make sure the anklet fits?
A: Measure the ankle circumference and subtract about 1.5 cm for clasp allowance. Mark your chain length and test the fit before final assembly.
Q: Can beginners handle sewing the motifs?
A: Absolutely! Using a fine tapestry needle and sewing only through the centers simplifies the process. Take it slow to keep petals free.
Q: What if my petals look floppy?
A: Try blocking them flat while pinned to improve shape. Using a slightly firmer tension during the petal stitches also helps.
Q: How do I replace the closure?
A: You can easily swap the lobster clasp for a crocheted loop and pearl button by following the instructions for an 8-chain loop and sewing on the button end.
Final Thoughts
This Daisy Pearl Anklet is a lovely, wearable little crochet project that’s both manageable for advanced beginners and rewarding in its delicate detail. Its versatility and charm make it a joy to create and wear, bringing a fresh, floral touch to your handmade accessories collection. With a little patience in assembly and finishing, you’ll have a beautifully neat and unique anklet to cherish or gift.




Love