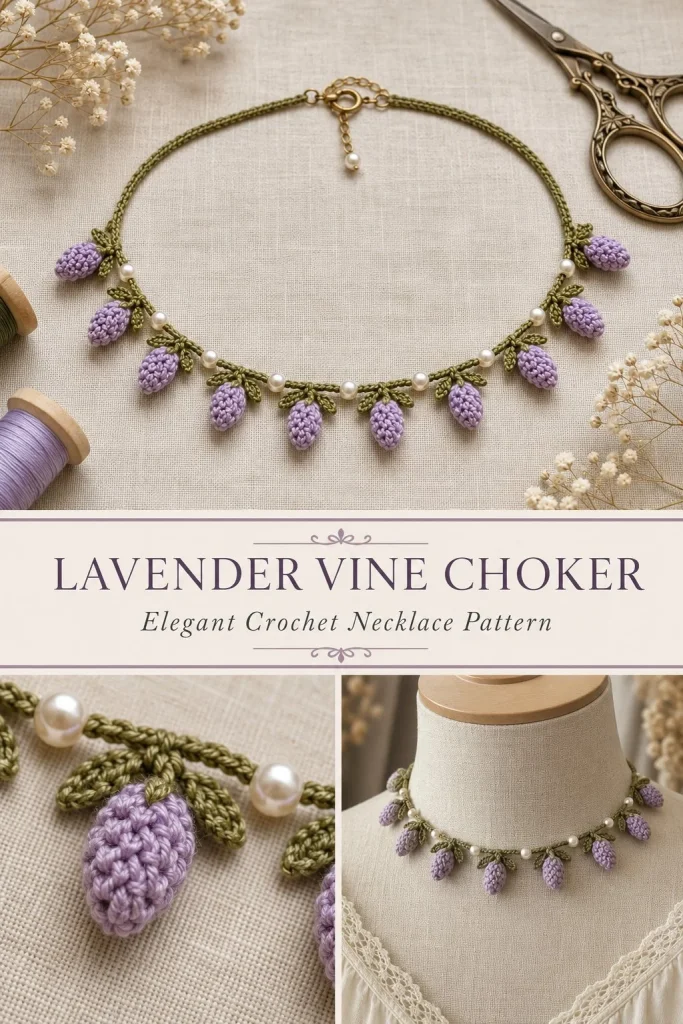
This delicate lavender vine choker is a charming accessory that blends simple stitches with elegant shaping, making it a perfect project for anyone wanting to add a touch of handmade beauty to their jewelry collection. Designed to be lightweight and adjustable, this piece uses fine size 10 crochet thread to create an olive green base adorned with soft lavender buds and olive leaves, evoking the soft elegance of a blossoming vine around your neck. It’s a beginner-friendly pattern that’s straightforward yet satisfying, especially if you enjoy sewing small crochet motifs together—a useful skill for many jewelry or wearable projects. One detail I’ve found makes a big difference in the final look is working the slip stitches in the base with even tension to keep the cord straight and neat; it really helps the buds and leaves sit beautifully when attached.
Why You’ll Love This Crochet Pattern
- Lightweight and delicate, perfect for spring and summer wear or layering under collars.
- Uses size 10 thread and a 1.0 mm hook, which is great practice for working with finer, more precise materials.
- Small motifs like the lavender buds and leaves develop your skills in shaping and joining crochet pieces.
- The assembly process is rewarding and customizable, allowing you to space and position the decorations as you like.
- Beginner-friendly with clear stitch instructions – ideal for makers stepping up from simple scarves or amigurumi.
- The finished necklace is perfect as a unique handmade gift or a personal keepsake.
Finished Size
The finished choker will measure approximately 44 cm (17.3 inches) in length, designed to fit most neck sizes. The buds and leaves cluster around the center 22 cm mark, creating a balanced look. Keep in mind that your yarn choice, hook size, and tension can cause slight variations in size, so adjust your base chain length accordingly for desired fit.
Skill Level
Easy to intermediate beginner. The stitches themselves are simple, mostly slip stitches and single crochets, but working with thin thread and tiny motifs requires some patience. Sewing the pieces evenly spaced and securely attached offers a gentle challenge suitable for those improving their finishing skills.
Materials Needed
- Size 10 crochet thread in olive green (for the base cord)
- Size 10 crochet thread in lavender (for the buds)
- 1.00 mm steel crochet hook
- 8 small pearl beads (approximately 3 mm) – optional embellishment for buds
- One lobster clasp and two jump rings (or alternatively, two crochet tie cords about 20 cm long each)
- Fine tapestry needle for sewing pieces and weaving ends
- Sharp scissors
- Jewelry pliers, if using lobster clasp and jump rings
Stitches and Abbreviations
- ch: chain
- sl st: slip stitch
- sc: single crochet
- magic ring: adjustable ring used to start crochet in rounds
- join: join rounds by slip stitching
Gauge and Tension Notes
Gauge is not critical for this project, but maintaining even tension, especially when working the slip stitch base, will ensure the choker lays flat and looks neat. Since you’re working with fine thread, try to avoid pulling too tightly, which can curl the base cord. Aim for consistent loops to keep the row even.
Pattern Notes Before You Start
This project is worked in separate pieces: the base cord is a single row of slip stitches, the lavender buds are crocheted in rounds, and the leaves are individual small motifs. All pieces are sewn onto the base rather than joined during crocheting, allowing flexibility in placement. Color changes between olive green and lavender happen between pieces, so no colorwork within a single piece. The closure can be a lobster clasp or crochet tie cords based on preference.
Step-by-Step Crochet Instructions
-
Choker Base
Chain to your desired neck length minus the clasp allowance (for example, chain 40 for a 44 cm finished length minus about 4 cm for clasp/jump rings). Beginning in the second chain from the hook, work slip stitches (sl st) across the entire row. You should have one slip stitch in each chain. Fasten off, leaving long tails for assembly. -
Lavender Buds (Make 9)
- Create a magic ring with lavender thread.
- Round 1: Work 6 sc into the ring. Join with sl st to first sc. (6 sts)
- Round 2: sc in next sc, sc inc in next sc around to gently shape the bud (9 sts).
- Round 3: sc in each stitch around to finish shaping (9 sts). Join and fasten off, leaving a long tail for sewing.
Optionally, sew one small pearl bead on each bud center for added detail.
-
Leaves (Make 18)
- Chain 5.
- Starting in the 2nd chain from the hook, work 1 sc, 1 half double crochet (hdc), 1 double crochet (dc), 1 hdc, then 1 sc in the last chain to form the leaf shape.
- Fasten off, leaving a tail for sewing.
-
Assembly
Mark the center point (22 cm) on the base cord. Evenly space the 9 lavender buds along the center, leaving room between each for leaves. Sew each bud securely to the base cord using the long tail and tapestry needle. Next, sew 18 leaves evenly between and around the buds, creating a natural vine impression. -
Closure
Attach the lobster clasp and jump rings to each end of the base cord, using the tails or with the help of jewelry pliers. Alternatively, attach crochet tie cords of about 20 cm length at each end for an adjustable, non-metal closure. -
Finishing
Weave in all ends neatly on the wrong side of the base cord or within the motifs. Check all sewn pieces are secure and the choker lays flat without puckering. Trim any loose threads carefully.
Assembly and Finishing
Take your time positioning buds and leaves so the overall design feels balanced and organic. Using a fine tapestry needle helps achieve discreet stitches when attaching motifs. Weaving ends tightly and trimming them close will prevent snagging during wear. If using lobster clasp, test closure motion to ensure the choker length works for your neck comfortably with the clasp and jump rings in place.
Helpful Tips
- When working with size 10 thread, good lighting and a magnifier can help you see stitches clearly.
- Hold your base chain loosely for the slip stitch row to keep the choker from curling.
- Sew buds and leaves starting from the center, moving outward to keep spacing symmetrical.
- Practice the leaf stitch separately to get even shapes before making all 18.
- Adding a tiny pearl bead to each bud adds a subtle sparkle and texture contrast.
Common Mistakes to Avoid
- Crocheting the base too tightly: causes curling and discomfort. Keep slip stitches loose and even.
- Uneven spacing of buds and leaves: mark placement before sewing to avoid a lopsided vine look.
- Not leaving long enough tails for sewing: can make attachment fiddly or weak.
- Skipping weaving in tails well: can lead to unraveling or rough finish that irritates skin.
- Overstretching the choker when measuring: keep natural tension for accurate fit.
Customization Ideas
- Use a different color palette—soft pinks or creams for a vintage look, or bright jewel tones for a bold statement.
- Add decorative beads or tiny seed beads within or around buds for sparkle.
- Make a longer version to wear doubled as a layered choker or bracelet wrap.
- Swap the lobster clasp for a magnetic clasp or simple button closure.
How to Use or Display This Crochet Project
Wear this lavender vine choker with casual dresses or blouses for a handmade touch to your outfit. It pairs beautifully with simple silver or pearl jewelry. Consider gifting it for birthdays or spring holidays. When not in use, lay flat or hang on a jewelry stand to prevent shaping loss. Its delicate style makes it an ideal piece for spring celebrations, garden parties, or everyday charm.
Care Instructions
Hand wash gently in cool water with mild soap. Avoid wringing or twisting; instead, press out excess water with a towel. Lay flat to dry on a clean surface, reshaping the buds and leaves if needed to maintain form. Store flat or hung to avoid crushing the motifs. Do not bleach or machine wash as fine threads and delicate shapes will suffer.
Frequently Asked Questions
Q: Can I use thicker yarn for this pattern?
A: Thicker yarn would change the look and drape of the choker. This pattern is designed for size 10 thread and a small hook to keep it lightweight and delicate. If you use thicker yarn, you’ll need to adjust hook size, chain length, and motif scale accordingly.
Q: How do I make sure the buds don’t fall off the base?
A: Use a fine tapestry needle and sew the buds repeatedly through several stitches and the base cord. Knot securely and weave in tails well for durability.
Q: Can I make this choker adjustable?
A: Yes. Use crochet tie cords instead of a lobster clasp or add several jump rings so you can fasten at different lengths.
Q: What if my motifs look too stiff?
A: Make sure you’re using size 10 thread—not a heavier weight—and keep your tension even but not overly tight. You can lightly block your motifs flat by pinning and misting them.
Q: How do I add beads to buds without distorting shape?
A: Sew beads carefully with a fine needle through the center stitches of the bud after finishing the crochet rounds, using thread color that matches lavender.
Final Thoughts
This lavender vine choker is a rewarding little project that combines simple stitches with thoughtful assembly to create a wearable piece of art. Whether you’re gifting it or keeping it for yourself, it’s a wonderful way to practice stitching fine thread and sewing motifs while making something uniquely beautiful. Enjoy the slow, satisfying rhythm of the tiny buds and leaves coming together—it’s one of those projects that feels special every time you wear it.



