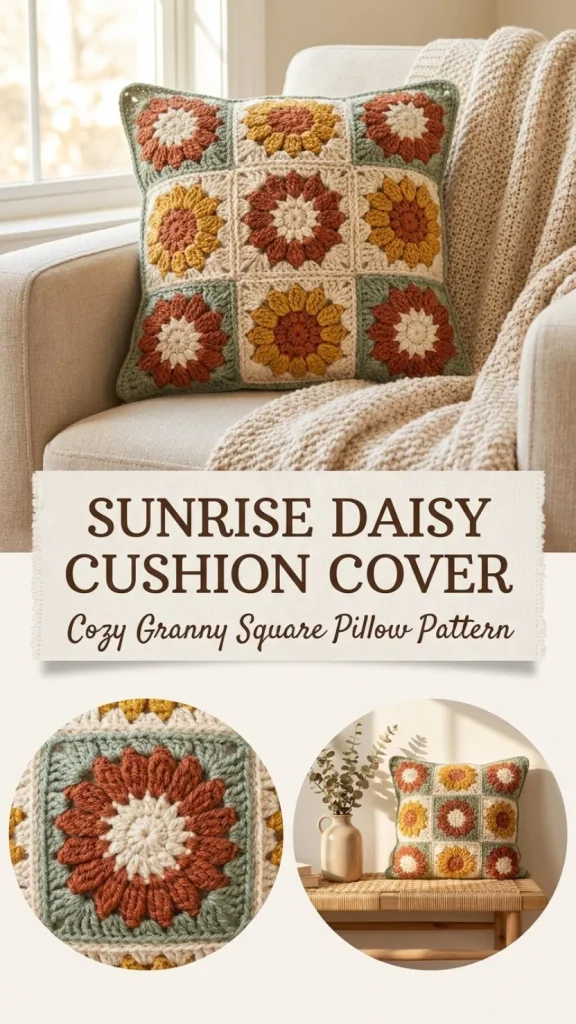
This Sunrise Daisy Cushion Cover is a charming crochet project that adds a cozy, cheerful touch to any living space. Featuring nine granny flower squares joined into a bright 3 x 3 front panel with classic flower motifs, it creates an eye-catching cushion that’s both decorative and practical. The back is worked in two simple rectangular panels that overlap to form an envelope closure, making it easy to insert or remove your pillow form. This pattern is beginner-friendly while offering plenty of visual interest with its multi-round flower squares and textured stitches. A real maker’s tip: blocking the squares before assembly ensures each motif lays flat and the joins look neat, which makes the whole cushion cover appear professionally finished. This project also pairs well with accessories featuring similar floral motifs, like the daisy pearl anklet pattern, if you want to add handmade details to your home or gift set.
Why You’ll Love This Crochet Pattern
- Combines traditional granny square motifs with a floral design for a fresh look.
- The envelope back makes changing your pillow form quick and fuss-free.
- Uses worsted cotton yarn for durability and cozy texture that’s soft to the touch.
- Structured assembly with whip stitch or slip stitch gives a tidy, secure finish.
- Perfect for beginners looking to practice joining motifs and working in rows.
- Provides a satisfying project that results in a usable, lovely home accent.
Finished Size
The finished cushion cover measures approximately 16 inches square. Keep in mind that your block size, yarn choice, and personal tension can slightly affect the final dimensions, so consider checking your gauge or adjusting your hook size if you want an exact fit for a specific pillow form.
Skill Level
This pattern is suitable for an advanced beginner. It introduces working in rounds for the flower square motifs and in rows for the back panels, as well as joining methods like whip stitch or slip stitch. These techniques are manageable with some crochet experience, plus the instructions break down each step clearly for success.
Materials Needed
- Worsted weight cotton yarn (#4) in four colors: rust, mustard, cream, and sage
- 5.0 mm crochet hook
- Tapestry needle for weaving ends and joining pieces
- Scissors
- Stitch markers (optional but helpful for keeping track of rounds and joins)
- Pillow form approximately 16 inches square
Stitches and Abbreviations
- ch = chain
- dc = double crochet
- sl st = slip stitch
- sc = single crochet
- hdc = half double crochet
Gauge and Tension Notes
Gauge is somewhat flexible but aim for consistent tension to keep your flower squares uniform in size (about 5.25 inches each after blocking). Blocking helps achieve the proper shape and smooth edges, which makes joining easier and improves the overall look of your cushion cover.
Pattern Notes Before You Start
This project consists of motif work for the front panel and straightforward rectangular panels for the back. The front is made of nine granny flower squares joined in a 3 x 3 arrangement. The back is created from two rectangular panels joined with an envelope opening. Color changes happen by rounds within each granny square, progressing from a mustard center to cream petals, rust square shaping, and sage outer edging. Pieces are joined by whip stitch or slip stitch for a neat seam.
Step-by-Step Crochet Instructions
-
Make 9 Granny Flower Squares
- Center round (mustard): Create a magic ring, ch 3 (counts as first dc), work 11 dc into ring, join with sl st to top of ch 3. (12 dc)
- Petal round (cream): Join yarn with a sl st in any dc. *Sl st in next st, ch 2, 4 dc in same st, ch 2, sl st in next st; repeat from * six times total for six petals. Fasten off.
- Square round (rust): Join yarn in any petal gap. Work (3 dc, ch 2, 3 dc) in the same gap for the first corner. *3 dc in each of the next two gaps, (3 dc, ch 2, 3 dc) in the next gap; repeat around to form a square. Join with sl st and fasten off.
- Outer round (sage): Sl st to a corner space, ch 3, (2 dc, ch 2, 3 dc) in same corner. Work 3 dc in each side gap and (3 dc, ch 2, 3 dc) in each corner around. Join and fasten off.
- Block each square evenly to achieve a 5.25-inch size.
-
Join Squares
- Arrange the nine squares in a 3 x 3 grid (approx. 16 inches square front panel). Join by whip stitch or slip stitch, being careful to line up corners and edges for a smooth join.
-
Back Panels
- Ch 49. Row 1: dc in 3rd ch from hook and in each ch across (47 dc). Continue straight dc rows until panel measures 16 inches tall.
- Make a second back panel same width but only 9 inches tall.
-
Assembly
- Overlap the two back panels by 7 inches to create an envelope-style closure. Place them behind the joined front panel with right sides facing out.
- Single crochet evenly around all four layers, placing 3 sc in each corner.
- Work one more round around the edge in reverse single crochet or half double crochet for a polished border.
Assembly and Finishing
After joining and edging, weave in all loose ends carefully using a tapestry needle for a tidy inside finish that won’t snag. Blocking the squares beforehand helps the cushion cover maintain its shape and keeps the floral motifs crisp. Insert your pillow form through the back overlap. The envelope opening is roomy enough for easy removal and cleaning. For an extra neat look, consider lining the back panel edges with a fabric strip before closing to prevent stretching over time.
Helpful Tips
- Use stitch markers when joining squares to keep corners aligned perfectly.
- Blocking the granny flower squares on a flat surface with pins ensures even edges before joining.
- Keep your tension consistent when working the envelope back panels so the front and back fit well.
- When working the outer sage round, keep turning your work gently to maintain stitch consistency and prevent puckering.
- If you struggle with whip stitching, practicing on scrap motifs first helps build confidence.
Common Mistakes to Avoid
- Don’t skip blocking the squares as this can lead to uneven joins and a wobbly cushion front.
- Avoid pulling yarn too tight when joining squares, which can distort the shape.
- Ensure you count stitches carefully in each granny square round to prevent mismatched edges.
- When working the back panel, watch for unintentional increases or decreases to maintain a straight rectangle.
- Don’t forget to leave a sufficient overlap in the back to make pillow insertion easy.
Customization Ideas
- Experiment with color schemes—try pastel tones for a soft, springtime look or bright jewel tones for a bold statement.
- Use a variegated yarn for petals or outer squares to add dynamic color transitions.
- Substitute worsted cotton for a soft acrylic blend if you prefer a plusher texture.
- Add a simple embroidered center or tiny beads to the flower centers for a delicate embellishment.
How to Use or Display This Crochet Project
This cushion cover makes a perfect handmade gift for anyone who loves home décor with a personal touch. It’s cozy enough for everyday use on the sofa or bedroom but decorative enough to elevate your living room style. Pair it with solid color cushions to highlight the detailed floral motifs, or place it on an armchair as a statement piece. Its removable back also allows easy cleaning and versatility in pillow inserts.
Care Instructions
Hand wash or machine wash on a gentle cycle with cold water due to the cotton yarn. Lay flat to dry to maintain the shape and prevent stretching. Store the cushion cover away from direct sunlight to avoid yarn fading and keep it fresh in an airtight bag or basket when not in use.
Frequently Asked Questions
Q: Can I use a different yarn weight for this pattern?
A: You can substitute yarns but be aware that the finished size and texture will vary. Stick close to worsted weight for best results.
Q: How do I make sure my granny squares are all the same size?
A: Consistent tension while crocheting and blocking each square before joining are key steps.
Q: Can I crochet the entire cushion cover in one piece?
A: This pattern is designed for motif-based construction and the envelope back for a neat finish, but advanced crocheters may experiment with a single panel approach.
Q: What if I want a zipper closure instead of an envelope?
A: You could create two equal back panels and sew in a zipper instead of overlapping panels.
Q: How do I keep the flower petals from curling?
A: Blocking and slightly stiffening the petals by wet-blocking helps them lay flat.
Final Thoughts
I hope you enjoy creating the Sunrise Daisy Cushion Cover as much as I enjoyed designing it. The combination of floral motifs with a practical envelope back makes this project both beautiful and functional—a lovely addition to your crochet collection or a thoughtful handmade gift. If you’re inspired by floral crochet motifs, you might also enjoy experimenting with smaller accessories like the daisy pearl anklet, which pairs well as a delicate accessory set.
Conclusion
For vibrant inspiration on incorporating floral elements into your projects, consider exploring the bright and cheerful colors of the Tequila Sunrise Pompon flowers, which beautifully complement lively crocheted designs like this cushion cover.



