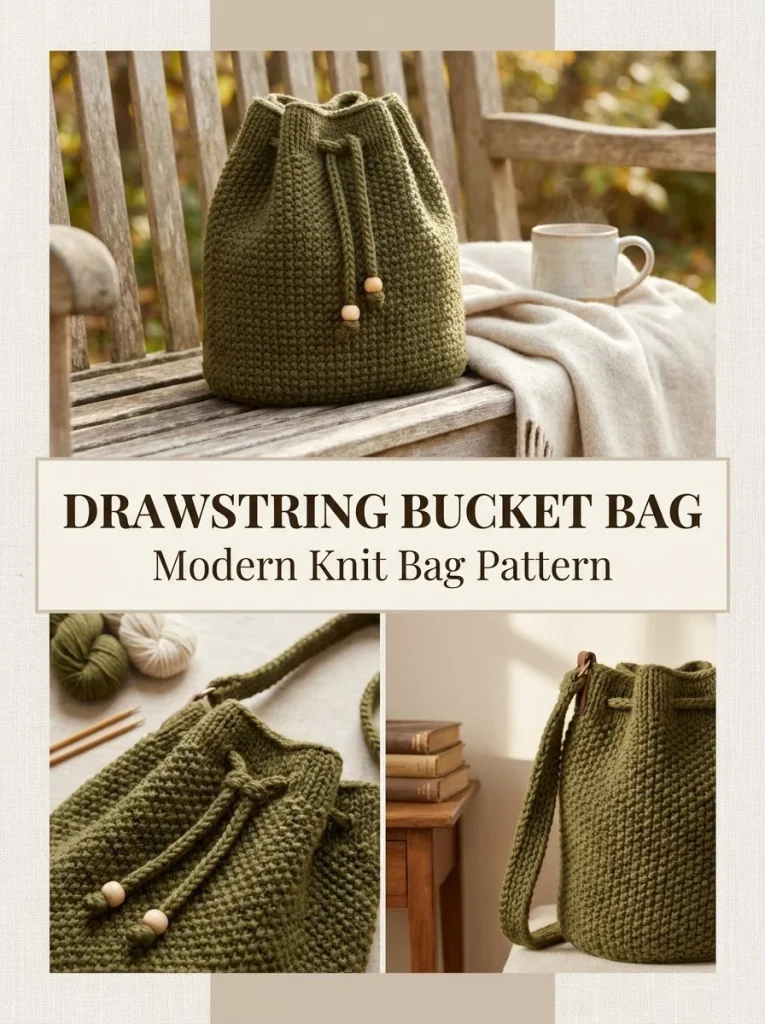
The Olive Drawstring Bucket Bag is a charming project that combines functionality with style, making it a lovely addition to any accessory collection. This bag features a soft texture and a relaxed silhouette, making it ideally suited for carrying everything from craft supplies to everyday essentials. The construction is straightforward yet rewarding, predominantly utilizing the seed stitch technique combined with garter stitch for the base and strap. This means that not only will you enjoy the process of creating this bag, but you’ll also end up with a unique piece that showcases your crochet skills.
A highlight of this project is its versatility. It allows for various yarn choices while maintaining a cohesive design. The deep moss olive color enhances its rustic feel, making it perfect for all seasons. Additionally, you can personalize the bag further by adjusting the size or trying out different colorways. Those who are new to garment making will find that this pattern builds confidence through its clear instructions and manageable stitch counts.
Pattern at a Glance
Skill Level: Intermediate
Terminology: US Terms
Construction: Worked in rounds with a base, body, and straps
Finished Size: Approximately 9.5 in high and 9 in wide when laid flat
Yarn Weight: Worsted-weight
Needle: US 8 / 5 mm circular needle, 24-32 in
Main Stitch: Seed stitch
Gauge: About 18 sts x 26 rounds = 4 in / 10 cm in seed stitch
Layout: Seamless construction after the base
Joining: Not applicable
Border: No border; the top edges are knitted snugly via eyelets for the drawstring.
Materials
To craft the Olive Drawstring Bucket Bag, you’ll need the following materials:
- Yarn: Worsted-weight cotton-wool or firm wool-blend yarn in deep moss olive (approximately 420-480 yards).
- Needles: US 8 / 5 mm circular needle, 24-32 inches; optional DPNs for smaller sections.
- Notions: Stitch markers, tapestry needle for weaving in ends, scissors for cutting yarn.
These materials will not only ensure a beautiful final product but will also aid in creating a sturdy yet lightweight bag.
Yarn and Color Notes
Choosing the right yarn is crucial for this project. Worsted-weight yarn works best as it provides a good balance of softness and structure, allowing the bag to hold its shape. A cotton-wool blend can add a lovely drape and durability, while the deep moss olive color brings an earthy tone that suits any season. If you’re feeling adventurous, consider experimenting with variegated yarns or even a two-tone design to add a unique twist to the project.
Finished Measurements
When completed, the Olive Drawstring Bucket Bag measures approximately 9.5 inches high and 9 inches wide when laid flat. These dimensions provide an ideal size for a variety of uses, whether you need a bag for shopping, a craft project, or as an everyday carry-all.
Gauge
To achieve the correct fit for this bag, ensure your gauge is approximately 18 stitches x 26 rounds = 4 inches / 10 cm in seed stitch. To check your gauge:
- Work a small swatch using the same yarn and needles you’ll use for the project.
- Measure your gauge over a 4-inch section after blocking, if necessary.
It’s essential to achieve the correct gauge, as variations can affect the size and shape of the finished bag. If your gauge is tighter, your bag may be smaller; if it’s looser, the bag could end up larger.
Abbreviations
- K: Knit
- P: Purl
- M1: Make 1 (increase)
- RS: Right Side
- YO: Yarn Over
- K2tog: Knit 2 together
- St(s): Stitch(es)
Important Pattern Notes
- Turning Chains: When working in the round, do not need to consider turning chains since it joins seamlessly.
- Right Side / Wrong Side: For this bag, the right side is the outer layer with the textured stitch showing.
- Stitch Markers: These are helpful when joining the base to the body and tracking rounds as you crochet.
- Repeat Structure: Keep an eye on your stitch counts, especially when establishing the increases and decreases.
Special Stitches and Techniques
Seed Stitch
This project primarily employs seed stitch, which creates a lovely textured fabric. The sequence involves alternating knit and purl stitches, giving the bag a distinctive look.
Eyelets for Drawstring
The eyelet round uses a yarn over technique (YO) combined with decreases (K2tog) to create openings for threading the drawstring. It’s a simple yet effective method to finish the bag’s top and allow for functionality.
Understanding the Construction
The Olive Drawstring Bucket Bag is constructed from the bottom up. You will begin with a garter-stitch base that provides stability. After establishing the base, you’ll pick up stitches around the edge to create the body in seed stitch. Following this, you’ll create eyelets for the drawstring, thread the drawstring through, and finally attach the shoulder strap. The assembly is straightforward, allowing you to focus on the crafting process without complex piecing.
Full Pattern Instructions
Foundation
Gauge: Approximately 18 sts x 26 rounds = 4 in / 10 cm in seed stitch.
Base
- Cast on 30 sts using the long tail method for a stretchy edge.
- Work garter stitch for about 4.5 in.
- On the next right side (RS) row, knit 1 (K1), make 1 (M1), knit to the last stitch, M1, K1. This will increase your stitch count.
- Repeat this increase every 4th row two more times (totaling 36 sts).
- Knit even until the base measures about 8.5 in long.
- Begin decreasing: decrease 1 st at each end every 4th row three times to return to 30 sts.
- Bind off loosely to maintain elasticity.
Pick Up Body
- With the circular needle, pick up approximately 86 sts evenly around the entire base.
- Place a marker and join in the round carefully.
- Adjust by 1 st if needed for an even count.
Seed-Stitch Body
- Round 1: K1, P1 around.
- Round 2: P1, K1 around.
- Repeat these two rounds until the side wall measures 7.5 in from the base.
Drawstring Eyelets
- Knit 2 rounds.
- For the eyelet round: K2, YO, K2tog around, adjusting the last repeat as necessary to keep spacing even.
- Knit 4 more rounds, then bind off firmly but not tightly.
Drawstring
- Make a 3-stitch I-cord about 32 in long.
- Thread it in and out through the eyelets, bringing both ends to the front.
- Knot each end securely.
Shoulder Strap
- Cast on 8 sts.
- Work in garter stitch until the strap measures 30-34 in or your desired length.
- Bind off and attach each strap end securely to opposite sides of the bag, placing it about 1 in below the top edge.
Finishing
- Weave in all ends and lightly block the body to shape.
- Allow the base to dry flat to retain the bucket shape.
Checkpoints
- Throughout the process, ensure your piece measures accordingly at intervals for accuracy.
- After picking up the body, confirm that you still have 86 stitches for consistent sizing.
Assembly
Once your pieces have been created, ensure the strap is evenly sewn into place, providing stability. The additional drawstring should facilitate easy closure, making it functional for everyday use.
Resizing
If you want to resize your bag, consider adjusting the base width by altering the cast-on stitches. You may maintain the other proportions for a consistent appearance. Adjusting the length of the strap can also change how the bag is worn.
Variations
You can create variations of this bag using different colors. For instance, creating a scrap-yarn version or trying a two-color version can give your bag a fresh and unique look.
Troubleshooting
Why Is My Project Getting Wider?
If you find that your bag is getting wider, check to see if you’ve accidentally added extra stitches during your increases or if the yarn is relaxing more than expected.
Why Is My Edge Wavy?
A wavy edge may occur if your tension is too loose or if your bind-off was not firm enough. Try to maintain even tension throughout your work for a smooth finish.
Why Don’t My Eyelets Match?
Make sure your yarn overs (YOs) are being mirrored correctly with decreases (K2tog) to prevent misalignments in your eyelet round.
FAQs
Can I use a different yarn weight?
Yes, but be aware that using a different yarn weight will alter the size and structure of the bag. Always check gauge.
Can I use cotton?
Absolutely! Cotton can add a nice touch, especially for summer bags, though it may change the drape and feel.
Can I make it larger?
Yes, by increasing the number of stitches cast on for the base and adjusting the body length as needed.
Do I need a special hook?
A standard crochet hook should suffice, but if you are finding it difficult to handle the yarn, you may prefer a larger ergonomic hook.
Final Thoughts
The Olive Drawstring Bucket Bag comprises simple yet effective techniques, yielding a functional, stylish accessory. Whether you’re making it for yourself or as a gift, rest assured that this project reflects creativity and craftsmanship. Enjoy the process of creating and personalizing your bag, and consider exploring similar patterns like the ones found in projects such as the Blue Bow Bag Charm or the Berry Basket Drawstring Pouch for more fun crochet endeavors!



