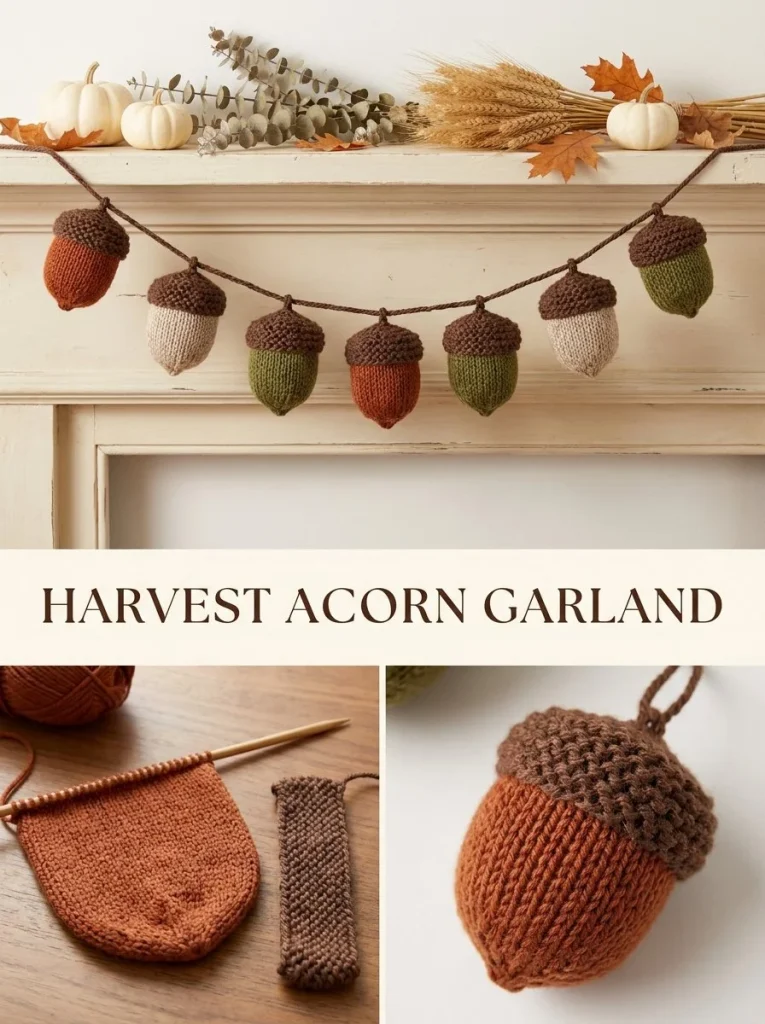
This charming Harvest Knit Acorn Garland is a delightful project that blends creativity with a touch of autumnal elegance. Featuring knitted acorns in warm tones and a garland that brings an inviting seasonal feel, it’s perfect for decorating your home during the fall months. The project is constructed using basic knitting techniques, ensuring that both novice and experienced knitters can enjoy making these adorable accents. Plus, it’s a great way to practice your skills while making a lovely handmade decoration. You may also find Harvest Gold Triangle Kerchief Knitting Pattern useful.
Knitting these acorns requires minimal materials yet delivers maximum visual appeal. You can display the finished garland along your mantle, wrap it around a staircase banister, or even use it as a festive table centerpiece. If you’re looking for other fun knitting projects, you might also enjoy creating the Acorn Brown Keyhole Scarf, which complements the rustic vibe of the garland.
Pattern at a Glance
Skill Level: Beginner
Terminology: Standard knitting terms
Construction: Knit pieces sewn together
Finished Size: Each acorn is approximately 3.5 inches / 9 cm tall; the garland measures 48-54 inches / 122-137 cm long
Yarn Weight: Worsted
Needles: US 6 (4.0 mm)
Main Stitch: Knit and purl
Gauge: Not critical; knit firmly so stuffing does not show
Motifs: 7 acorns
Layout: Individual acorns strung together
Materials
For this project, you’ll need the following materials:
- Yarn: Worsted-weight wool or acrylic yarn in warm brown, oatmeal, rust, and olive.
- Needles: US 6 (4.0 mm) knitting needles.
- Notions: Tapestry needle for weaving in ends, scissors for cutting yarn, and a small amount of polyester fiberfill for stuffing.
Feel free to substitute yarn colors for a more personalized touch, but aim for colors that evoke the cozy colors of fall for a seasonal effect.
Yarn and Color Notes
Using worsted-weight wool or acrylic yarn gives your acorns the perfect texture and durability. Wool is particularly charming due to its warmth and resilience, while acrylic can be easier to care for and offers a wide range of color choices. For this project, consider using a combination of solid colors to make your acorns stand out. You might opt for a color palette that includes earthy browns and greens to reflect the natural world.
Finished Measurements
The finished size of each acorn is about 3.5 inches / 9 cm tall, and when all acorns are sewn together, the garland will be between 48-54 inches / 122-137 cm long, depending on how you space the acorns. Make sure to check your measurements after completing each piece to ensure everything aligns properly.
Gauge
While the gauge is not critical for this project, it’s advisable to knit firmly to ensure the stuffing won’t show through the stitches. Testing your gauge with a swatch can help you maintain consistency. If your stitches look loose or stretched, consider adjusting the tension or switching to smaller needles.
Abbreviations
- CO: Cast on
- K: Knit
- P: Purl
- K2tog: Knit two stitches together
- SSK: Slip slip knit
Important Pattern Notes
- While knitting, ensure you maintain an even tension across each acorn. This will give your garland a polished look.
- Pay attention to the right side (RS) and wrong side (WS) of your work to keep the seams clean.
- The acorns are made from basic knit and purl stitches, making this an ideal project for both beginners and seasoned knitters.
Special Stitches and Techniques
The project primarily uses basic knitting techniques involving knitting and purling. The decrease stitches (K2tog and SSK) are essential for shaping the acorn bodies. Both techniques come together to give the items their identifiable silhouette. If you’re unfamiliar with these stitches, consider watching a tutorial for a quicker understanding.
Understanding the Construction
This garland consists of several pieces: the acorn body, cap, and stem. You will knit each acorn separately and sew them together. Once the acorns are complete, they are securely attached to the garland cord. The assembly process ensures that each acorn is spaced equally apart and gives the garland a clean, finished look.
Full Pattern Instructions
Acorn Body (Make 7, Mixing Rust, Olive, and Oatmeal)
- CO 14 sts.
- Row 1: P all.
- Row 2: K all.
- Repeat Rows 1-2 until you have completed 8 rows.
- Row 9: P all.
- Row 10: K1, K2tog, K8, SSK, K1 (12 sts).
- Row 11: P all.
- Row 12: K1, K2tog, K6, SSK, K1 (10 sts).
- Row 13: P all.
- Row 14: K1, K2tog, K4, SSK, K1 (8 sts).
- Row 15: P all.
- Row 16: K1, K2tog, K2, SSK, K1 (6 sts).
- Cut yarn, leaving a 12-inch / 30 cm tail. Thread the tail through the remaining 6 sts and pull closed. Seam the side from the point upward, stopping 1 inch / 2.5 cm below the top. Lightly stuff the acorn, then finish seaming the top opening.
Cap (Make 7 in Warm Brown)
- CO 16 sts.
- Knit every row for 6 rows.
- BO.
- Wrap the garter strip around the top third of the acorn, seam the short ends, and tack the lower edge to the body.
Stem
Make a 3-stitch I-cord about 1 inch / 2.5 cm long, sewing it to the center of each cap.
Garland Cord
- Make a 3-stitch I-cord 48-54 inches / 122-137 cm long, or use a tightly twisted matching cord.
- Sew acorns evenly along the cord, spacing them about 6-7 inches / 15-18 cm apart.
- Secure all joins firmly and weave in ends.
Checkpoints
- Your acorn body should measure approximately 3.5 inches tall after stuffing.
- Each garland should hold seven acorns spaced evenly along the cord.
Assembly and Joining
As you complete each acorn and cap, it’s essential to align them properly before attaching them to the cord. Ensure the acorns face the correct direction, and the garland is taut but not too tight. Remember to secure the ends while weaving them into the cord so that everything stays in place.
Finishing
After your acorns are sewn onto the garland cord, you might want to do a final check for any loose ends or untrimmed yarn tails. Weaving in those ends neatly will prevent your project from unraveling or getting tangled. If you want, you can also block the acorns gently to shape them.
Resizing
If you wish to make larger or smaller acorns, adjust the number of stitches you cast on based on your desired size. Keep in mind that the overall height of the garland will depend on the size of the acorns, which can be easily adapted based on your preferences.
Useful Variations
- For a winter theme, consider using white and gray yarn to create snow-themed acorns.
- Create a smaller garland for a tabletop display or mantle by reducing the length of the cord.
- Use a single color for a more minimalist look or experiment with gradients.
Troubleshooting
Why Is My Project Getting Wider?
Ensure that you are not accidentally adding stitches while knitting. Count your stitches regularly to maintain your stitch count.
Why Is My Fabric Curling?
If your edges are curling, try using a different stitch technique at the beginning of your rows, such as a ribbing or garter stitch.
Why Are My Color Changes Messy?
When changing colors, make sure to carry the old color along the edge properly or weave in the ends cleanly to avoid loose threads.
Frequently Asked Questions
Can I use a different yarn weight?
Yes, you can, but be mindful that this may change the overall size and appearance of your acorns.
How should I block it?
For this pattern, a gentle steam block will help flatten your acorns without altering their shape.
Can I make it larger?
You can increase the cast-on stitches and adjust the increases and decreases accordingly for larger acorns.
Is the pattern reversible?
The acorns are not reversible due to their construction, but the garland itself has a customizable orientation!
Can I use cotton yarn?
Yes, cotton yarn will work, but it may create a different texture—less softness compared to wool or acrylic.
This Harvest Knit Acorn Garland is a delightful opportunity to embrace fall creatively and add a personal touch to your seasonal decorations. Happy knitting, and enjoy this beautiful project!



