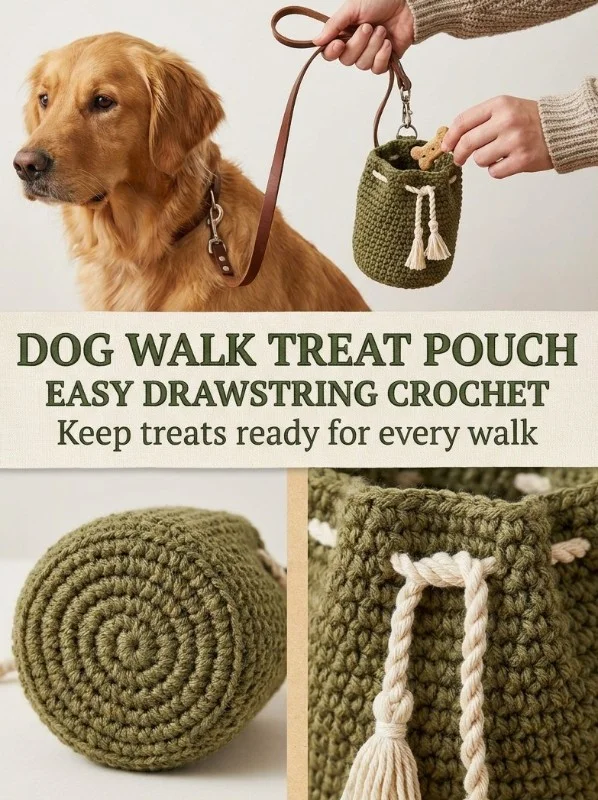
This enjoyable crochet project is the perfect blend of functionality and style. Designed with dog owners in mind, the Dog Walk Treat Pouch is a practical accessory for walks, ensuring that your furry friend is always rewarded on the go. Crafted using a simple drawstring pattern, this pouch is not only easy to make but also uses easily accessible materials, making it a great choice for crocheters of all skill levels.
The construction involves creating a magic ring to form the base, then working in rounds to build the container that will hold treats. Made from washable cotton yarn, it combines durability with an appealing look. The final result is a cute and practical pouch that can be customized in color and yarn choice, giving it a personal touch.
Pattern at a Glance
- Skill level: Easy
- Terminology: US crochet terms
- Construction: Worked in rounds
- Finished size: Approximately 4-5 inches tall
- Yarn weight: Worsted-weight #4
- Hook: 4.5mm
- Main stitch: Single crochet (sc)
- Gauge: Not critical for this project
- Motifs: N/A
- Layout: Circular pouch
- Joining: None
- Border: None
Materials
To create the Dog Walk Treat Pouch, you will need the following materials:
- Worsted-weight #4 washable cotton yarn: Use olive for the main body and cream for the drawstring.
- Hook: 4.5mm hook to work the pouch.
- Tapestry needle: For weaving in ends and sewing pieces.
- Optional: A small carabiner to attach to your bag for easy accessibility.
Yarn and Color Notes
Using washable cotton yarn is ideal for this project, particularly for its durability and easy care. Cotton is breathable, making it suitable for storing dry treats, and it’s also available in many colors, allowing for creative combinations. You might consider using a solid tone for the main pouch and a contrasting or complementary shade for the drawstring. This can lend visual interest and make the pouch a stylish accessory for your dog walks.
Finished Measurements
The finished pouch will measure approximately 4-5 inches tall. This height is practical for storing treats without being bulky, and it’s ideal for carrying in your hand or attaching to your bag. Since the size can depend on your tension while working, feel free to adjust the number of rounds in the sides if you prefer a taller or shorter pouch.
Gauge
While gauge isn’t critical for this project, it’s always good practice to check your tension. The tighter your stitches, the sturdier your pouch will be. If your gauge is considerably larger than expected, consider using a smaller hook or increasing the number of rounds until you reach the desired height.
Abbreviations
For this project, you will use the following abbreviations:
- ch: chain
- sc: single crochet
- sl st: slip stitch
- BLO: back loop only
Important Pattern Notes
Before starting the pattern, here are important points to remember:
- The magic ring technique creates a tight starting point, which is essential for avoiding gaps.
- When working in rounds, join the last stitch to the first with a slip stitch unless specified otherwise.
- For the eyelet round, make sure to adjust the final count to ensure a snug fit for the drawstring.
Special Stitches and Techniques
The main stitch utilized in this pattern is the single crochet. You will also encounter a magic ring and the back loop only technique, which creates a difference in texture at the base edge. Understanding these techniques will enhance your crochet skills and result in a more polished pouch.
Understanding the Construction
The Dog Walk Treat Pouch starts with a magic ring, which creates a compact center for the attractive circular base. The construction works in rounds to form the body, followed by a specific eyelet round for the drawstring. This simple yet effective method provides the sturdiness needed for a functional treat pouch.
Full Pattern Instructions
Foundation
- Magic ring: Create a magic ring and chain 1.
- Round 1: Work 8 sc into the ring.
- Round 2: Increase by working 2 sc in each stitch around (16 stitches).
- Round 3: Work 1 sc, 2 sc in next repeat around (24 stitches).
- Round 4: Work 2 sc, 2 sc in next repeat around (32 stitches).
- If you require a larger base, continue increasing until the desired size is achieved.
Side Rounds
- Side Round 1: Work sc in the back loop only around to create the base edge.
- Following rounds: Continue with sc evenly around without increases until the pouch measures approximately 4-5 inches tall.
Eyelet Round
- Eyelet round: Work sc in next 2 sts, chain 1, skip 1 st around. Adjust the ending as necessary to ensure pattern consistency.
- Finish with a final sc round to secure the edge.
Drawstring
- Using the cream yarn, chain 60-70 and fasten off.
- Weave the chain through the new eyelets you’ve created.
Side Hanging Loop
- Hanging loop: Chain 12 and slip stitch back along the chain.
- Sew both ends securely to the upper side of the pouch.
It is advisable to use washable yarn and always keep dry treats in a separate food-safe liner or a small bag inside the crochet pouch to maintain hygiene.
Checkpoints
- After completing the base, ensure it measures around 3 inches in diameter before continuing to the next steps.
- When you complete the side rounds, the pouch should have a height of 4-5 inches before adding the drawstring.
Assembly and Joining
There is no required assembly, as the pouch is worked seamlessly in the round. However, ensure that you secure the ends of the chains well to avoid any unraveling. The loop should be firmly sewn but not overly tight, allowing flexibility for the pouch to expand slightly when filled.
Finishing
After you finish stitching, weave in any loose ends using your tapestry needle. It’s also beneficial to give your pouch a light blocking to smooth out the stitches, especially if you used cotton yarn.
How to Resize
If you wish to make a larger or smaller pouch, consider adjusting the increasing rounds at the base. Just remember to maintain the ratio of increases (i.e., every nth stitch) so the shape remains consistent.
Useful Variations
For a different take on this project, you could:
- Utilize a single color for a classic look.
- Experiment with varying yarn textures for a more tactile experience.
- Create a mini version of the pouch for toys or smaller treats.
Troubleshooting
Why is my project getting wider?
Check to ensure you’re not inadvertently adding stitches during your rounds; this can happen with over-crocheting.
Why is my edge wavy?
This often indicates that your tension might be too loose. Try working more tightly or using a smaller hook.
Why is my fabric curling?
Curling can happen if the stitch tension is uneven. Keep your tension consistent throughout.
Frequently Asked Questions
Can I use a different yarn weight?
While #4 cotton yarn is recommended for durability, you can experiment with lighter or heavier weights, just keep in mind that your finished size and texture may vary.
Can I make it larger?
Yes! Simply add more increase rounds until you achieve your desired base size, then continue with the side rounds as instructed.
Can I make it in one color?
Absolutely! A single color can give a chic and minimalist look, making it very versatile for any occasion.
Final Thoughts
The Dog Walk Treat Pouch is an excellent project that combines practicality with creativity. This handy accessory is not only visually appealing but also incredibly useful for dog owners. With just a few rounds and simple techniques, you can create a functional pouch that brings joy to both you and your furry companion. Make sure to explore variations and techniques, as this can enhance your crochet skills while creating something special for your outings. For additional inspiration, you might also enjoy creating a Shell Trim Coin Pouch or a charming Blue Bow Bag Charm. Happy crocheting!



