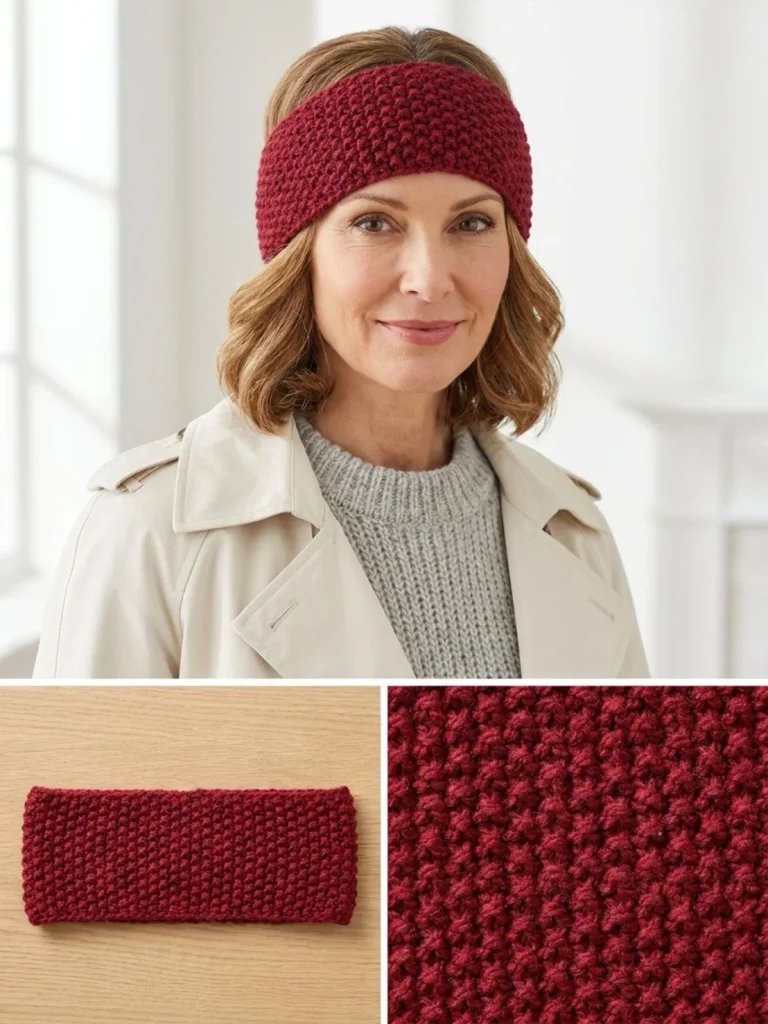
The Cranberry Moss Stitch Headband is a delightful and practical project for knitters looking to create a cozy accessory for themselves or as a heartfelt gift. This headband is perfect for adding warmth during the cooler months while still being stylish. The moss stitch provides a lovely texture that enhances the design, making it visually appealing and fun to knit. As someone who enjoys ensuring a finished piece looks neat and fits well, I find that using a slightly larger needle can help maintain the headband’s flat shape without being too tight.
Why You’ll Love This Crochet Pattern
- Easy to follow, making it suitable for beginners.
- The moss stitch creates a beautiful texture.
- Quick to make, perfect for last-minute gifts.
- Cozy and comfortable, ideal for chilly days.
- Customizable for different sizes and colors, allowing for personal expression.
Finished Size
The finished headband will measure approximately 18–19 inches (46–48 cm) in circumference; however, this may vary depending on your chosen yarn, needle size, and tension.
Skill Level
This project is categorized as beginner. It’s straightforward enough for those new to knitting but also enjoyable for intermediate knitters looking for a quick project.
Materials Needed
- Yarn: Approximately 70–90 yards of DK or light worsted yarn in cranberry red.
- Needles: Size US 6 (4.0 mm) knitting needles.
- Tapestry Needle: For weaving in ends.
- Scissors: For cutting yarn.
- Measuring Tape: To check your headband size.
Stitches and Abbreviations
- K: Knit
- P: Purl
The pattern primarily uses the knit and purl stitches, ensuring a smooth learning curve.
Gauge and Tension Notes
While gauge is not critical for this project, keeping a consistent tension will enhance the overall appearance and fit of your headband.
Pattern Notes Before You Start
This headband is knitted in rows. You’ll be working back and forth until the strip reaches the desired length. Once finished, the short ends are joined together, creating a seamless and comfortable fit.
Step-by-Step Crochet Instructions
- Cast on 17 stitches.
- Row 1: K1, *K1, P1; repeat from * to end.
- Row 2: P1, *P1, K1; repeat from * to end.
- Repeat Rows 1 and 2, maintaining the moss stitch until the strip measures 18–19 inches or the desired head circumference, allowing for slight negative ease.
- Bind off loosely in pattern.
- Sew the short ends together using mattress stitch or whip stitch.
- Weave in all ends and block lightly to ensure a neat finish.
Assembly and Finishing
Once the headband is assembled, block it lightly to help it retain its shape. This step is particularly essential for ensuring that the moss stitch texture remains defined and that any unevenness is smoothed out.
Helpful Tips
- To maintain a flat shape, avoid tightly pulling your stitches.
- Consider using a stitch marker to keep track of your rows.
- Lightly blocking the headband helps to enhance the stitch definition.
Common Mistakes to Avoid
- Be cautious about tension; too tight may distort the shape.
- Ensure you bind off loosely to prevent the edges from puckering.
- Watch for mismatched stitches; keeping consistent tension throughout is key.
Customization Ideas
- Experiment with different colors to match various outfits.
- Adjust the length for a wider or narrower headband.
- Add embellishments such as buttons or decorative stitches for added flair.
How to Use or Display This Crochet Project
The headband is not just a cozy accessory; it can also be styled with various outfits or given as a thoughtful gift. Pair it with matching mittens or a scarf for a complete winter look.
Care Instructions
For cleaning, hand wash the headband gently in cold water and lay it flat to dry. Avoid wringing or twisting the fabric, as this can alter its shape.
Frequently Asked Questions
1. Can I use a different yarn?
Yes, any DK or light worsted yarn can be used, but be sure to check your gauge for the best fit.
2. How do I ensure my headband fits?
Measure your head circumference and adjust the length of your knit strip accordingly.
3. What if I’m not comfortable with moss stitch?
You can substitute a simple knit stitch for the entire pattern, but the texture of the moss stitch truly enhances the design.
4. Can I make this headband wider?
Absolutely! Just cast on more stitches in multiples of 2 to maintain the moss stitch pattern.
By following this pattern, you’ll have a beautifully textured Cranberry Moss Stitch Headband that you can wear or gift with pride. If you’re looking for more knitting inspiration, check out this easy lace shoulder scarf pattern or try your hand at a heart texture dishcloth gift set for a wonderful addition to your knitting repertoire.



