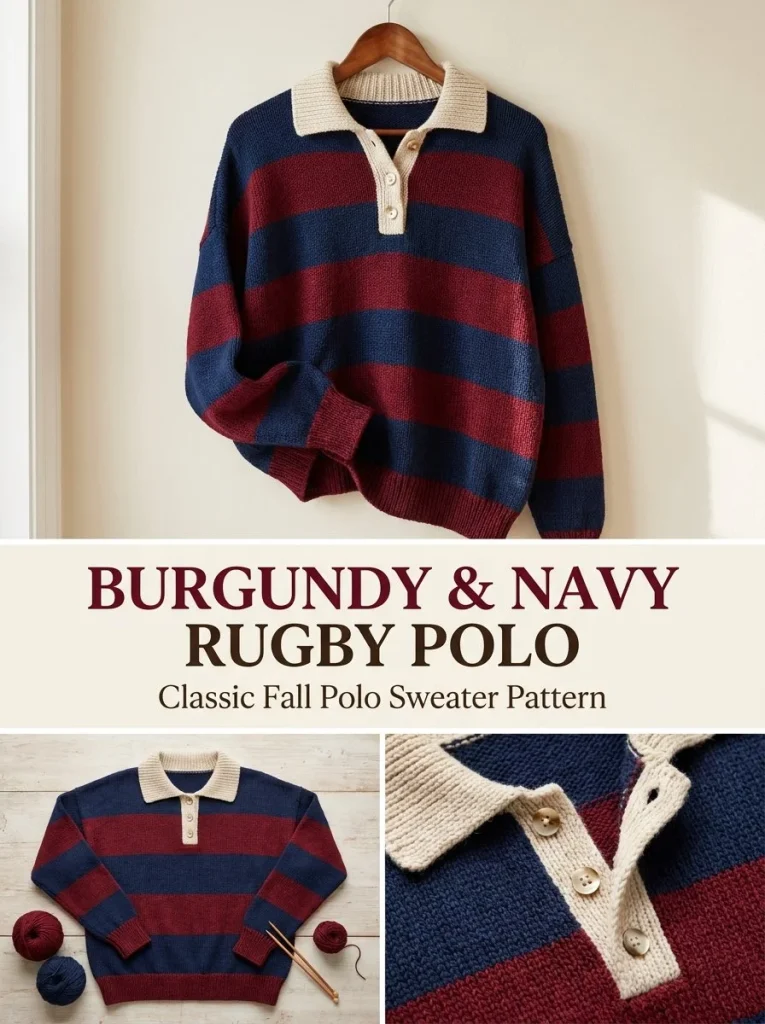
This stylish Burgundy & Navy Rugby Polo Sweater seamlessly combines casual comfort with contemporary design, ideal for any wardrobe. The striking rugby stripes in deep navy and burgundy are not only fashionable but also create a bold statement that draws the eye. With an oatmeal polo collar and a three-button placket, this sweater is perfect for layering or wearing alone. The versatility of this garment makes it a staple piece that works for various occasions, whether you’re heading to a casual brunch or a cozy night in. You may also find Burgundy Ruffle Necktie Scarf useful.
The construction of this sweater involves classic techniques, blending ribbing with stockinette stitches, resulting in a textural contrast that’s visually appealing. This pattern not only teaches fundamental knitting skills, such as casting on, decreasing, and sewing seams, but also allows knitters to customize the fit and length. If you’re passionate about knitting garments, this project can provide a great foundation to build upon.
Moreover, if you’re in the market for stylish accessories, consider exploring a few knitted items, such as the Burgundy Leaf Texture Skinny Scarf, which can beautifully complement your new sweater.
Pattern at a Glance
- Skill level: Intermediate
- Terminology: US conventions
- Construction: Worked flat in pieces, then seamed
- Finished size: Approximately 44 in / 112 cm chest, 22.5 in / 57 cm long, relaxed adult M/L
- Yarn weight: Worsted-weight merino or wool blend
- Needles: US 7 (4.5 mm) for ribbing; US 8 (5 mm) for the body
- Main stitch: Stockinette with ribbing
- Gauge: 18 stitches x 24 rows = 4 in / 10 cm in blocked stockinette on larger needles
- Motifs: Rugby stripes
- Layout: Back, front panels, sleeves, collar
- Seaming: Standard knitting seam
Materials
To make your Burgundy & Navy Rugby Polo Sweater, gather the following materials:
- Worsted-weight merino or wool blend: Approximately 850 yards in deep navy, 650 yards in burgundy, and 180 yards in oatmeal/cream.
- Needles: US 7 (4.5 mm) needles for ribbing and US 8 (5 mm) needles for the body.
- Notions: 3 small buttons, stitch markers for organization, and a tapestry needle for weaving in ends.
These materials create a cozy yet breathable fabric that’s ideal for transitioning between seasons. The worsted-weight yarn provides structure while remaining comfortable against the skin.
Yarn and Color Notes
Choosing the right yarn is crucial for this project. A merino or wool blend is ideal due to its softness and warmth, making it comfortable for daily wear. Additionally, this type of yarn has excellent drape, which helps the finished product maintain its shape while providing good stretch.
When selecting colors, the bold combination of deep navy and burgundy is stylish and classic, lending itself well to both casual and semi-formal occasions. The oatmeal accents for the collar and button placket add a nice contrast, breaking the darker colors without overcomplicating the design.
Finished Measurements
The expected finished dimensions for the sweater are:
- Chest: About 44 in / 112 cm
- Length: 22.5 in / 57 cm long
These measurements relate to a relaxed adult medium/large fit. If you’re aiming for a different size, keep these proportions in mind as you adjust your gauge and stitch count accordingly.
Gauge
Achieving the correct gauge is essential for the fit of your sweater. You should measure your gauge by knitting a swatch in stockinette stitch, which should measure 18 stitches x 24 rows over a 4 in / 10 cm square when blocked on the larger needles (US 8 / 5 mm).
If your stitches are larger than this, your sweater will turn out larger than intended; conversely, if smaller, it will be a snug fit. Adjust your needle size accordingly until you achieve the correct gauge.
Abbreviations
- K: Knit
- P: Purl
- RS: Right side
- sts: Stitches
- CO: Cast on
- BO: Bind off
Important Pattern Notes
Before diving into the knitting instructions, here are some important notes:
- Turning chains: If applicable, make sure to note if you need to add a turning chain for ribbing sections.
- Right side: The first row of stockinette will define the right side of the fabric; make sure to keep that visible throughout your construction.
- Yarn carrying: Be mindful when changing colors; cut and weave in yarn ends instead of carrying them up the sides to maintain a clean finish.
- Stitch markers: Use stitch markers generously to help keep track of rows and ensure you’re maintaining the intended stitch counts during your project.
Special Stitches and Techniques
In this pattern, you’ll primarily use the K2, P2 rib for the cuffs and hem, along with stockinette stitch for the main body. Here’s how to perform these stitches:
- K2, P2 Rib: Knit two stitches, purl two stitches; repeat this sequence across the row. This creates a stretchy fabric that holds its shape nicely at the cuffs and hem.
- Stockinette Stitch: Knit on the right side and purl on the wrong side. This creates the smooth texture used on the majority of the sweater.
Understanding the Construction
This Burgundy & Navy Rugby Polo Sweater is constructed in multiple pieces: two body sections, two sleeves, and a collar. Each section can be tackled independently, allowing for flexibility—especially if you need to take a break from knitting and pick it up later.
- Back Panel: Start with the navy yarn, working ribbing followed by stockinette with alternating stripes.
- Front Panel: Work as the back but add a placket for the buttons.
- Sleeves: Knit each sleeve separately making sure to follow the stripe pattern.
- Assembly: The sleeves are set into the drop-shoulder edges for a relaxed fit.
Full Pattern Instructions
Back Panel
Foundation:
With the navy yarn and US 7 (4.5 mm) smaller needles, cast on 100 stitches.
Row 1-12:
Work in K2, P2 rib for 12 rows.
Row 13:
Switch to US 8 (5 mm) needles. Work in stockinette stitch: knit every row.
Stripe Sequence:
Begin the rugby stripe sequence:
- Work 20 rows in navy
- Work 20 rows in burgundy
- Repeat until you reach the desired length.
End with navy.
Measurements
Continue until the piece measures 20.5 in / 52 cm from the cast-on.
Neckline:
On the next RS row, bind off center 30 stitches for the back neck. Work 35 stitches for each shoulder separately for 10 more rows and then bind off.
Front Panel
Foundation:
Repeat the back panel instructions up to the same length, stopping at 14.5 in / 37 cm.
Placket Opening:
On the next RS row, work 46 stitches, bind off 8 stitches for the placket opening, and continue with the remaining 46 stitches.
Neck Decrease:
Work the sides separately. At the neck edge, decrease 1 stitch every other RS row 11 times, so 35 stitches remain for each shoulder.
Continue to match the back panel in terms of total length and bind off.
Sleeves (Make 2)
Foundation:
With the navy yarn and smaller needles, cast on 44 stitches.
Row 1-12:
Work in K2, P2 rib for 12 rows.
Change to larger needles:
Switch to US 8 (5 mm). Follow the same stripe rhythm, as desired.
Increase:
Increase 1 stitch each side every 6th row, totaling 14 times for 72 stitches.
Measurement:
Continue straight until the sleeve measures about 18 in / 46 cm, then bind off loosely.
Assembly
- Block all pieces before assembling.
- Seam the shoulders with a tidy stitch.
- Set the sleeves into the drop-shoulder edges and sew side and sleeve seams.
Placket
Using the oatmeal yarn and smaller needles:
- Pick up about 36 stitches evenly along one side of the opening.
- Work K1, P1 rib for 8 rows and bind off.
- Repeat on the other side, making 3 evenly spaced one-row buttonholes on the right band.
- Sew bands across the bottom of the opening and add 3 buttons.
Collar
Using the oatmeal and a smaller circular needle:
- Pick up about 96 stitches around the neckline, excluding the lower placket overlap.
- Work K1, P1 rib for 20 rows, then bind off loosely so the collar folds naturally.
Finishing Touches
Weave in all ends, and block lightly to finish your piece beautifully. The finished look features deep navy and burgundy rugby stripes with an oatmeal polo collar and a three-button placket.
Checkpoints
- Your back panel should now match approximately 20.5 in / 52 cm.
- Ensure you still have 100 stitches after the ribbing section.
- After finishing the front panel, verify that it mirrors the back in total length.
- Both sleeves should be the same length, measuring about 18 in / 46 cm.
Resizing
If you wish to resize your sweater:
- Keep in mind the overall stitch count of 100 stitches for the back and adjust evenly.
- For larger sizes, consider adding to the length of the body and sleeves while maintaining the same stripe repeat.
- If a smaller size is desired, you can omit some rows between color changes.
Variations
Explore these variations to customize your sweater:
- Use a single color for a more classic look.
- Opt for lighter colors in warm weather to make a short-sleeved version.
- Experiment with varying the stripe width for a unique design.
Troubleshooting
Why Is My Sweater Getting Wider?
If you’re noticing your work stretching, check your tension and ensure you’re maintaining a consistent stitch count throughout your project.
Why Are My Color Changes Messy?
Neaten your color changes by ensuring you’re not carrying the previous color too far or by cutting and weaving in the ends correctly.
Why Is My Ribbing Curling?
If ribbing is curling, verify that you’re knitting the correct stitches—incorrect purls can lead to an uneven edge. Blocking can also help alleviate this issue.
Frequently Asked Questions
Can I use a different yarn weight?
Yes, but be aware that changing yarn weight may alter the overall size and drape of the finished garment.
Can I make it larger?
Absolutely! Just make sure to adjust your stitch count and follow the same proportionate increases and decreases.
Is the pattern reversible?
No, this sweater features a distinct right and wrong side due to the ribbing and stockinette stitches.
How should I block it?
For best results, wash your sweater gently and lay it flat to dry to maintain its shape.
Do I need a special needle for the collar?
Standard circular needles will work; just ensure you have the appropriate size for maintaining gauge.
Can a beginner make this?
It’s best suited for those with intermediate skills, but determined beginners may well rise to the challenge with the right dedication.
As you can see, this well-structured and stylish Burgundy & Navy Rugby Polo Sweater is a fantastic addition to any wardrobe. By mastering the techniques highlighted in this article, you’ll not only knit this exquisite piece but also sharpen your skills for future projects. Embrace the creativity knitting offers and explore various designs, colors, and styles, all while enjoying the process!



