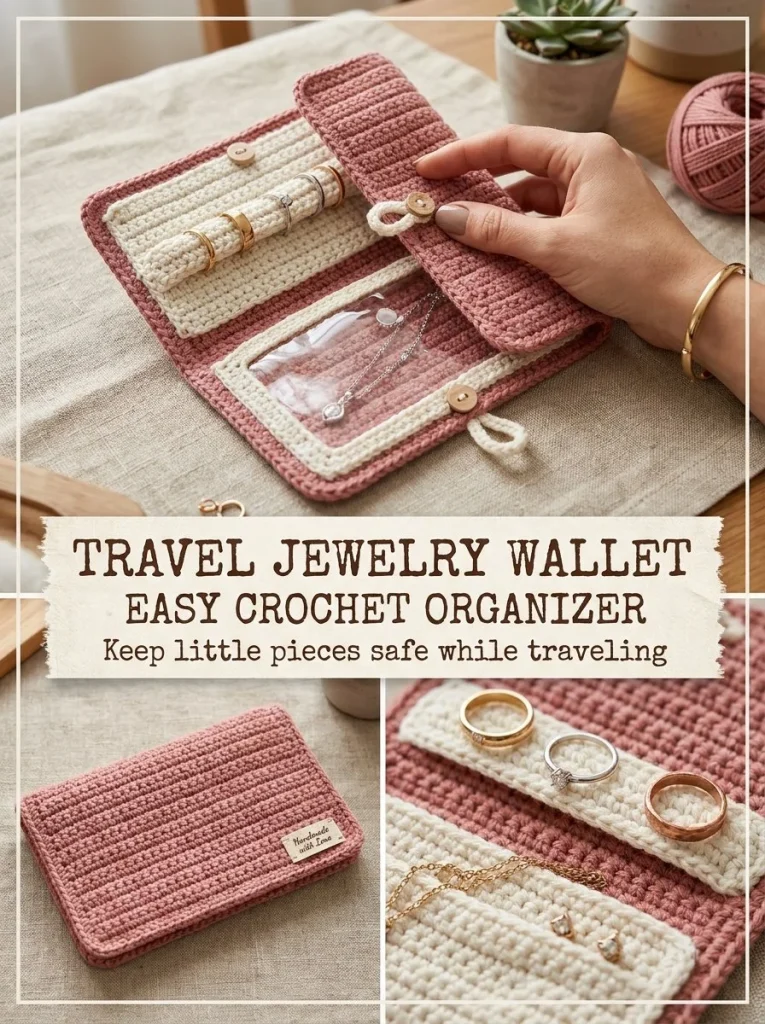
Creating a crochet travel wallet not only helps organize your jewelry when you’re on the go, but it also showcases the artistry of crochet. The Crochet Jewelry Travel Wallet is an easy-to-make accessory that beautifully combines practicality and style. This wallet features a lovely dusty rose color with a small cream pocket that stands out, making it visually appealing and functional. With the simple yet effective construction, this wallet provides ample space for rings, earrings, and other small items while ensuring that they remain tangle-free during your travels.
Embarking on this crochet project is perfect for beginners looking to enhance their skills or for seasoned crocheters wanting a quick and enjoyable make. As you follow along with the instructions, you will familiarize yourself with fundamental crochet techniques, such as single crochet (sc) and chain stitches. When completed, this travel wallet not only serves as a nifty storage solution but also makes a wonderful gift for friends and family who appreciate handmade items.
Pattern at a Glance
Skill level: Easy
Terminology: US crochet terms
Construction: Worked in rows with a folded design
Finished size: Approximately 8 x 12 inches when folded
Yarn weight: DK #3 cotton
Hook: 4mm
Main stitch: Single crochet
Gauge: Not critical for this project
Motifs: None
Layout: Straight rectangle with pockets and straps
Joining: Sewn edges for pockets and buttons
Border: None
Materials
To create your Crochet Jewelry Travel Wallet, gather the following materials:
- DK #3 cotton yarn in dusty rose: Used for the main body of the wallet. This yarn is lightweight and creates a soft, durable fabric.
- Small amount of cream yarn: This yarn is used to create the pocket and earring strip for added visual interest.
- 4mm hook: This size is ideal for working with DK weight yarn and helps achieve the proper tension for your stitches.
- 1 button: A simple button is used to secure the wallet when folded, keeping everything inside safe.
- Tapestry needle: For weaving in ends and sewing parts together.
These materials come together to form a compact yet spacious wallet tailored for your jewelry.
Yarn and Color Notes
Using a DK #3 cotton yarn is ideal for this project due to its versatility and availability in various colors. The dusty rose hue not only provides warmth but also complements a range of outfits. If you wish to personalize your wallet, consider using other colors or even a variegated yarn for an eye-catching effect. Just keep in mind that the texture and drape may slightly differ depending on the yarn you choose.
Finished Measurements
When folded, your completed wallet should measure approximately 8 x 12 inches. It is important to check your work periodically to ensure that you are on track with the dimensions as you crochet.
Gauge
For this project, the gauge is not critical. However, if you’d like a tighter fabric, ensure you are using a 4mm hook and DK weight yarn. You can measure your gauge by making a small swatch and counting the stitches per inch.
Abbreviations
- ch: chain
- sc: single crochet
Important Pattern Notes
Keep the following notes in mind as you work on your wallet:
- Turning Chains: The first chain in each row does not count as a stitch.
- Maintaining Tension: Keep a consistent tension throughout to avoid any inconsistencies in your fabric.
Special Stitches and Techniques
The primary technique utilized in this project is the single crochet stitch. This stitch creates a dense fabric, perfect for a wallet that needs to hold its shape while protecting its contents.
Understanding the Construction
This wallet is composed of a rectangular base, which is folded into thirds. The wallet features a small pocket for loose items and straps for securing rings and earrings. Understanding this construction helps visualize how the pieces relate to each other, making it easier to follow the pattern.
Full Pattern Instructions
Foundation
Begin with a foundation chain of 31 stitches. This will create the entire base of your wallet.
Row 1
Start by single crocheting in the second chain from the hook and across until the end of the row. This will amount to 30 single crochet stitches.
Continuing Rows
Continue to work in single crochet rows until the piece measures approximately 8 x 12 inches. Check your measurement regularly to ensure accuracy.
Small Pocket
With the cream yarn, chain 13. Work in single crochet rows until the piece measures approximately 3 x 3 inches. Attach this pocket to the bottom and both sides near the lower inside edge of the wallet for secure storage.
Ring Strap
For the ring strap, chain 14 and single crochet back across this chain. Once completed, sew both short ends securely to the inside of the wallet, leaving a slight space beneath the strap for the rings.
Earring Strip
To create the earring strip, chain 17, then single crochet back across this chain as well. Sew both short ends flat but leave the center open for attaching earring hooks if desired.
Assembly and Finishing
Once all components are finished, fold the base into thirds to determine where to position the button closure. Sew the button securely on the outer front. Add a chain loop to the opposite flap edge for easy access. Before folding, place your jewelry inside to ensure everything fits snugly. Be cautious to avoid heavy or sharp jewelry that might stretch the yarn.
Checkpoints
At various steps, check the following:
- Your base should measure approximately 8 x 12 inches.
- The small pocket should fit snugly at the bottom and sides.
- Each strap and earring strip should be securely sewn with enough space for their intended use.
Finishing
Once you’ve sewn everything, weave in any loose ends using your tapestry needle. Your wallet is now ready for use! You can quilt the pieces if you desire extra stability.
Resizing
For anyone looking to resize the wallet, consider adding or subtracting chains in increments of 1 to adjust the length. Adding an additional chain of 30 for the base and maintaining the same dimensional ratios will also work for a slightly larger wallet.
Useful Variations
If you’re interested in personalizing your wallet further, consider these variations:
- Use two different colors for the wallet body.
- Create a mini version to store business cards or other small items.
- Experiment with different sizes by adjusting the stitches to accommodate varying contents.
Troubleshooting
Why Is My Project Getting Wider?
This may happen due to loose tension. Try holding the yarn more snugly while crocheting to maintain a consistent width.
Why Is My Edge Wavy?
Ensure you are maintaining the same stitch count across rows; if you inadvertently decrease or miss stitches, it could cause the edges to warp.
Frequently Asked Questions
Can I use a different yarn weight?
While DK weight is recommended, you could use a lighter or heavier yarn, adjusting the hook size accordingly.
Can I make it larger?
Yes, simply increase the number of starting chains, ensuring to maintain the same proportions for the rest of the pattern.
Can a beginner make this?
Absolutely! This project is designed to be simple and straightforward, making it perfect for those new to crochet.
How should I block it?
If needed, gently steam or pin the wallet into shape and allow it to dry completely before use.
This Crochet Jewelry Travel Wallet offers fantastic functional design paired with an approachable making experience. Whether you’re using it for yourself or gifting it to a loved one, it’s sure to be a practical choice for anyone looking to keep their jewelry organized. For additional crochet projects, check out the blue pearl crochet wrist cuff pattern or the sofa arm organizer pattern to continue expanding your crochet repertoire.



