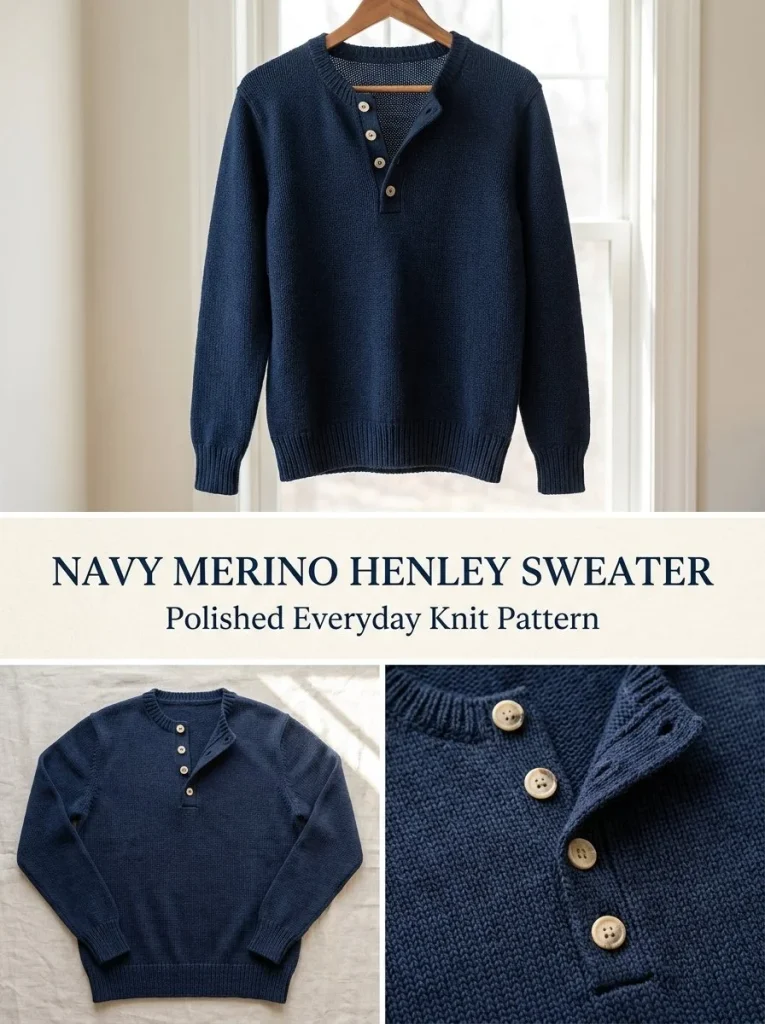
This stunning Navy Merino Henley Sweater is perfect for anyone looking to create a cozy yet stylish addition to their wardrobe. Featuring a classic henley design enhanced by elegant ribbed edges, this sweater is not only visually appealing but also functional. The use of worsted-weight merino wool ensures warmth without being overly heavy, making it a great transitional piece for various seasons. You may also find Short Sleeve Mock Neck Sweater Knitting Pattern useful.
The construction of this piece is straightforward, with a back and front panel worked separately before joining them together, allowing for a tailored fit. The ribbed cuffs and hem give the sweater a refined finish, while the four-button henley placket adds a touch of classic charm. If you’re interested in other projects, remember to check out the Pumpkin Wine Sweater gift crochet pattern for inspiration.
Pattern at a Glance
- Skill level: Intermediate
- Terminology: US knitting terminology
- Construction: Bottom-up for the body; sleeves worked separately.
- Finished size: Approximately 44 in / 112 cm chest and 23 in / 58 cm length.
- Yarn weight: Worsted
- Needles: US 6 (4 mm) for ribbing; US 7 (4.5 mm) for body
- Main stitch: Stockinette stitch
- Gauge: 20 sts x 28 rows = 4 in / 10 cm stockinette
- Motifs: None
- Layout: Front and back panels with sleeves
- Joining: Seamed at shoulders and sides
- Border: K1, P1 ribbing at neck, cuffs, and hem
Materials
To craft this lovely henley sweater, you will need the following materials:
- Yarn: 1450 yards of deep navy worsted-weight merino wool
- Needles:
- US 6 (4 mm) for ribbing
- US 7 (4.5 mm) for the body
- Buttons: 4 oatmeal or natural-shell buttons
- Notions:
- Stitch markers
- Tapestry needle for sewing and weaving in ends
Each material plays a significant role in ensuring the quality and fit of your sweater, particularly the yarn, which should offer warmth and slight elasticity.
Yarn and Color Notes
When selecting yarn, it’s crucial to choose one that provides the warmth and drape needed for a sweater. Merino wool is favored for its softness, breathability, and excellent insulation properties. The deep navy color is versatile, making it easy to pair with various outfits. For those who prefer color variations, consider using different shades of blue for stripes or accents.
Finished Measurements
The finished measurements for the sweater are approximately:
- Chest: 44 in / 112 cm
- Length: 23 in / 58 cm
Ensure that you check your gauge before beginning, as accurate measurements depend significantly on this.
Gauge
It’s essential to achieve 20 sts x 28 rows = 4 in / 10 cm in stockinette stitch to ensure proper sizing. Remember to measure your gauge over the stockinette section after blocking, as this will provide a more accurate picture of how the finished piece will fit.
If your gauge is larger than specified, this could result in a bigger sweater; conversely, if it’s smaller, the garment will fit tightly. Adjust your needle size accordingly if you find a discrepancy.
Abbreviations
- K – Knit
- P – Purl
- RS – Right Side
- WS – Wrong Side
- sts – Stitches
Important Pattern Notes
- Use stitch markers to denote the beginning of each round or section of work.
- Always check the wrong and right sides to avoid ambiguity when assembling the sweater.
- Ensure to maintain the established stitch count throughout to avoid any sizing issues later.
Special Stitches and Techniques
This project relies mainly on the fundamental knit and purl stitches. The following techniques are crucial:
- Ribbing: Used for all edges, creating a stretchy and textured finish.
- Stockinette Stitch: This basic stitch is formed by alternating rows of knit and purl stitches.
If you’re new to these stitches, consider practicing them on a swatch before starting the main project.
Understanding the Construction
This henley sweater is constructed from separate components: a back panel, a front panel, and sleeves. The back is worked first, followed by the front, which incorporates a henley opening. These parts are then assembled and finished with ribbed neck and sleeve bands. This approach allows for better fitting and finishing, ensuring that the project is both functional and fashionable.
Full Pattern Instructions
Foundation
Begin by gathering all materials and ensuring your gauge is correct.
Back
- With smaller needles, cast on 110 sts.
- Work in K2, P2 ribbing for 12 rows.
- Switch to larger needles and continue in stockinette until the piece measures 23 in / 58 cm.
- Bind off the center 34 sts for the neck, then bind off 38 sts for each shoulder.
Front
- Work as you did for the back until it measures 14.5 in / 37 cm.
- On the next RS row, work 51 sts, bind off 8 sts for the henley opening, then work the remaining 51 sts.
- Continue working each side separately.
- At 18.5 in / 47 cm, begin neck shaping:
- Bind off 8 sts once, 4 sts once, and 2 sts once.
- Then decrease 1 st three times.
- Continue until the front is the same length as the back, leaving 34 sts for each shoulder; bind off.
Sleeves
- With smaller needles, cast on 46 sts.
- Work in K2, P2 ribbing for 12 rows.
- Switch to larger needles and increase 1 st at each side every 7th row a total of 15 times to reach 76 sts.
- Continue until the sleeve measures 18 in / 46 cm, then bind off.
Assembly
- Join the shoulders, set the sleeves into the armholes, and seam together the body and sleeves.
- For henley bands, with smaller needles, pick up approximately 40 sts along each side of the neckline.
- Work K1, P1 rib for 8 rows.
- On the right band, create 4 evenly spaced buttonholes over rows 3-4.
- Overlap the bands neatly at the bottom and secure.
Neckband
- Pick up about 100 sts around the remaining neckline.
- Work in K1, P1 rib for 7 rows and bind off.
Final Touches
- Sew on all 4 buttons.
- Block lightly to finish.
With a clean and classic design, this henley sweater is sure to become a staple in your wardrobe.
Resizing
To resize the sweater, you can modify the starting stitch count while keeping in mind the gauge. For every 10 stitches you adjust, you will change the width of the sweater by approximately 1 inch. If you want a longer body or sleeves, simply measure the length you desire and adjust your rows accordingly.
Useful Variations
Consider making variations of this pattern by:
- Creating a two-color version with contrasting ribbing.
- Adapting it to short sleeves for warmer weather.
- Adding additional buttons or a different style of buttonholes for a unique touch.
Troubleshooting
Why Is My Neckline Too Tight?
Be sure to check that you are picking up enough stitches around the neckline. If you are too tight, try a larger needle size for that section.
Why Are My Edges Wavy?
This often occurs due to discrepancies in tension. Make sure to maintain a consistent tension throughout, especially when transitioning between knitting styles.
Why Is My Sweater Growing Wider?
If you notice your piece widening unexpectedly, check your stitch count regularly and ensure you are not skipping stitches.
Frequently Asked Questions
Can I use a different yarn weight?
While it’s best to use worsted-weight yarn for this pattern, you could opt for a lighter or heavier weight by adjusting your stitch count and gauge accordingly.
Can a beginner make this?
This pattern is categorized as intermediate due to the shaping involved. Beginners might consider attempting the ribbing and stockinette stitches before tackling the full project.
How should I block it?
Lightly steam blocking is recommended to shape your sweater without stretching it out of proportion.
By following this detailed guide, you will not only create a beautiful Navy Merino Henley Sweater but also enhance your knitting skills in the process. Enjoy your crafting journey!



