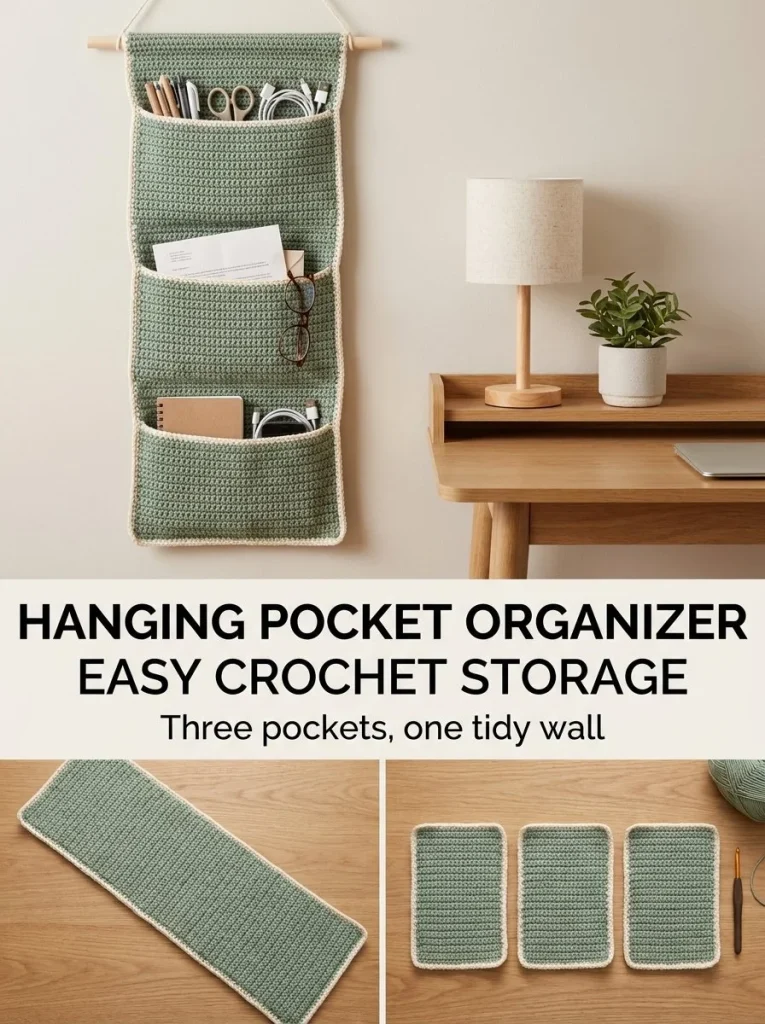
Creating a hanging pocket organizer is a fantastic way to add both functionality and charm to your home. The Sage Hanging Pocket Organizer comprises three generously sized pockets and showcases a lovely sage green color that promotes a calming atmosphere. This wall storage solution is perfect for holding various items, from gardening tools to children’s toys, and can be customized to match your decor while being relatively easy to crochet. You may also find Blue Bow Bag Charm Cute Easy Crochet Accessory Pattern useful.
This project is an excellent introduction for beginners into the world of crochet. It combines foundational stitches with simple construction techniques, allowing you to practice while producing a functional item. The finished organizer not only serves a practical purpose but is also a beautiful decorative piece for your wall. If you’re just starting with crochet, you might find it beneficial to explore our easy hooded crochet cardigan patterns as well.
Pattern at a Glance
Skill level: Beginner
Terminology: US crochet terms
Construction: Worked in rows with pockets sewn onto the backing
Finished size: Approximately 12 in wide, 30 in long
Yarn weight: Worsted-weight #4
Hook: 5mm
Main stitch: Single crochet (sc)
Gauge: 14 sc = 4 in/10 cm
Pockets: 3
Materials
To create your Sage Hanging Pocket Organizer, you will need the following materials:
- Worsted-weight #4 cotton yarn in sage green (main color)
- Small amount of cream yarn (for pocket edging)
- 5 mm crochet hook
- Tapestry needle for weaving in ends
- 12-14 in wooden dowel for hanging
- Hanging cord
- Gauge: Approximately 14 sc = 4 in/10 cm
Each material plays an integral role in achieving the final look and functionality of your organizer. For instance, cotton yarn is a great choice due to its durability and ease of care, making it ideal for a piece that will likely see regular use.
Yarn and Color Notes
Choosing the right yarn and color scheme can significantly impact the aesthetic of your hanging pocket organizer. The sage green cotton offers a soft, natural vibe that pairs beautifully with a variety of colors, particularly light creams and other pastels. Consider varying the yarn texture or combining solid colors with variegated yarn to create visual interest.
Finished Measurements
Upon completion, your organizer will measure approximately 12 inches in width and 30 inches in length. The size of the pockets will be around 5-6 inches tall, providing adequate space for a multitude of items. It’s essential to keep these measurements in mind while crocheting to ensure everything fits as intended.
Gauge
The gauge for this project is 14 sc over 4 inches (10 cm). It’s crucial to check your gauge for optimal results, especially if you are making this to fit a specific space. Here’s how to ensure proper gauge:
- Crochet a Swatch: Begin with a small swatch of stitches using your yarn and hook.
- Measure Your Gauge: After blocking, measure the number of stitches across 4 inches.
- Adjust Your Hook Size if Necessary: If you have more stitches than 14, try a larger hook; if you have fewer, try a smaller one.
Getting the gauge right helps to ensure that your finished piece matches the intended dimensions.
Abbreviations
- ch: chain
- sc: single crochet
- st(s): stitch(es)
- sl st: slip stitch
- rep: repeat
Important Pattern Notes
- Turning Chains: In this pattern, the chain does not count as a stitch.
- Right Side / Wrong Side: The right side is the side you want to display, typically the side facing out.
- Edging: The cream edging is optional and can add a beautiful contrast to your sage pockets.
Special Stitches and Techniques
The primary technique you will use in this project is single crochet (sc). This foundational stitch is essential for various crochet projects. Here’s a quick recap:
- Single Crochet (sc): Insert the hook into the stitch, yarn over and pull up a loop, yarn over again and pull through both loops.
Understanding the Construction
The construction process consists of two main parts: the backing and the pockets. The backing forms a long rectangle, while the pockets are shorter rectangles sewn onto it. You will start by crocheting the backing size you need and then create three pockets of equal width.
Full Pattern Instructions
Foundation
- Backing:
- Chain 43, or enough to achieve approximately 12 inches in width.
- Single crochet in the second chain from the hook and across the row.
- Continue crocheting single crochet rows until your backing measures approximately 28-30 inches long.
- Fasten off.
Pockets
- Make 3 pockets:
- Using the same stitch count as for the backing, chain 43.
- Work single crochet rows until each pocket measures approximately 5-6 inches tall.
- Place the first pocket 2 inches above the bottom edge of the backing and sew along the bottom and both sides, leaving the top open.
- Position the second and third pockets evenly above the first and sew in the same manner.
- If desired, add cream single crochet edging to the tops of the pockets for a finished look.
Finishing
- Preparation for Hanging:
- At the top of the backing, fold approximately 1.5 inches over the wooden dowel and sew the edge to the back to create a casing. Alternatively, you can crochet a row around the dowel.
- Thread the hanging cord onto both ends of the dowel and knot securely.
Checkpoints
- After completing the backing, ensure it measures approximately 28-30 inches long.
- Each pocket should consistently measure 5-6 inches tall.
- The placement of pockets should be even and aligned prior to sewing.
Assembly
To assemble your hanging pocket organizer:
- Align your pockets along the backing and ensure they are evenly spaced.
- Use a tapestry needle to sew pockets into place, reinforcing the seams for durability.
- Make sure the edges are aligned and the top of the pockets remains open for item storage.
Finishing
To add the final touches:
- Consider blocking your finished piece for a polished appearance.
- Weave in all loose ends with your tapestry needle.
- You may choose to add embellishments or extra touches, such as a decorative stitch along the pockets.
How to Resize
If you’d like to customize the size of your hanging pocket organizer:
- To increase or decrease width, adjust your foundation chain accordingly (maintaining the same number of stitches in the pockets).
- To alter the height, continue adding or reducing rows in both the backing and the pockets, ensuring they remain proportionate.
Useful Variations
Once you’ve mastered this pattern, consider trying some variations:
- Create a larger organizer with more pockets.
- Use different colors to reflect seasonal changes.
- Experiment with yarn texture for added dimension.
Troubleshooting
Why Is My Project Getting Wider?
This can happen if you’re adding extra stitches unintentionally. Ensure your stitch count is accurate at the end of each row.
Why Is My Edge Wavy?
Wavy edges often result from incorrectly counting stitches or changing your tension. Make sure to maintain even tension and stitch counts.
What If My Pockets Are Uneven?
If your pockets do not line up, try measuring the distance from the bottom of the piece again and re-adjust. Consistent spacing during assembly is key.
Frequently Asked Questions
Can I use a different yarn weight?
Yes, but be aware that it may affect the finished size and structure. Always check your gauge.
Can I make it larger?
Absolutely! Consider altering your foundation chain and height for the pockets as needed.
Is the pattern reversible?
This design is primarily functional with a specific right side facing outward.
How should I block it?
Blocking can be done with steam or by soaking and laying flat to shape. Ensure no pins are left in place for too long to avoid shape distortion.
Do I need a special hook?
A standard 5mm crochet hook is ideal for this project, but always check gauge to ensure your materials match.
Can a beginner make this?
Yes, it’s a great project for beginners to get comfortable with single crochet and basic assembly techniques.
In conclusion, creating your own Sage Hanging Pocket Organizer is a rewarding crochet project that combines utility and style. It can be adapted in various ways to fit your specific needs and decor, making it a truly personalized addition to your home. Happy crocheting!



