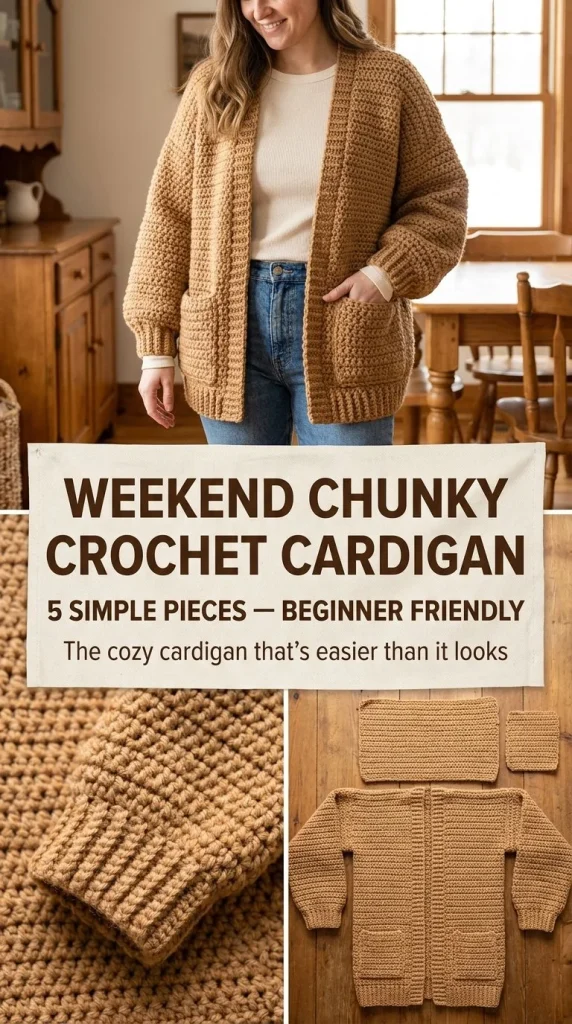
The Weekend Chunky Crochet Cardigan is a perfect project for beginners looking to create a stylish and cozy oversized cardigan. With its simple construction and the use of super-bulky yarn, this pattern allows for quick progress and a rewarding finished product. If you’re new to crocheting or simply looking for a relaxing weekend project, this cardigan will have you feeling warm and fashionable in no time. As you work through this pattern, you might also find inspiration in other beginner-friendly projects like the cherry blossom hair comb.
Skill Level
Beginner – This project is suitable for those new to crochet, as it relies primarily on basic stitches and simple construction techniques.
Materials
To create your Weekend Chunky Crochet Cardigan, you will need the following materials:
- Super-bulky #6 yarn
- 9mm crochet hook
- 3 large buttons
- Tapestry needle
- Stitch markers
- Measuring tape
- Gauge: approximately 8-9 hdc = 4 in/10 cm
Abbreviations — US Terms
- ch – chain
- sl st – slip stitch
- sc – single crochet
- hdc – half double crochet
- st(s) – stitch(es)
- sp – space
Special Stitches
Half Double Crochet (hdc)
- Yarn over, insert the hook into the indicated stitch or space.
- Yarn over again and pull through (3 loops on the hook).
- Yarn over once more and pull through all 3 loops on the hook.
Gauge
The gauge for this project should be around 8-9 hdc per 4 inches (10 cm). It’s important to achieve this gauge to ensure your cardigan fits properly.
Finished Size
This cardigan is designed to have a relaxed fit. The finished size will depend on the chosen bust measurement with 8–12 inches of positive ease. Measure and adjust your pieces accordingly.
Pattern Notes
- The cardigan is worked in rows and consists of one back rectangle and two front rectangles.
- You’ll also create two wide sleeve rectangles and pockets.
- Be sure to use stitch markers to keep track of your rows, especially when creating buttonholes.
Crochet Instructions
Part 1 – Back Rectangle
Begin by calculating the back width. If your finished bust measurement is 40 inches, the back width will be 20 inches.
Foundation Chain:
- Chain to the width of the back plus additional chains for turning (e.g., 20 ch for back width + 2 ch for turning).
Row 1
- Hdc in the 3rd ch from the hook and in each ch across.
- Turn.
Total: 18 hdc (assuming you began with 20 ch).
Rows 2-?
- Ch 2 (this counts as the first hdc).
- Hdc in each st across.
- Turn.
- Repeat until the rectangle reaches your desired hip length (about 26–30 inches recommended).
Part 2 – Front Rectangles
Each front panel will be based on 1/4 of your finished bust measurement.
Foundation Chain:
- For a 40-inch bust, your front width will be 10 inches. Chain accordingly to cover that width, plus 2 chains for turning.
Row 1
- Hdc in the 3rd ch from hook and each ch across.
- Turn.
Rows 2-?
- Ch 2.
- Hdc in each st across.
- Turn.
- Repeat until each front panel reaches the desired length.
Part 3 – Sleeves
For the sleeves, you’ll want to create two wide rectangles that accommodate the upper arm.
Foundation Chain:
- Chain enough to reach the desired width (approximately 12 inches).
Rows 1-?
- Hdc as previously described, continuing until the desired sleeve length is achieved (about 15–18 inches).
Assembly
- Seam the front panels to the back at the shoulders, leaving the neck opening.
- Align the center of one sleeve over each shoulder seam and attach.
- Seam from the wrist to the underarm, running down the body side.
Creating Pockets
For pockets, make two rectangles about 7-8 inches square.
- Attach a pocket rectangle to each lower front panel using the tapestry needle for sewing.
Button Band and Cuffs
- Around the front edges and back neck, work 4-6 rows of sc or hdc.
Buttonholes:
- Create exactly 3 evenly spaced buttonholes on one front band, then sew 3 large buttons on the opposite side.
Ribbed Cuffs (Optional)
- For ribbed cuffs, you may add an extra few rows in hdc or switch stitches to sc for texture.
Finishing
- Weave in all ends with a tapestry needle.
- Lightly block the cardigan to shape it if necessary.
- For maintenance, check your yarn label for care instructions.
If you enjoy this beginner-friendly cardigan, you might also want to explore making a crochet belt pouch, which can be a great companion accessory!
Care
To care for your cardigan, refer to the yarn label for specific washing instructions. As a general rule, hand wash in cold water and lay flat to dry to maintain its shape and integrity.
By following these detailed instructions, you should have everything you need to create your own Weekend Chunky Crochet Cardigan. Enjoy the process and have fun experimenting with colors and textures to make this piece uniquely yours!



