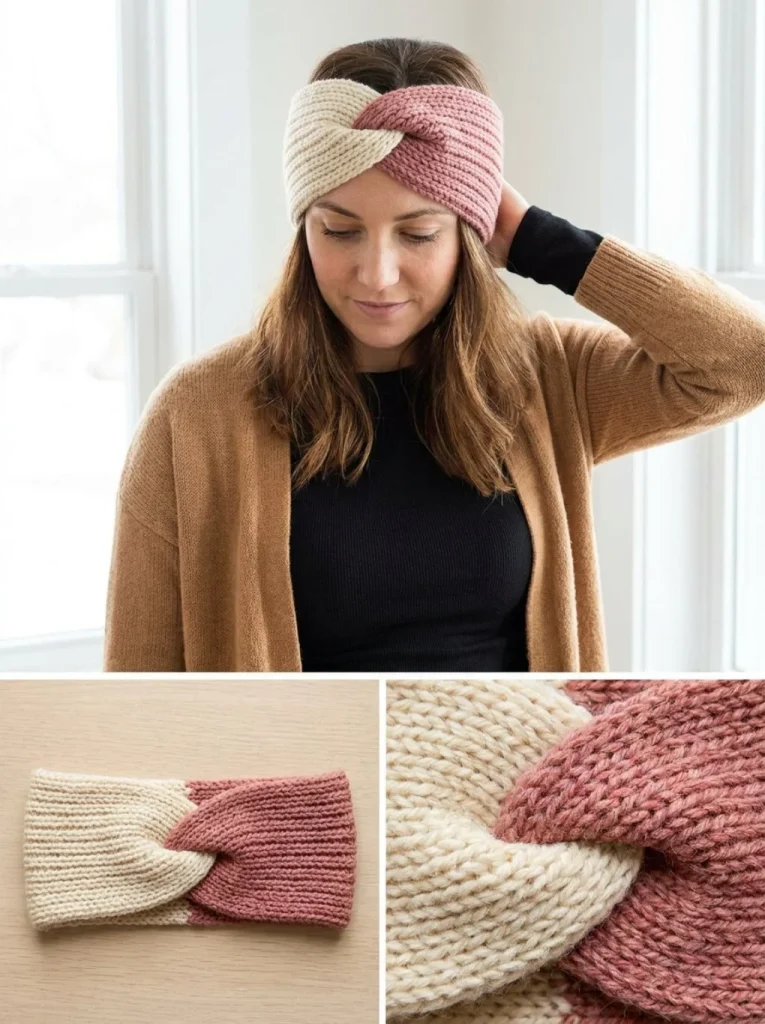
This Two-Tone Twist-Front Headband is a delightful project that combines functionality with style. Perfect for keeping your ears warm during chilly days, it adds a touch of charm and color to any outfit. The twist-front design not only looks great, but it also ensures a snug fit, making it an ideal gift for friends and family. One of the best parts about this headband is how beginner-friendly it is, allowing those new to knitting to create something truly beautiful. Plus, with just two simple colors, you can have your own unique version. If you are looking for a little extra inspiration, check out the cranberry moss stitch headband knitting pattern for another wonderful head accessory.
Why You’ll Love This Crochet Pattern
- Works up quickly, making it perfect for last-minute gifts.
- Features a stylish twist-front design that adds flair.
- Made with worsted yarn, ensuring warmth and comfort.
- Easy to customize with different colors and sizes.
- A practical accessory that is both cozy and chic.
Finished Size
The finished size of the headband is approximately 19–20 inches (48–51 cm) in length and 4 inches (10 cm) in width. Keep in mind that size may vary depending on your yarn choice, hook size, and knitting tension.
Skill Level
This project is classified as beginner-friendly. It is ideal for novice knitters looking to practice basic knits and purls, with clear instructions guiding you through each step.
Materials Needed
- Worsted (#4) yarn: about 60 yd / 55 m in warm cream and 60 yd / 55 m in dusty rose
- US 7 (4.5 mm) knitting needles
- Tapestry needle
- Scissors
Stitches and Abbreviations
- K: Knit
- P: Purl
- Sts: Stitches
Gauge and Tension Notes
While gauge is not crucial for this project, maintaining an even tension will help achieve a consistent look. A relaxed grip can help yield a softer finish.
Pattern Notes Before You Start
The headband is knitted in rows, switching colors midway through. Pay special attention to the twist seam, as it creates the unique front design. Also, adjust the length if your head circumference is notably different, knitting the strip about 1.5–2 inches (4–5 cm) shorter for a comfortable fit.
Step-by-Step Crochet Instructions
- Cast On: Cast on 18 stitches using the warm cream yarn.
- Work the Ribbing: For every row, *K1, P1; repeat from * across until the cream section measures 9.5–10 inches (24–25 cm).
- Change Color: At the beginning of the next row, switch to the dusty rose yarn. Continue the 1×1 ribbing until the full strip measures 19–20 inches (48–51 cm).
- Bind Off: Bind off in pattern using the dusty rose yarn.
- Form the Twist Seam: Lay the strip flat with the right side facing up. Bring the two short ends together and fold each in half lengthwise.
- Interlock the Ends: Interlock the folded ends so they alternate: one half of End A, one half of End B, the remaining half of End A, and the remaining half of End B.
- Sew the Ends: Sew straight across all four layers several times with matching yarn.
- Turn the Seam: Flip the seam to the inside, with the interlocked part forming the front twist and showcasing both colors.
- Finishing Touches: Weave in any loose ends and gently shape your finished headband.
Assembly and Finishing
To ensure a polished look, focus on weaving the ends in neatly. After shaping, make sure to check the fit and adjust based on your preference for snugness.
Helpful Tips
- When casting on, try to avoid pulling the yarn too tightly, as it can restrict your stitches later.
- Use a contrasting color yarn for your tail if you find it hard to see and weave in the ends neatly.
- Always check your tension, as this will help you create a more consistent finish.
- If your twist isn’t sitting as you’d like, adjust the layers to enhance the shape.
Common Mistakes to Avoid
- Forgetting to alternate the ends may lead to uneven layers. Always double-check your interlocks.
- Not binding off properly can cause the edges to curl.
- Not measuring your head circumference correctly can lead to an ill-fitting headband.
Customization Ideas
- Experiment with different color combinations for a unique look.
- Add decorative elements like buttons or embroidery.
- Consider using yarns with different textures for added interest.
- Adjust the size by increasing or decreasing the number of stitches cast on.
How to Use or Display This Crochet Project
This headband is perfect for everyday wear, outdoor activities, or simply lounging around at home. It makes a lovely gift for birthdays or holidays, and can also be used to accessorize various outfits.
Care Instructions
To clean the finished headband, hand wash in cold water with a mild detergent. Lay it flat to dry to maintain its shape and appearance.
Frequently Asked Questions
-
Can I use different yarn weights?
Yes, but keep in mind that it may affect the size and fit of your headband. -
What if I want to make a larger size?
You can easily adjust the number of stitches cast on, keeping in mind the tension. -
How do I store my knitted headband?
Store it flat in a drawer to avoid stretching. -
Can I use this pattern for a child’s headband?
Absolutely! Just adjust the cast-on stitches for a smaller fit.
This Two-Tone Twist-Front Headband is sure to be a staple accessory for yourself or a loved one. For another fantastic knitting project, check out the acorn brown keyhole scarf knitting pattern. Enjoy your crafting!



