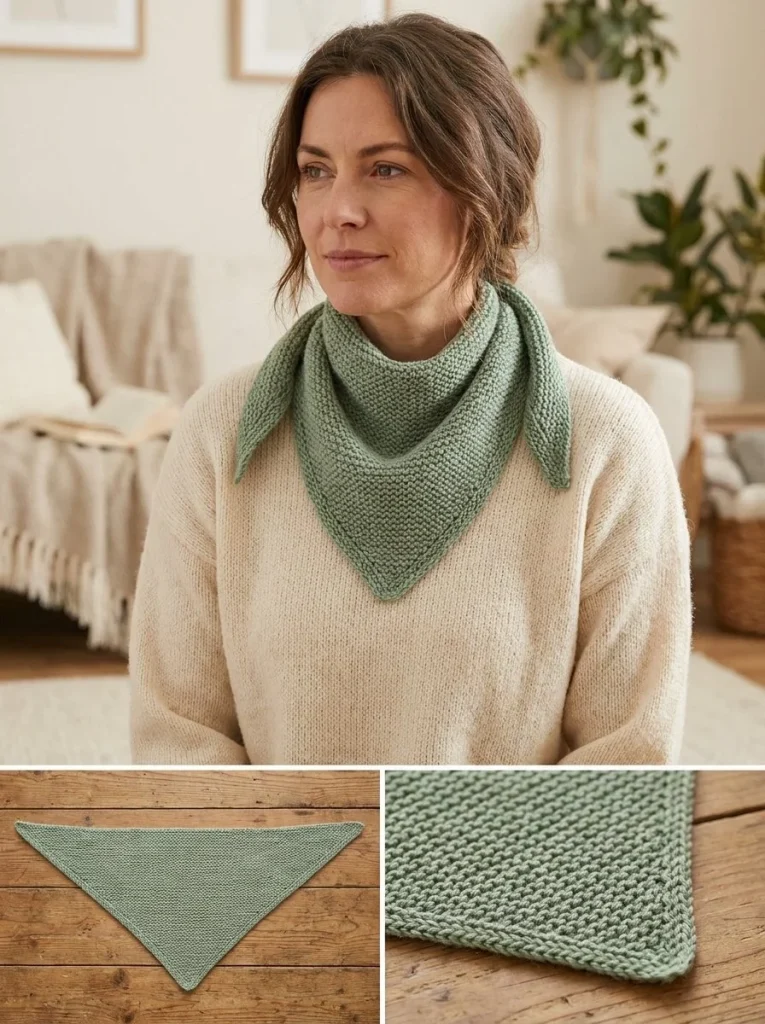
The Moss-Stitch Mini Neckerchief is an adorable and practical accessory that’s perfect for both new crocheters and those with a bit more experience looking for a quick project. With its cozy texture and stylish design, this neckerchief adds a wonderful touch to any outfit, making it a fantastic gift or a lovely addition to your personal wardrobe. One of my favorite parts about making this piece is how the moss stitch creates a beautiful, textured fabric that’s easy to work with and looks great once completed. Plus, it’s an excellent way to practice your increasing skills while creating a wearable item. You may also find Cottagecore Lace Mini Doily Hair Clip Lace Hair Clip useful.
Why You’ll Love This Crochet Pattern
- This pattern is beginner-friendly, encouraging new crocheters to build confidence in their skills.
- The unique moss stitch texture offers visual interest and a cozy feel.
- It’s a quick project that can be finished in just a few hours, perfect for those last-minute gifts.
- The neckerchief design allows for versatility in styling; wear it tied snug at the neck or draped loosely.
- The use of DK-weight yarn makes it a lightweight accessory suitable for various seasons.
Finished Size
The finished size measures approximately 75 cm across the top edge and 27–30 cm deep at the center point. Remember that the size may vary depending on your chosen yarn, hook size, and tension.
Skill Level
This project is suitable for beginners, as the moss stitch is easy to master, allowing crafters to get comfortable with increasing and maintaining stitch patterns.
Materials Needed
- DK-weight cotton-wool blend yarn (approximately 90–120 m)
- 4 mm knitting needles
- Tapestry needle
- Scissors
Stitches and Abbreviations
- K: Knit
- P: Purl
The moss stitch is created by alternating knit and purl stitches, which gives the piece its textural element.
Gauge and Tension Notes
While gauge isn’t crucial for this project, ensuring that your tension is consistent will help the finished piece maintain its shape. Aim to keep your stitches even to avoid puckering.
Pattern Notes Before You Start
This neckerchief is worked in rows, forming a triangle shape through increases. You’ll work in a knit 1, purl 1 moss stitch across the right-side rows, while wrong-side rows are completed without additional increases. Pay attention to keep the first and last stitches knitted for neat edges.
Step-by-Step Crochet Instructions
- Cast on 3 stitches.
- Begin the first right-side row by knitting the first edge stitch, then increase by knitting into the front and back of the next stitch. Follow with the moss stitch across the row, increasing one stitch before the final edge stitch, then knit the last stitch.
- On the wrong-side rows, maintain the established moss stitch without increasing.
- Continue this pattern, increasing on every right-side row and maintaining stitches on wrong-side rows, until the top edge measures about 75 cm or the center depth reaches about 28 cm.
- Bind off loosely, weave in ends, and lightly block into a clean triangle shape.
- Finally, tie the narrow ends neatly at the neck.
Assembly and Finishing
Ensure your edges are neat by weaving in any loose ends with a tapestry needle. If the piece is curling, light blocking should help flatten it out into shape. This step helps the finished item look polished and professional.
Helpful Tips
- When increasing stitches, make sure to do it evenly to maintain a balanced shape.
- Use a loose bind-off to help the edges remain flexible and prevent tightness that could distort the shape.
- For a more polished look, consider steaming or lightly pressing your finished piece with an iron on a low setting.
- Experiment with different yarn colors or textures to customize the look of your neckerchief.
Common Mistakes to Avoid
- Be careful not to skip the edge stitches; they keep your edges tidy and prevent fraying.
- Avoid pulling your stitches too tightly; this can lead to puckered edges or uneven tension.
- If you’re having trouble with the moss stitch, practice a small swatch before starting the project to get comfortable with the pattern.
Customization Ideas
- Change up the yarn color to match your wardrobe or seasonal trends.
- Experiment with different yarn textures, such as a soft alpaca or trendy cotton, for varied effects.
- Add embellishments like tassels or decorative buttons for a unique twist.
- Consider resizing the neckerchief for a tighter fit or a more relaxed drape.
How to Use or Display This Crochet Project
The Moss-Stitch Mini Neckerchief is easily styled for any occasion. Wear it for added warmth during chilly days or as a fashion statement that complements your outfit. It also makes a thoughtful gift, showcasing your creativity and crafting skills.
Care Instructions
To keep your neckerchief looking fresh, hand wash in cold water with a mild detergent. Lay it flat to dry, avoiding direct sunlight to preserve the color and texture of the yarn.
Frequently Asked Questions
-
Can I use different yarn weights?
Yes, but be aware it will change the final size and drape of your project. -
What are the best methods for blocking my finished piece?
Lightly misting it with water and arranging it flat can help maintain its shape. -
How can I ensure my edges stay neat?
Always remember to knit the first and last stitches of each row. -
Is this pattern adaptable for larger sizes?
Yes, you can increase the initial stitch count to create a larger neckerchief.
This Moss-Stitch Mini Neckerchief is a delightful project with plenty of opportunities for customization and creativity. For an additional crochet project to complement it, consider checking out the Horizontal Ridge Mini Scarf knitting pattern. Happy crocheting!



