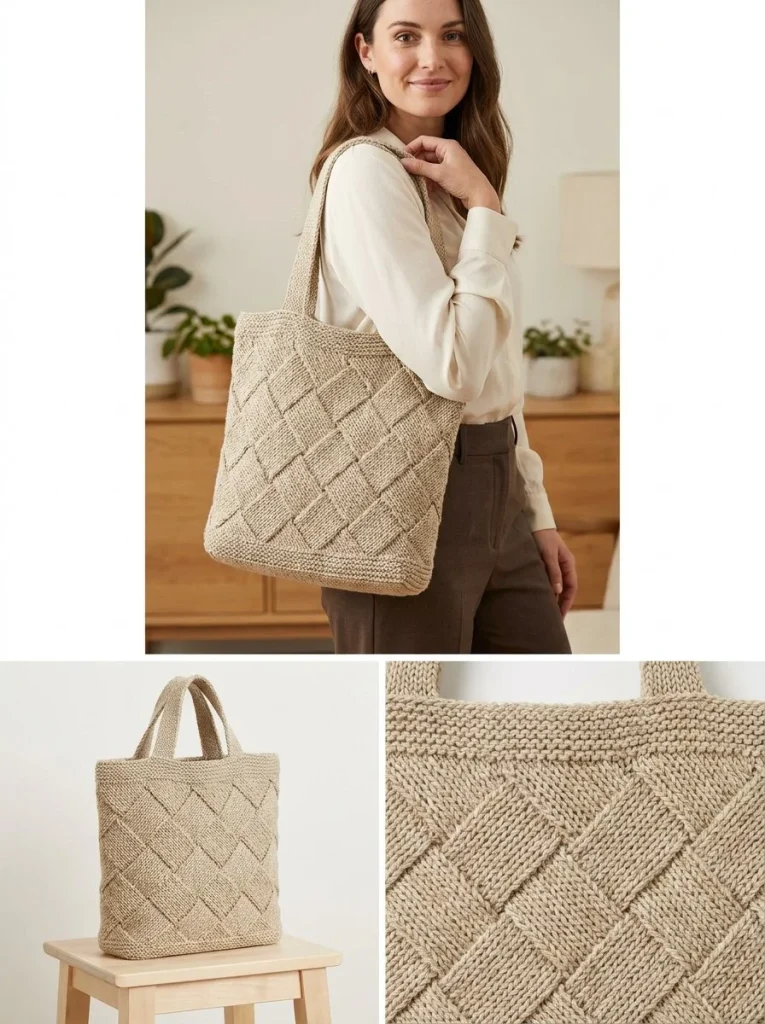
This diagonal basketweave knit tote offers a stylish yet practical accessory that fits perfectly into everyday life. Designed with simple panels worked in a textured diagonal basketweave stitch, it provides cozy durability while being surprisingly lightweight. The subtle interplay of knit and purl stitches creates a unique fabric that resists flattening, giving the tote a lovely hand-crafted feel that’s both eye-catching and sturdy. I appreciate how the 8-row pattern repeat brings dimension without overwhelming a beginner, making this a great stepping stone to knitting more textured projects. If you’ve enjoyed crocheting smaller accessories before, such as delicate floral hair combs, you’ll find this tote a satisfying way to expand your skills with a functional, wearable piece. Its neutral yarn choice in cotton-blend worsted weight creates a lovely structure, ideal for carrying everything from daily essentials to library books.
Why You’ll Love This Crochet Pattern
- Creates a sturdy, wearable tote with a fresh diagonal basketweave texture
- Uses straightforward knit and purl combinations that build beginner-friendly skills
- Includes clear steps to knit two matching panels and assemble them by seaming
- The garter stitch borders frame the texture nicely and keep edges tidy
- Handles are simple to knit but strong enough to hold everyday items securely
- Suitable for worsted-weight cotton yarn, making it easy to care for and durable
Finished Size
The completed tote measures approximately 30 cm in height (about 12 inches), with the width roughly matching the 56 stitches cast on (varies depending on yarn and tension). Handles measure about 55 to 60 cm (22 to 24 inches) for comfortable shoulder carry. Keep in mind that your yarn choice, knitting needle size, and stitch tension may slightly alter final dimensions.
Skill Level
This project suits an advanced beginner or intermediate knitter. While basic knit and purl stitches are required, the diagonal basketweave pattern involves following an 8-row repeat that requires some attention and stitch-counting. If you can comfortably knit garter stitch and reading stitch patterns, the step-by-step instructions here will support you well.
Materials Needed
- Worsted-weight cotton-blend yarn (flax-oat or muted sage recommended)
- Size 5 mm knitting needles
- Tapestry needle for weaving in ends and sewing panels
- Scissors
- Stitch markers (optional but helpful for keeping track of pattern repeats)
Stitches and Abbreviations
- K: knit stitch – Insert your right needle into the front of the stitch and knit
- P: purl stitch – Insert your right needle into the front of the stitch from the back and purl
- Sts: stitches
- RS: right side (knitting term for the "front" of the piece)
Gauge and Tension Notes
Gauge is not critical for the structural integrity of this tote, but consistent tension ensures the basketweave pattern shines and panels align well when seamed. A fabric too tight might make the tote stiff, while loose stitches could cause it to stretch unevenly. Aim for a smooth, even gauge that matches your usual worsted yarn knitting standards. Consider knitting a small swatch of the diagonal basketweave pattern first to get comfortable with the texture.
Pattern Notes Before You Start
You will knit two separate rectangular panels of identical size using the basketweave stitch pattern. Each panel begins with 56 stitches cast on, maintaining 4 garter stitch stitches on each edge for a neat border and working the center 48 stitches in an 8-row diagonal basketweave repeat. After panels reach 30 cm, knit 8 rows garter stitch across all stitches for a sturdy top edge. Finally, the panels are seamed along the sides and bottom, and two simple handles knit in garter stitch are attached to the tote’s top edge. No color changes or shaping occur beyond this textured pattern.
Starting projects like this after crafting beginner-friendly crochet accessories—like the delightful cherry blossom crochet hair comb pattern—builds confidence with stitch repetition and finishing techniques that carry over well into this tote.
Step-by-Step Crochet Instructions
- Make Panel 1: Cast on 56 stitches.
- Setup Borders: Keep the first 4 and last 4 stitches as garter stitch (knit every row) throughout.
- Work the Basketweave Pattern in Center 48 sts:
- Row 1 (RS): K4, P4 across center stitches
- Row 2 and every even row: Work center stitches "as they appear" (knit the knits, purl the purls)
- Row 3 (RS): K2, P4, K4 to last 2 center sts, K2
- Row 5 (RS): P4, K4 across center
- Row 7 (RS): P2, K4, P4 to last 2 center sts, P2
- Repeat Rows 1 through 8 until panel measures approximately 30 cm from cast-on edge.
- Knit 8 rows garter stitch across all 56 stitches to create a firm top edge, then bind off loosely.
- Repeat steps 1-5 to create Panel 2 identical to Panel 1.
- Make Handles: Cast on 8 stitches. Knit garter stitch back and forth (every row knit) until the length measures 55 to 60 cm. Bind off. Make 2 handles.
- Assembly: Place panels together with right sides facing out. Seam the sides and bottom using mattress stitch or whipstitch by hand with tapestry needle.
- Sew the handle ends securely inside the top edge on front and back, evenly spaced.
- Weave in all ends tightly. Lightly block the finished tote without flattening the diagonal texture to retain the fabric’s dimension.
Assembly and Finishing
Once you’ve knitted both panels and the handles, carefully line up the piece edges to sew seams neatly so that no stitches are missed or unevenly pulled. Mattress stitch works well here for a flat seam that won’t distract from the basketweave pattern. When attaching handles, position them evenly to balance weight; secure the ends firmly inside so they don’t pull free with use. After assembly, a gentle blocking steam or light wet blocking will help the diagonal texture pop without flattening the subtle ridges. Avoid heavy pressing to keep that lovely hand-knit depth.
Helpful Tips
- Use stitch markers to separate the 4-stitch garter borders from the 48-stitch basketweave center — this helps avoid mistakes in pattern rows.
- Maintain consistent tension especially on the garter border to keep edges neat and stable.
- When sewing the panels, use plenty of tapestry needle passes to avoid gaps or loose seams.
- For handles, knitting on the smaller side of length is safer; you can always add chain or braided ties if you want extra length later.
- Blocking with pins placed just outside the edges rather than on stitches retains texture definition effectively.
- If new to textured knitting, practice the basketweave stitch pattern on a swatch before starting the tote.
Common Mistakes to Avoid
- Missing the first and last 4 stitches to work in garter stitch on every row—this can warp the edges and lose structure.
- Confusing the stitch pattern on odd vs. even rows; remember to always knit the stitches as they appear on even rows.
- Binding off too tightly causing the top edge to curl or pull; keep your bind off relaxed for comfort and ease in seaming handles.
- Uneven seam tension pulling the sides out of square—take your time with mattress stitch or whipstitch.
- Attaching handles unevenly causing the bag to sag to one side, so measure placement carefully.
Customization Ideas
- Substitute yarn color to suit your style; darker tones will show the texture differently than lighter hues.
- Try a blend with a touch of silk or bamboo yarn to add a soft sheen and drape.
- Adjust the handle length to create a wristlet version or longer crossbody strap.
- Knit both panels slightly larger or smaller by adding or reducing repeats of the 8-row basketweave pattern, modifying the stitch count accordingly.
For inspiration to complement your handmade look, consider delicate accessories like these bluebell drop earrings to pair with your tote, adding a thoughtful touch to your finished ensemble.
How to Use or Display This Crochet Project
This knit tote makes an excellent gift—functional, stylish, and easy to customize. Use it as an everyday bag for groceries, books, or crafting supplies, or bring it along as a lightweight beach or picnic tote. The durable cotton-blend yarn and textured fabric mean it stands up to regular use without losing shape. When not in use, display it on a hook or woven basket to showcase its lovely handmade character and remind you of the comfort of handknit texture.
Care Instructions
Since this tote uses cotton-blend worsted yarn, gently hand wash or machine wash on a delicate cycle with cold water to keep the yarn clean without felting or stretching. Avoid harsh detergents. Lay it flat to dry, reshaping it lightly to preserve the basketweave texture. Store it in a dry, ventilated space. Avoid hanging long-term when wet to prevent stretching of the handles.
Frequently Asked Questions
Q: Can I substitute the yarn weight or fiber?
A: Yes, but keep in mind that gauge changes will alter finished size and fabric drape. Cotton blends work well for durability, but softer fibers will produce a more flexible tote.
Q: Is this pattern suitable for a beginner knitter?
A: It’s best for an advanced beginner who knows knit and purl stitches and can follow an 8-row repeat pattern. If you’re new to textured knitting, try practicing the stitch first.
Q: How do I fix mistakes in the basketweave pattern?
A: Carefully unravel back to the error, watch the stitch pattern carefully, and correct stitch order. Use stitch markers or a row counter to keep track.
Q: Can I make this tote larger?
A: Absolutely. Add more repeats of the basketweave pattern and increase your stitch count evenly. Just maintain the 4-stitch garter stitch borders on each edge.
Q: How do I avoid stretching the handles?
A: Knit the handles firmly in garter stitch and avoid making them too long. Sew handle ends securely and consider lining the handles if extra strength is needed.
Final Thoughts
Knitting this diagonal basketweave tote brings a satisfying mix of texture and function to your handmade collection. Its sturdy structure with cozy knit texture is perfect for everyday use or gifting, and the clear step-by-step instructions make this a manageable project even if you’re growing your knitting skills. With just a few simple materials and mindful finishing, you’ll have a unique piece that highlights the charm of handknit accessories in your daily life.



