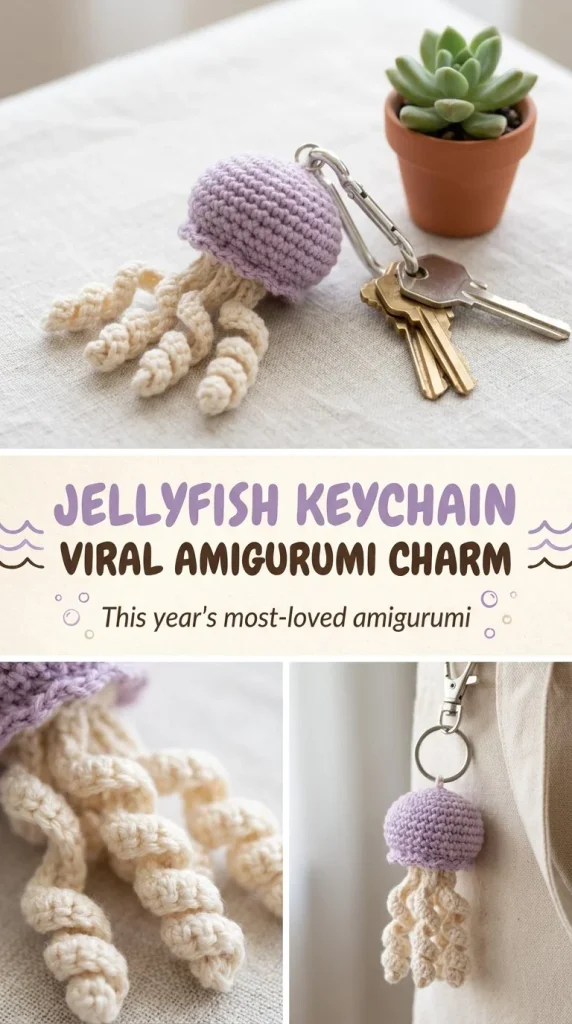
Crocheting a pastel jellyfish keychain is a delightful way to create a cute, compact amigurumi that’s both decorative and practical. This pattern uses simple single crochet rounds to build a charming lavender dome body, with cream-colored yarn tentacles that add a whimsical touch. It’s an accessible project for new crocheters looking to try amigurumi without feeling overwhelmed by complicated shaping or techniques. I find that working in continuous rounds keeps the jellyfish dome smooth and nicely rounded, which is important for getting that perfect puffed look. Attaching the tentacles as knotted yarn strands rather than crocheted adds a soft, flowing effect that mimics real jellyfish tentacles beautifully. For anyone interested in engaging beginner-friendly amigurumi projects, this makes a fun gift or personal accessory, and it pairs well with patterns like this cherry blossom crochet hair comb you might enjoy trying next.
Why You’ll Love This Crochet Pattern
- Uses basic stitches and simple shaping, perfect for beginners wanting to explore amigurumi.
- Small and portable, ideal for practicing crocheting in rounds without a large time commitment.
- The pastel colors create a soft, appealing look, great for gifts or charm collections.
- The knotted yarn tentacles add natural movement without extra crochet work.
- Designed to be stuffed lightly for a neat, plush finish that holds its shape well.
- Easy to customize in size or color with minimal adjustments.
Finished Size
The finished keychain measures approximately 2 to 3 inches (5 to 7.5 cm) wide, depending on your yarn tension, hook size, and exact length of the tentacles. Using DK-weight yarn and a 3mm hook as recommended will keep it petite and neat, but feel free to scale larger or smaller to fit your style.
Skill Level
Easy beginner. This project introduces working in the round with basic increases and decreases while avoiding complicated stitch patterns. The tentacles are made simply by knotting cut yarn strands, which keeps assembly straightforward.
Materials Needed
- DK-weight yarn in lavender (for the body)
- DK-weight yarn in cream (for tentacles)
- 3mm crochet hook
- Small amount of polyester stuffing
- Small metal keyring
- Tapestry needle for sewing and weaving ends
- Scissors
- Optional: stitch markers to keep track of rounds
Stitches and Abbreviations
- sc: single crochet – insert hook, yarn over, pull through, yarn over, pull through 2 loops.
- ch: chain – yarn over, pull through loop on hook.
- sc2tog: single crochet two stitches together (decrease) – insert hook into first stitch, yarn over, pull up a loop, insert hook into next stitch, yarn over, pull up a loop, yarn over, pull through all loops on hook.
- Magic Ring: a technique for starting rounds in the round to create a tight center with no hole.
Gauge and Tension Notes
Gauge is not critical for this small amigurumi, but maintaining consistent tension will preserve the shape. Aim for firm stitches to avoid stuffing showing through and ensure the body holds its rounded form.
Pattern Notes Before You Start
The jellyfish body is crocheted in continuous rounds increasing and decreasing to form a dome shape. Tentacles are not crocheted but are attached afterward, allowing easy variation in length and fullness. You’ll finish by closing the dome top tightly and attaching the keyring securely.
Step-by-Step Crochet Instructions
-
Body (Lavender):
- Round 1: Make a magic ring, ch 1, and work 6 sc into the ring (6 sts).
- Round 2: 2 sc in each stitch around (12 sts).
- Round 3: sc 1, 2 sc in next stitch around (18 sts).
- Rounds 4–5: sc evenly around (18 sts in each round). Stuff lightly but keep stuffing manageable—too much will distort shaping.
- Round 6: sc 1, sc2tog around (12 sts). Add more stuffing as you go to fill the dome smoothly.
- Round 7: sc2tog around (6 sts). Fasten off, leaving a long tail. Use the tail to cinch the opening closed tightly, forming the dome.
-
Tentacles (Cream):
- Cut 6 to 8 strands of cream yarn, each about 10 to 14 inches long depending on your preferred tentacle length.
- Tie a knot at one end of each strand. This is the end that gets attached to the dome underside.
Assembly and Finishing
Use a tapestry needle to attach the knotted tentacle strands evenly spaced around the inside edge of the dome underside. Secure each well with tight knots to prevent slipping. Trim tentacles evenly for a polished look. Attach the keyring securely to the top center of the dome by threading it through the cinched stitches or by sewing it on with strong yarn.
Helpful Tips
- Keep stitches tight but consistent so stuffing won’t show through the lavender body.
- Use stitch markers to track round starts especially on rounds with decreases.
- When stuffing, add small amounts gradually to avoid lumps and maintain the dome shape.
- Knot tentacles loosely first and then tighten after attaching to adjust length.
- Weaving in stitches neatly around the keyring helps the final piece stay sturdy over time.
- For extra practice with amigurumi basics, try pairs of projects such as a simple crochet bookmark like this cozy owl bookmark pattern.
Common Mistakes to Avoid
- Crocheting too loosely, causing stuffing to peek through and the dome to lose shape.
- Not cinching the dome closed tightly enough, leaving a hole at the top.
- Attaching tentacles unevenly or too few, which can affect balance and overall look.
- Cutting tentacles too short or too long, impacting the jellyfish’s charm.
- Overstuffing and distorting the dome shape, making it less rounded and neat.
Customization Ideas
- Change color scheme with pastel blues, pinks, or mint greens for a themed set.
- Use variegated yarn for a soft rainbow jellyfish look.
- Swap the cream yarn for sparkly or textured yarn to add interest to tentacles.
- Add small beads or safety eyes to give it personality, though keep it kid-friendly if gifting to children.
- Create larger or smaller keychains by using different yarn weights and corresponding hook sizes.
How to Use or Display This Crochet Project
Attach your jellyfish keychain to backpacks, purses, or keys for a subtle nod to your love of the ocean or handcrafted goods. It also works well as a zipper pull or a cute bag charm gift. You could make several in different colors and string them as a garland or mobile. They’re sweet table decorations or stocking stuffers, especially if presented with a small crocheted travel pouch.
Care Instructions
Spot clean your jellyfish with a damp cloth and mild soap, reshaping the dome gently while damp. Avoid machine washing or drying as this can distort the shape and fray the yarn ends. Store in a dry place to prevent mildew or color fading.
Frequently Asked Questions
Q: Can I use a different yarn weight or hook size?
A: Yes, but remember your finished size will change. Adjust tentacle length accordingly and keep stitches tight enough to avoid stuffing showing.
Q: How do I close the magic ring without a hole?
A: Pull the ring tight after your first round of stitches, and begin crocheting steadily to avoid gaps.
Q: Can I add safety eyes to the jellyfish?
A: It’s possible if you prefer a face, but keeping this pattern simple suits beginners and kids best without small parts.
Q: How long should the tentacles be?
A: Between 10 and 14 inches looks nice, but you can shorten or lengthen depending on your preference.
Q: What if my jellyfish looks flat or misshapen?
A: Check that you are increasing and decreasing evenly and that stuffing is balanced but not overly firm.
Final Thoughts
This pastel jellyfish keychain is a charming little project that introduces the basics of amigurumi with a soft, approachable design. It’s quick to make, easy to customize, and turns out beautifully rounded with a gentle flow of tentacles. Whether for your keys or as a thoughtful gift, it’s a lovely way to bring a splash of handmade charm to everyday items.



