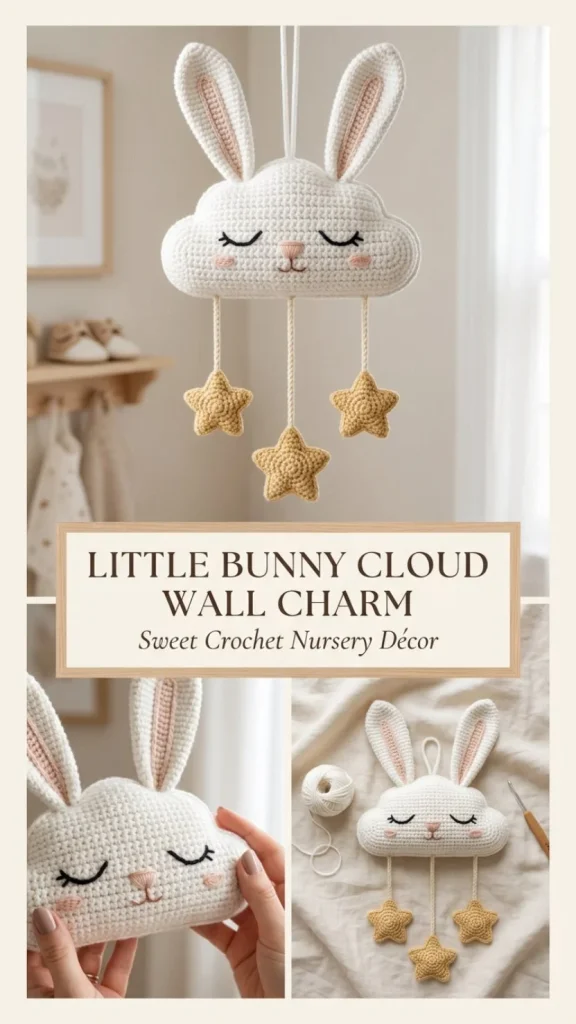
This charming Little Bunny Cloud Wall Charm is a delightful crochet project that combines soft cloud shapes with sweet bunny ears, perfect for adding a touch of whimsy to any nursery or cozy corner. It’s designed with beginner-friendly panels and simple embroidery details, making it an accessible yet rewarding project for those new to amigurumi or decorative motifs. The plush fiberfill creates a gentle puffiness that gives the piece a cuddly feel, while the hanging cords with tiny stars bring a subtle finishing magic. I’ve found that shaping the ears just right and embroidering the face before assembly really help bring this cheerful charm to life. If you enjoy crafting cozy, handmade decor, this pattern pairs beautifully with adorable storage ideas like the bunny earbud pocket pouch, allowing you to create a sweet matching set.
Why You’ll Love This Crochet Pattern
- Uses simple stitches and easy-to-follow instructions that suit beginner and advanced beginner crocheters alike.
- The separate cloud panels and ears make it easy to manage tension and shape, preventing common shaping issues.
- Fiberfill stuffing adds a soft dimension, enhancing its charm as a wall hanging or nursery gift.
- Practical assembly tips guide you through embroidery and finishing to keep your work neat and polished.
- Versatile design lends itself well to customization, whether in color choices, texture, or added embellishments.
- Lightweight and quick to crochet, it makes a delightful quick gift or personal project.
Finished Size
The finished charm measures approximately 7 inches (18 cm) wide and 5 inches (13 cm) tall, with hanging cords extending slightly longer. Keep in mind that your size may vary slightly depending on your yarn weight, hook size, and personal tension.
Skill Level
This pattern is classified as advanced beginner. While the stitches used are basic—such as single crochet and increases—the shaping and assembly steps require attention to detail, especially during embroidery and stuffing to achieve the best final look.
Materials Needed
- DK cotton yarn (#3 weight) in white, pale blush, and soft gold colors
- Black embroidery thread for facial features
- 3.0 mm crochet hook
- Fiberfill stuffing for soft puffiness
- Tapestry needle for sewing and embroidery
- Scissors
- Stitch markers (optional but helpful for counting stitches)
- Small wooden hanging ring or yarn loop for top attachment
Stitches and Abbreviations
- ch = chain: foundation stitch creating a base row
- sc = single crochet: basic crochet stitch worked in each stitch
- sl st = slip stitch: joining or moving stitch without height
- hdc = half double crochet: stitch with medium height
- dc = double crochet: taller stitch for shaping
- inc = increase: two single crochet stitches worked in the same stitch
Gauge and Tension Notes
Gauge does not need to be exact for this decorative project, but keeping your stitches consistent ensures a tidy shape and proper fit between panels. Aim for firm but not overly tight stitches to allow some softness when stuffing.
Pattern Notes Before You Start
This charm is constructed from two separate cloud panels crocheted flat, then sewn together with the bunny ears inserted between layers at the top edge. The facial embroidery is added to one panel before assembly. The stars and hanging cords are crocheted separately and attached at the bottom. Color changes occur mainly with different yarn colors, kept straightforward.
Step-by-Step Crochet Instructions
-
Cloud Panels (Make 2)
Using white yarn, ch 11.
R1: sc in 2nd ch from hook and next 8 ch, 3 sc in last ch; work along opposite side of foundation chain with sc in next 8 ch, 2 sc in first chain = 22 sts
R2: inc (2 sc in one stitch), sc in next 8 sts, inc in each of next 3 sts, sc in next 8 sts, inc in each of last 2 sts = 28 sts
R3: (sc, inc), sc in next 8 sts, (sc, inc) x3 times, sc in next 8 sts, (sc, inc) x2 times = 34 sts
Fasten off and repeat for second panel. -
Bunny Ears (Make 2)
Using white yarn, ch 9.
Beginning in 2nd ch from hook, work: sl st, sc, hdc, dc in next 3 ch, hdc, 5 sc in last ch; continue along opposite side with hdc, dc in next 3 ch, hdc, sc, sl st.
Fasten off.
Embroider a narrow blush-colored line down the center of each ear for detail. -
Facial Embroidery on One Cloud Panel
Use black embroidery thread to stitch two closed curved eyes approximately 1.5 inches (4 cm) apart.
Add a small triangular blush nose and a short vertical stitch with two tiny curved lines for the mouth beneath. -
Assembly of Cloud
Place the two cloud panels together with wrong sides facing.
Insert ear bases evenly along the upper edge, one on each side of center between panels.
Join panels with single crochet stitches through both layers.
Before finishing the last 2 inches (5 cm), stuff the cloud lightly with fiberfill for a soft puff.
Finish joining and fasten off securely. -
Stars (Make 3)
Using soft gold yarn.
R1: magic ring, 5 sc, join with sl st
R2: sl st in next st, ch 4, sl st in 2nd ch, sc in next ch, hdc in next ch, sl st in base stitch) repeat around 5 times
Fasten off. -
Hanging Cords
Using blush or soft gold yarn, make 3 cords—ch 18, ch 24, and ch 30.
Starting in second ch, sl st back along chains for strength.
Sew one star to each cord’s end.
Sew cord tops evenly spaced along the bottom edge of cloud with longest cord centered. -
Top Loop
Using white yarn, ch 30, sl st back along chain.
Attach both ends securely to upper back of cloud between ears or to a wooden ring for hanging. -
Weave in all ends neatly for a finished look.
Assembly and Finishing
When joining the cloud panels, take your time to keep stitches even, especially around the ears, so they lay flat and secure. Stuffing should be light but even; too much stuffing may distort the shape. Embroidery before assembly makes stitching smoother and prevents stretching holes unevenly. For durability, reinforce the top loop attachment with a small wooden ring or double sew yarn ends. Attach the stars to hanging cords carefully, so they don’t slip off.
Helpful Tips
- Use stitch markers to keep track of increases in cloud shaping rounds for accuracy.
- Block your cloud panels lightly before assembly to ensure even edges and better shape.
- When embroidering eyes and nose, practice on scrap yarn pieces to get the curves just right.
- Keep your fiberfill filling light and even—it’s easier to add more than to remove excess stuffing.
- Reinforcements on hanging cords with slip stitches add durability to this lightweight charm.
This pattern also pairs well with other cute accessories, such as the shooting star cloud wall charm, for a coordinated nursery decor theme.
Common Mistakes to Avoid
- Skipping the increases in cloud shaping can cause a flat or misshapen charm; count stitches carefully.
- Overstuffing the panels leads to a bulky appearance that distorts the delicate cloud shape.
- Embroidery done after assembly can stretch fabric unevenly; it’s best to do facial features first.
- Not securing hanging cords firmly may cause them to detach with use. Reinforce well.
- Crocheting the ears too tight may make them stiff and difficult to insert between panels.
Customization Ideas
- Try pastel blues or lavender instead of white for a soft color variation.
- Use a fluffy or textured yarn for a cloud with more tactile interest.
- Add tiny beads or sequins to stars for a subtle sparkle effect.
- Make larger or smaller versions by adjusting foundation chains and rounds proportionally.
How to Use or Display This Crochet Project
This Little Bunny Cloud Wall Charm makes a lovely nursery decoration hung above a crib or changing table. It can also brighten up a child’s bedroom or playroom wall and serves as a thoughtful handmade gift for baby showers or birthdays. Lightweight and soft, it’s perfect to send through the mail or tuck into a gift basket. Coordinating crochet decor pieces add charm to a themed room.
Care Instructions
Use gentle hand washing or a delicate cycle with cold water to clean your charm, especially if made with cotton yarn. Lay flat to dry away from direct sunlight to maintain color and shape. Avoid harsh wringing or twisting to keep the stuffing even and the embroidered details intact.
Frequently Asked Questions
Q: Can I make this charm using a different yarn weight?
A: Yes, but remember the finished size and density will change. You may need to adjust hook size accordingly for consistent tension.
Q: Is it necessary to use embroidery thread for the facial features?
A: Embroidery thread gives you fine control for detailed features, but you could use a thin yarn if preferred.
Q: Can the hanging cords be made longer?
A: Absolutely. Adjust the chain length to suit your display needs or preferred aesthetic.
Q: What is the best way to ensure even stuffing?
A: Add fiberfill gradually and use small amounts at a time to avoid lumps.
Q: Can I substitute safety eyes instead of embroidered eyes?
A: For a wall charm, embroidery is safer and more durable, but safety eyes could be used if securely attached.
Final Thoughts
This Little Bunny Cloud Wall Charm is a sweet, approachable project that brings a touch of softness and joy to any room. Its simple shapes and careful finishing techniques make it a satisfying project for beginners eager to learn shaping and embroidery. Paired with accessories like the bunny earbud pouch, it’s easy to create a cozy and charming gift set. Enjoy the process of stitching this little cloud friend and watching it brighten up your space!
Conclusion
For a complementary decorative touch in your nursery, consider pairing this charm with the charming Dreaming Elephant Print – Nursery Poster Wall Art, which beautifully complements soft handmade decor themes.



