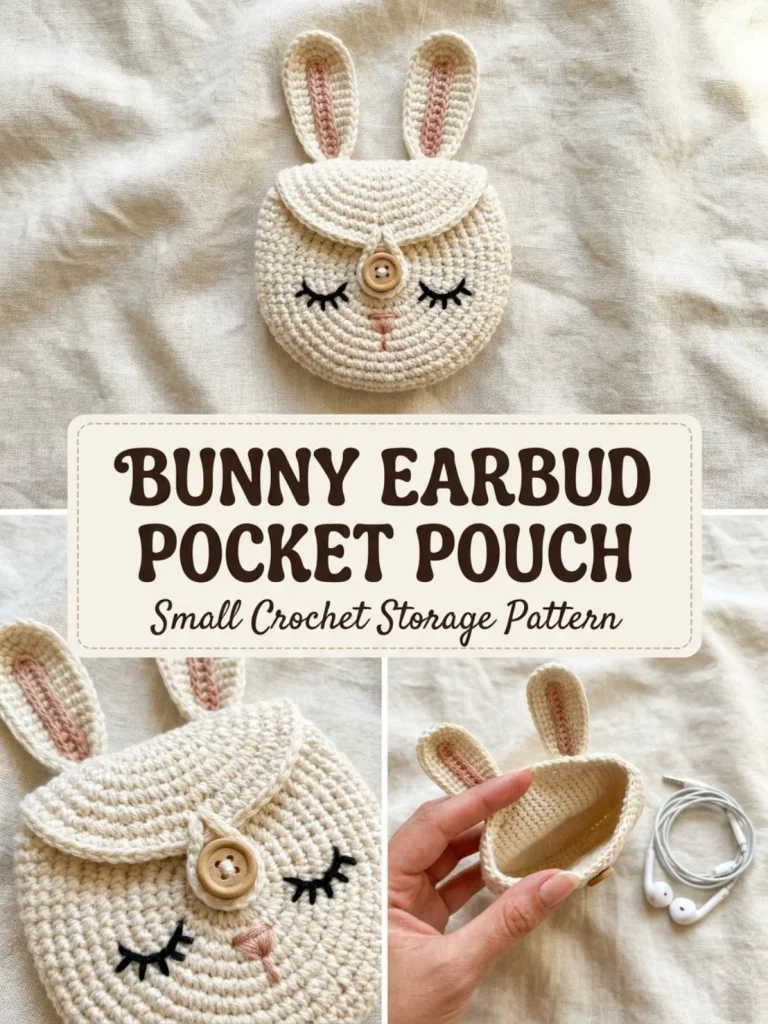
This Bunny Earbud Pocket Pouch is a charming little crochet project designed to keep your earbuds safe and tangle-free. Its compact, round shape with cute bunny ears makes it both functional and decorative, perfect for carrying your earbuds in style or gifting to a friend who loves handcrafted accessories. The pattern is beginner-friendly, using simple stitches like single crochet and increases, which helps you build confidence while making something practical. Crafting this pouch creates a cozy little home for your earbuds, and its flap with a button closure ensures they stay securely tucked inside. I found that adding a small blush embroidery for the inner ear detail really brings the bunny’s personality to life—it’s these little handmade touches that make all the difference when giving a gift or keeping it for yourself. If you enjoy projects like this, you might also appreciate the berry basket drawstring pouch, which uses similar construction techniques for a different shape and purpose.
Why You’ll Love This Crochet Pattern
- Creates a cute, compact pouch perfect for holding earbuds or other small items.
- Beginner-friendly design using basic stitches with clear shaping and joining instructions.
- Includes charming bunny ears and embroidered details for a sweet handmade finish.
- The button flap closure keeps contents secure and adds a touch of functionality.
- Works up quickly using DK cotton yarn and a small hook, making it a great quick gift.
- Serves as a fun project to practice rounds, shaping, and joining two crochet circles.
Finished Size
The finished pouch measures approximately 3.5 inches (9 cm) in diameter and about 1 inch (2.5 cm) thick when closed. Note that size can vary slightly depending on your yarn choice, tension, and hook size.
Skill Level
Advanced beginner. This pattern is approachable for those who know basic crochet stitches and are comfortable working in rounds and doing simple shaping techniques like increases and decreases. The joining of the two circles and shaping the flap provides a nice challenge without being overwhelming.
Materials Needed
- DK weight cotton yarn in cream (main), blush pink (for embroidery), and a small amount of black (for face details)
- 3.0 mm (C) crochet hook
- Small button for flap closure
- Yarn needle for sewing and embroidery
- Scissors
- Optional: small piece of fabric for lining (to add durability and neatness inside)
Stitches and Abbreviations
- ch – chain
- sc – single crochet: Insert hook into stitch, yarn over, pull up a loop, yarn over, pull through both loops on hook.
- inc – increase: 2 sc in same stitch.
- dec – decrease: single crochet two stitches together.
- hdc – half double crochet: Yarn over, insert hook into stitch, yarn over, pull up a loop, yarn over, pull through all 3 loops.
- dc – double crochet: Yarn over, insert hook in stitch, yarn over, pull up a loop, yarn over, pull through two loops, yarn over, pull through last two loops.
- magic ring – a technique to begin crocheting in the round with an adjustable center.
Gauge and Tension Notes
Gauge is not critical for this project since it is a small pouch, but maintaining consistent tension will help create neat stitches and a well-shaped piece. Too tight tension can make the pouch stiff and smaller, while loose tension might lead to a floppy or uneven shape. DK cotton and a 3.0 mm hook strike a good balance for softness and durability.
Pattern Notes Before You Start
This pouch is made from two crocheted circles joined together with single crochet stitches, leaving an opening at the top for the flap. The ears and flap are crocheted separately, then sewn on later. The face is embroidered on the front circle after assembly. Consider lining the inside with a small piece of fabric before attaching the button to give extra structure and protect delicate earbud cords.
Step-by-Step Crochet Instructions
-
Pouch Circles (Make 2 in cream):
R1: Create a magic ring, work 6 sc into it. (6 sts)
R2: 2 sc in each st around. (12 sts)
R3: (sc, inc) x6. (18 sts)
R4: (2 sc, inc) x6. (24 sts)
R5: (3 sc, inc) x6. (30 sts)
R6: (4 sc, inc) x6. (36 sts)
Fasten off the first circle. Do not fasten off the second circle. -
Joining Circles:
Place circles wrong sides together. Using the working yarn from the second circle, single crochet through both layers around 28 stitches, leaving approximately 8 stitches unjoined at the top to form the pouch opening. Fasten off. -
Flap:
Join cream yarn to one side of the opening on the back circle.
Row 1: sc evenly across the 8 unjoined stitches. (8 sts)
Row 2: ch 1, dec, sc 4, dec. (6 sts)
Row 3: ch 1, dec, sc 2, dec. (4 sts)
Row 4: ch 1, sc 1, ch 4, skip 2, sc 1 (this creates the button loop).
Fasten off. -
Ears (Make 2 in cream):
ch 8.
Starting in 2nd ch from hook, work: sc, hdc, dc x3, hdc, sc, then work down the opposite side of the chain with sc, hdc, dc x3, hdc, sc.
Fasten off. -
Face Embroidery:
On the front circle, embroider sleepy eyes using black yarn or embroidery floss. Add a small pink triangle for the nose and a short line for the mouth. Use blush pink yarn to embroider blush lines inside each ear for a soft detail.
Assembly and Finishing
Sew the ears to the back top edge of the pouch, one on each side of the flap. Sew the button to the front circle right below the flap loop. Optionally, hand-sew a small fabric lining inside the pouch before attaching the button to give the pouch a cleaner finish and protect earbuds from snagging on yarn. Weave in all ends neatly and securely. Block lightly if needed to shape the pouch evenly.
Helpful Tips
- Use a stitch marker to keep track of your rounds while making the circles; it helps keep count and identify stitch starts.
- When joining the two circles, don’t pull too tightly with the joining single crochet; maintain a bit of stretch so the pouch doesn’t pucker.
- Embroider the face before sewing the ears on to give yourself more room to work comfortably.
- The flap button loop works best when you skip the center chains; double-check sizing so the loop fits snugly over your button.
- If using cotton yarn, consider pre-washing to reduce any potential shrinkage or color bleeding later.
Including small projects like this pouch in your rotation can be really inspiring, similar in charm and function to the mini cottage bunny lovey, perfect if you want to create a cute matching set or gift bundle.
Common Mistakes to Avoid
- Skipping stitch counts or miscounting rounds can cause uneven circles–use markers and recount often.
- Joining the circles unevenly might leave gaps or cause puckering; crochet gently through both layers.
- Missing decreases in the flap can lead to a bulky or misshapen closure.
- Sewing on ears unevenly will throw off the pouch’s symmetry; place pins first and check positioning.
- Not finishing off ends securely can cause unraveling, so double weave your tails.
Customization Ideas
- Use variegated yarn or add stripes for a colorful bunny-themed pouch.
- Crochet the ears in a contrasting color like soft pink or gray for added interest.
- Substitute a larger button and adjust the flap loop to fit, creating a slightly bigger pouch.
- Add a wrist strap or keychain loop at the pouch side for easy carrying or bag attachment.
How to Use or Display This Crochet Project
This pouch is ideal for holding earbuds, small jewelry, or coins, keeping items safe inside your bag or pocket. It makes a thoughtful handmade gift for tech lovers or kids who enjoy cute accessories. Display it on your craft shelf or gift it complete with a pair of earbuds tucked inside. Its charming bunny design adds a cozy handmade touch to your collection of everyday essentials.
Care Instructions
Hand wash your pouch gently in cool water with mild soap to keep the cotton yarn soft and vibrant. Avoid twisting or wringing. Lay flat to dry to maintain its shape. If your pouch becomes dirty from frequent use, spot cleaning is effective for quick refreshes.
Frequently Asked Questions
Q: Can I use acrylic yarn instead of cotton?
Yes, but cotton is preferable for sturdiness and neat stitch definition. Acrylic might stretch or pill faster.
Q: How do I keep the embroidery looking neat?
Use embroidery floss or crochet cotton with a thin needle and secure knots tightly on the wrong side.
Q: Can I add stuffing inside the ears?
The ears are designed flat, but very light stuffing could add dimension if desired.
Q: Is the fabric lining necessary?
Not mandatory, but it helps protect earbuds from snagging on the yarn and strengthens the pouch.
Q: Can the pouch be resized?
Yes, by adjusting the number of increase rounds in the circles and flap stitches, but keep proportions consistent.
Final Thoughts
This Bunny Earbud Pocket Pouch is a sweet little project that mixes practicality with delightful charm. It’s a great way to practice crochet in the round, shaping, and embroidery while ending up with a utterly giftable item. With a bit of care in assembly and finishing, your pouch will be sturdy and cute for everyday use or gifting. Happy crocheting!



