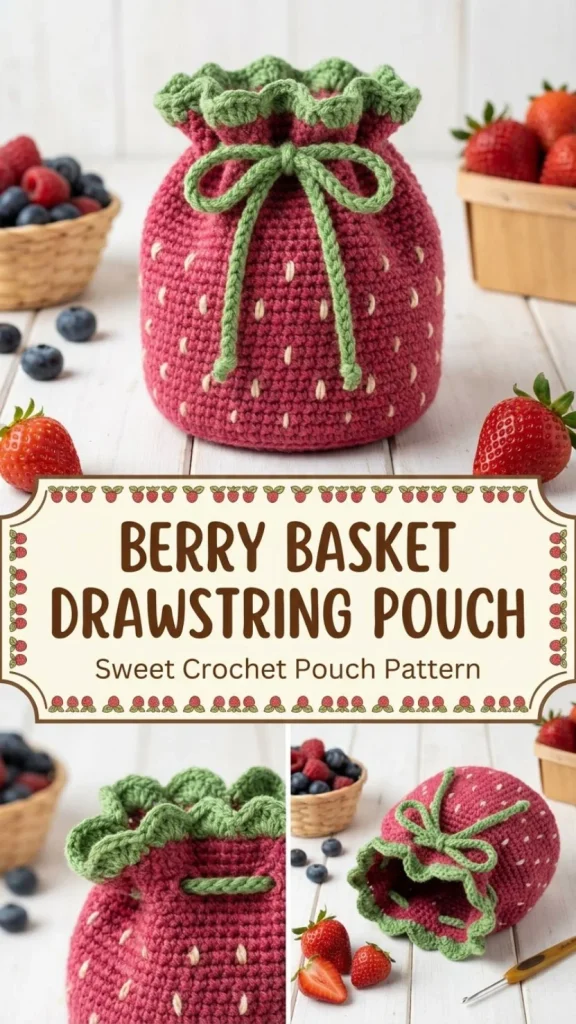
This charming Berry Basket Drawstring Pouch is a delightful crochet project perfect for beginners and intermediate crafters looking to add a practical yet decorative accessory to their handmade collection. Designed to resemble a small raspberry basket, this pouch combines simple stitches with subtle shaping to create a cozy, giftable item ideal for storing jewelry, small craft supplies, or personal treasures. The eyelet row not only adds a delicate detail but cleverly doubles as a channel for the drawstring, which gives a neat closure while maintaining that classic basket look. From my own testing, working the base in the back loop only at row five really helps the pouch stand up well, making it both functional and attractive. If you enjoy accessories with nature-inspired accents, this pattern complements other delicate designs such as the Pink Lily Bell Anklet, which shares a similar soft and charming aesthetic.
Why You’ll Love This Crochet Pattern
- Creates a sturdy yet soft pouch with simple stitches and clear shaping.
- Features practical eyelets for threading a drawstring that keeps contents secure.
- Soft leaf edging at the top adds an elegant, handcrafted touch.
- Embroidered seed details give a textured, natural berry effect.
- Perfect size for organizing small items, making it ideal as a gift or personal project.
- Beginner-friendly with a helpful foundation in working rounds and shaping.
Finished Size
The pouch measures approximately 4 inches in diameter at the base and stands about 3.5 to 4 inches tall, including the leafy edging. Size may vary slightly depending on your yarn choice, hook size, and crochet tension, so it’s worth checking your gauge before starting if you want a precise fit.
Skill Level
Advanced beginner. While the stitches are basic single crochets and increases, the pattern involves working in continuous rounds, creating an eyelet row, and finishing with decorative edging and embroidery. These skills build confidence for those ready to go just beyond straightforward amigurumi-style work.
Materials Needed
- Worsted cotton yarn (#4 weight) in raspberry (main body), cream (embroidery), and leaf green (top edging and drawstring)
- 4.0 mm crochet hook
- Tapestry needle for weaving in ends and embroidery
- Scissors
- Stitch marker to mark rounds
- Optional: small fabric for lining if you want additional durability or to hold tiny items securely
Stitches and Abbreviations
- sc = single crochet: Insert hook, yarn over, pull through loop, yarn over, pull through two loops.
- inc = increase: Two single crochet stitches worked into the same stitch.
- ch = chain: Yarn over, pull through loop.
- sl st = slip stitch: Insert hook, yarn over, pull through stitch and loop on hook.
- dc = double crochet: Yarn over, insert hook, yarn over, pull through the stitch, yarn over, pull through two loops, yarn over, pull through last two loops.
Gauge and Tension Notes
Gauge is not critical for functionality but maintaining even tension helps the base stay flat and the body of the pouch hold its shape nicely. Too tight tension may make the drawstring harder to thread; too loose, and the pouch might lack structure. Aim for a firm but flexible fabric.
Pattern Notes Before You Start
This pouch is worked in continuous rounds starting with a magic ring to form a circular base resembling a raspberry. The base is shaped by working single crochet rounds with increases on each row to expand evenly. The fifth row is worked in the back loop only to set a defined edge before building up the sides. The eyelet round incorporates chains and skipped stitches to create a neat row of holes for threading the drawstring. The green yarn is then worked all around the top stitches and chains before adding the decorative leafy edging. Embroidered seed details are stitched on afterward using cream yarn or embroidery thread for a natural textured effect.
Step-by-Step Crochet Instructions
- R1: Begin with a magic ring, 8 sc into the ring, join with sl st to first sc. (8 sts)
- R2: Inc in each stitch around. (16 sts)
- R3: Sc 1, inc 1 repeat 8 times. (24 sts)
- R4: Sc 2, inc 1 repeat 8 times. (32 sts)
- R5: Sc in back loop only around to define the base edge. (32 sts)
- R6–10: Sc around through both loops to build the sides. (32 sts each round)
- R11 (Eyelet round): 3 sc, ch 1, skip 1 stitch repeat around, adjusting last repeat to keep eyelets evenly spaced. Join with sl st.
- R12 (Top round in green): In each stitch and ch-1 space, work a sc to cover both. Join with sl st.
- Leaf edging: (Sl st in next st, ch 3, 2 dc, ch 3, sl st in next st) repeat every 4 stitches around for 8 soft leaves.
- Drawstring: Using green yarn, chain 75 stitches, then sl st back along the chain for smooth sturdiness. Thread through eyelet holes and knot ends to secure.
- Embroider tiny seed dashes scattered evenly over the raspberry body with cream yarn or embroidery thread.
Assembly and Finishing
Weave in all ends securely using your tapestry needle. If you want the pouch to hold small items securely, consider hand-sewing a simple fabric lining on the inside. Shape the pouch gently by hand so it stands upright with a pleasing leaf-shaped top edge. The drawstring cord maintains closure while adding a polished finish.
Helpful Tips
- Use a stitch marker to keep track of your round joins and avoid losing count.
- Working row five in back loop only really helps keep the base distinct and stable.
- When embroidering seeds, keep stitches small and evenly spaced for a natural berry effect.
- If your yarn is particularly soft or slippery, lining the pouch can improve durability.
- For a sturdier drawstring, always slip stitch back along the chain rather than leaving it single.
Common Mistakes to Avoid
- Skipping the back loop only round for the base can make your pouch less stable.
- Uneven tension in the eyelet round can cause pockets to shift or look irregular.
- Forgetting to adjust the last repeat of the eyelet chain can result in uneven spacing.
- Not weaving in ends well enough may cause your embroidery or drawstring to unravel.
- Using yarn too thick or thin for the 4.0 mm hook will affect the pouch’s shape and size.
Customization Ideas
- Substitute yarn colors to make different berry varieties like blueberry or blackberry.
- Use variegated yarn for a multicolor berry look without embroidery.
- Adjust the chain length on the drawstring to make a longer or shorter closure.
- Add small beads on embroidered seeds for extra texture and sparkle.
- Make larger or smaller versions by tweaking rounds, perfect for gift sets or decor.
How to Use or Display This Crochet Project
This little pouch is perfect for storing delicate items such as jewelry, crafting tools, or small keepsakes. It makes a thoughtful handmade gift, especially when paired with other floral or nature-inspired accessories like the Rose Vine Bracelet. You can display it on a dresser or shelf to add a splash of cozy charm, or even carry it as a unique coin purse or travel pouch.
Care Instructions
Machine wash on gentle cycle with cold water or hand wash gently to preserve shape and embroidery. Lay flat to dry to prevent stretching. Store in a cool, dry place away from direct sunlight to keep colors vibrant.
Frequently Asked Questions
Q: Can I use a different yarn weight for this pattern?
A: Worsted cotton is ideal for structure, but using lighter yarn will create a softer, less sturdy pouch, and heavier yarn may be too bulky for the leaf edging.
Q: Is the drawstring removable?
A: Yes, you can easily remove or replace the drawstring if you want to customize the pouch or wash it separately.
Q: How can I make the pouch bigger?
A: Add more increase rounds at the base (following the pattern’s increase logic) and increase the height with more side rounds before the eyelet round.
Q: Is embroidery thread best for the seed details?
A: Embroidery thread or thin yarn works well; it adds subtle texture without bulky stitches that could distort the pouch shape.
Q: Can I use this pattern to make other shapes?
A: This pattern is for a round berry-inspired design; for other shapes, modifying the base or side stitch counts would be necessary.
Final Thoughts
Crocheting this Berry Basket Drawstring Pouch is a soothing and satisfying experience that results in a delightful, functional accessory. I love how the combination of simple shapes and thoughtful finishing details create such charm. Whether for your craft space or as a heartfelt gift, this pouch pairs nicely with other delicate handmade pieces.
Conclusion
For a charming way to present or store small fruits or crafts, consider beautiful display options like the Pumtus 4 Pack Ceramic Berry Baskets. They make a perfect home complement for your handcrafted berry-inspired pieces, combining rustic farmhouse style with the cozy touch of crochet.



