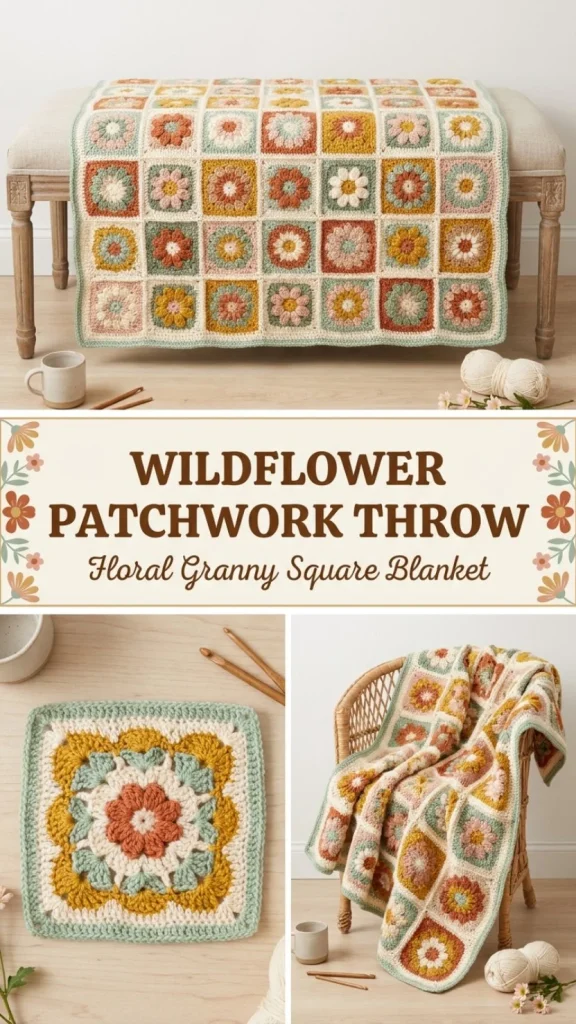
This Wildflower Patchwork Throw is a charming crochet blanket made from 35 floral granny squares arranged in a 5 by 7 layout. Each square features a cheerful flower motif built from a mustard center and soft blush or terracotta petals, surrounded by creamy and sage tones that give the throw a cozy, garden-inspired feel. It’s a perfect project for those who want a cozy, decorative blanket that’s beginner-friendly but still interesting, offering colorful stitches that brighten any living space. Working these motifs individually makes it easier to fix mistakes or swap colors, and joining them in strips helps the blanket lay flat and neat. For beginners, blocking each square to size is a little extra work, but it makes a big difference in the overall look and makes assembly much smoother. This project is a wonderful way to practice your granny square skills with a floral twist, and you can explore different finishing edges for a unique touch—you might want to explore some stylish variations on crochet edging techniques to personalize your throw.
Why You’ll Love This Crochet Pattern
- Combines classic granny square techniques with pretty floral motifs for a fresh modern look.
- Breaks down the project into manageable squares, perfect for working in short sessions.
- Uses worsted weight yarn and a popular 5.0 mm hook easily found in most craft shops.
- The finished throw is both decorative and cozy—a delightful gift or home accent.
- Encourages blocking and neat joining for clean, professional results.
- You’ll learn slip stitch joining through back loops and whip stitch methods, skills useful in many projects.
Finished Size
The completed blanket measures approximately 32 inches by 45 inches (about 6.5 inches per square in a 5 x 7 layout). Sizes may vary depending on your yarn choice, crochet tension, and blocking. Blocking the squares to uniform size is essential for a polished final look.
Skill Level
This pattern is suitable for an advanced beginner. It involves basic stitches like double crochet and slip stitch but requires attention to joining and shaping multiple motif pieces. The floral petal clusters add a fun texture element without being too complicated.
Materials Needed
- Worsted weight (#4) cotton or acrylic yarn: cream, mustard, terracotta, blush, sage, and soft green
- 5.0 mm (H-8) crochet hook
- Tapestry needle for weaving ends
- Stitch markers (optional but helpful)
- Scissors
- Blocking mats and pins for shaping squares after finishing
Stitches and Abbreviations
- ch = chain
- dc = double crochet
- sl st = slip stitch
- sc = single crochet
- cluster = multiple incomplete double crochets worked together in the same stitch or space (in this pattern, 3 dc cluster means 3 dc worked together as one cluster)
- st = stitch
- sp = space
Gauge and Tension Notes
Exact gauge is less critical for this blanket since it’s motif-based, but aiming for consistent tension will ensure squares block evenly. Avoid pulling too tightly on clusters and petals, which can cause warping. Work the squares with a comfortable hook tension that lets your stitches look even but not loose.
Pattern Notes Before You Start
The throw is made of 35 identical floral granny squares worked separately in rounds with color changes for petals, centers, and backgrounds. After completing individual squares, join them first into horizontal strips, then combine strips to assemble the full throw. Color placement should be even and balanced for visual harmony. Blocking each square to shape and size before joining is highly recommended for an even finish.
Step-by-Step Crochet Instructions
Flower Center (Make 35):
- With mustard yarn, create a magic ring.
- Ch 2 (counts as first dc), work 12 dc into the ring.
- Join to first dc to close the round. Fasten off.
Petal Round:
4. Join blush or terracotta yarn in any stitch from the previous round.
5. (Ch 2, 3 dc cluster in the same stitch, ch 2, sl st in next stitch) repeat 6 times total to form 6 petals.
6. Fasten off.
Square Round 1 (Join cream):
7. Join cream yarn in any space between petals.
8. In same space, work (3 dc, ch 2, 3 dc) to form a corner.
9. *In next petal space, work 3 dc; in next petal space, work (3 dc, ch 2, 3 dc); repeat from * two additional times.
10. In final petal space work 3 dc. Join to first dc.
Square Round 2:
11. Sl st to corner space.
12. Ch 3 (counts as dc), then (2 dc, ch 2, 3 dc) in the same corner space.
13. Work 3 dc in next side space, then (3 dc, ch 2, 3 dc) in the next corner space.
14. Repeat around. Join.
15. Finished square is about 6.5 inches. Block all squares to even out size.
Joining Squares:
16. Arrange color placement evenly across the 5 x 7 layout.
17. Join squares into 5 strips of 7 squares each by slip stitching through back loops only or use whip stitch for a neat seam.
18. Join the 5 strips together in the same manner.
Border Round 1 (sage):
19. With sage yarn, single crochet evenly around blanket edges, placing 3 sc in each corner.
Border Round 2:
20. Ch 3, then dc around the blanket, working 5 dc in each corner sc. Join.
Border Round 3 (soft green):
21. Work (sc, ch 2, skip 2) repeatedly around for a light decorative edge.
22. Adjust corners as (sc, ch 2, sc).
23. Finish off and weave in all ends securely.
Assembly and Finishing
Joining the squares through back loops creates a subtle ridge that helps keep the seams flexible and less bulky. When joining, keep tension consistent to avoid puckering. Once assembled, weave in ends using a tapestry needle with care to keep the front neat. Light steam blocking after assembly helps flatten the seams and relax stitches for a professional finish.
Helpful Tips
- Use cardstock or blocking mats and pins to get each square perfectly shaped before joining.
- Keeping your petals loose but not too floppy will keep the flower texture delicate and defined.
- When joining strips, place stitch markers between squares to keep alignment consistent.
- Weaving your ends as you go can save time at the end and prevent loose tails.
- Experiment with color placement beforehand on paper or digitally to balance the flower and background colors across the throw.
Common Mistakes to Avoid
- Skipping the blocking step, which causes uneven squares and a misshapen blanket.
- Joining squares too tightly, which puckers seams and distorts edges.
- Forgetting to count stitch clusters carefully in petal rounds, leading to uneven petals.
- Changing yarn tension drastically between color changes, resulting in inconsistent stitch sizes.
- Overlooking ends to weave in neatly, which can lead to unraveling over time.
Customization Ideas
- Swap color combinations for a seasonal or room-specific palette.
- Use a softer, more textured yarn like a baby yarn or alpaca blend for added warmth.
- Add a wider or different border stitch, such as shells or picots, for a more dramatic edge.
- Increase or decrease the number of squares to create various sizes from a lap throw to a large blanket.
How to Use or Display This Crochet Project
This throw works beautifully draped over a sofa, layered on a bed, or even as a picnic or garden accent. It’s spectacularly giftable for birthdays, housewarmings, or special occasions thanks to its thoughtful construction and pleasing colors. Pair it with pillows in coordinating shades to bring a fresh, handmade touch to your living space.
Care Instructions
If using cotton yarn, wash the throw gently by hand or machine on delicate, then dry flat to maintain shape. For acrylic blends, machine washing is typically safe—but always follow the yarn label guidelines. Store your blanket folded loosely in a cool, dry place to preserve fibers and shape.
Frequently Asked Questions
Q: Can I use a different yarn weight?
A: You can try, but the finished square size and throw dimensions will change. Adjust your number of squares or hook size accordingly.
Q: How do I prevent gaps when joining squares?
A: Work joins through the back loops only with consistent tension to avoid stretching or puckering.
Q: What if I don’t want to block?
A: Blocking improves size uniformity and neatness but if omitted, be sure to crochet squares slowly and carefully to maintain shape.
Q: Can I adjust the throw size?
A: Yes, make more or fewer squares and add or subtract strips to customize dimensions.
Q: What’s the best way to change colors cleanly?
A: Finish the last stitch of a round with the new color to create smooth transitions—avoid knots where possible.
Final Thoughts
The Wildflower Patchwork Throw is a gratifying crochet project combining approachable flower motifs with practical construction in manageable pieces. It offers an excellent opportunity to boost your skills while crafting a cosy, colorful wrap perfect for home or gifting. If you want to explore further beautiful patterns that blend floral motifs with patchwork style, consider browsing the extensive collection available through pattern support and community resources to keep your crochet journey inspired.
Conclusion
If floral motifs and patchwork-style throws inspire your creative side, you’ll find the Wildflower Patchwork Throw both satisfying and functional. For more fresh quilting inspiration that pairs beautifully with crochet projects, check out this Flower Quilt Pattern — Meet the Wildflower Remix BOM!. It’s a wonderful blend of flowers and patchwork that complements your handmade throw perfectly.



