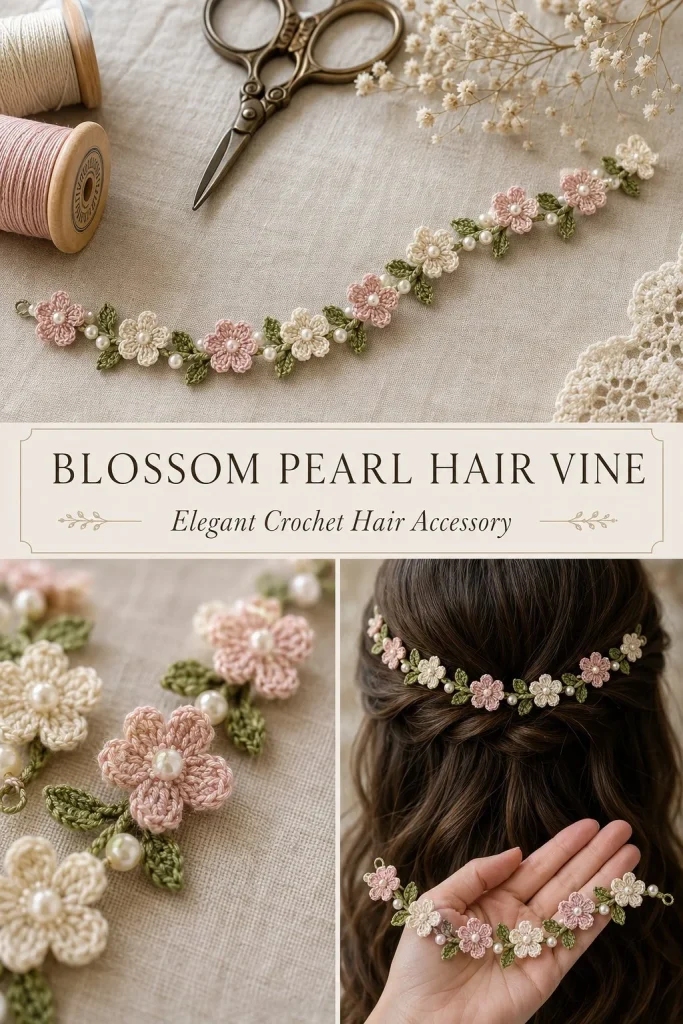
Creating delicate, wearable art can feel truly rewarding, especially when it doubles as an elegant accessory for special occasions. This crochet project is a Blossom Pearl Hair Vine—a charming, flexible hair adornment featuring soft blush pink and pale cream blossoms interspersed with tiny pearl beads. It’s designed to curve gently around the head, held in place with satin ribbons or pins, perfect for weddings, proms, or simply adding a romantic touch to your outfit. While the construction may sound intricate, the techniques are approachable for adventurous beginners and intermediate makers alike. Using fine thread and a small hook helps the vine keep its graceful shape, and weaving in the wire discreetly gives just the right amount of bend without bulk. One thing I’ve learned from making several prototypes is that leaving some “breathing room” on both ends of the vine helps it look less crowded and more natural when worn—something that also makes finishing and attaching the ribbons easier.
Why You’ll Love This Crochet Pattern
- Creates a lightweight, elegant hair accessory suitable for various styles and occasions
- Uses simple stitches and construction methods, great for building confidence with fine thread work
- Flexible structure thanks to optional wire, supporting gentle shaping and easy wearability
- Combines classic floral motifs with pearl accents for a timeless, delicate look
- Detailed sewing instructions ensure motifs stay firmly in place without bulky seams
- Satin ribbon or hairpin loops offer versatile styling options for secure attachment
Finished Size
The completed hair vine measures approximately 50 to 60 cm (20 to 24 inches) in length, with the central 36-40 cm decorated with blossoms and leaves. The size may vary a bit depending on your tension, thread choice, and how tightly you crochet. This length comfortably curves around most head sizes.
Skill Level
Advanced beginner to intermediate. While the individual stitches are basic (single crochet, slip stitch, half double crochet, double crochet), the pattern requires working with fine thread and managing small motifs like petals and leaves. Sewing pieces neatly and shaping the vine with wire or thread wrapping might challenge new crocheters but is a great next step in skill-building.
Materials Needed
- Size 10 crochet thread in olive green (for vine), blush pink, and pale cream (for blossoms)
- 1.00 mm steel crochet hook (recommended for fine thread)
- 7 small pearl beads, approximately 3 mm
- Optional: 0.3-0.4 mm soft jewelry wire for shaping the vine
- 2 narrow satin ribbons, approx. 25 cm each for ties
- Fine tapestry needle for sewing blossoms and leaves to vine and weaving in ends
- Sharp scissors
Stitches and Abbreviations
- ch = chain
- sl st = slip stitch
- sc = single crochet
- hdc = half double crochet
- dc = double crochet
- magic ring = adjustable ring used to start motifs
Gauge and Tension Notes
Gauge is not critical for this project since it’s more decorative than dimensional, but maintaining even tension is important for neat petals and leaves. Too tight, and the vine becomes stiff and hard to shape; too loose, and petals may look floppy. Aim for a balanced tension that produces firm but flexible stitches with size 10 thread and 1.00 mm hook.
Pattern Notes Before You Start
This vine is made of three main components worked separately: the base vine, blossoms, and leaves. The base vine is a chain slip-stitched throughout, optionally worked around jewelry wire for shaping. Blossoms and leaves are crocheted individually and sewn in place along the central portion of the vine. Petals in blossoms are formed in rounds with increases to shape the flower. Leaves are crocheted flat with slip stitches and half double crochets worked along both sides of a chain foundation. The final assembly includes beading and attachment of ribbons or loops at ends for wearing.
Step-by-Step Crochet Instructions
Base Vine
- Using olive green thread, chain until the vine length measures 50 to 60 cm.
- Starting in the 2nd chain from the hook, work slip stitches across the entire chain. This creates a neat, flexible foundation.
- If using jewelry wire for shaping, lay the wire under the chain as you slip stitch so the stitches anchor the chain and wire together. Ensure the wire extends about 2 cm past each vine end.
- Fold wire ends inward to avoid sharp edges, then cover with thread by wrapping and sewing to secure neatly.
- Fasten off, leaving long tails for sewing later.
Blossoms (Make 8 total: 4 blush pink and 4 pale cream)
- Create a magic ring with your chosen blossom color.
- Work 10 single crochet into the ring. Pull the ring tight and join with a slip stitch to the first single crochet.
- For the petal round, slip stitch in the next stitch.
- In the next stitch, work this sequence: chain 2, half double crochet, 2 double crochet, half double crochet, chain 2, slip stitch. This forms one petal.
- Repeat the petal sequence 5 more times around, forming 6 petals in total.
- Fasten off, leaving a 15 cm tail for sewing.
Leaves (Make 16 total)
- Chain 5.
- Starting in the 2nd chain from the hook, work along one side of the chain as follows: slip stitch, single crochet, half double crochet, single crochet.
- At the last chain, work 3 single crochet into it to round the tip.
- Working back along the opposite side of the chain, work: single crochet, half double crochet, single crochet, slip stitch.
- Fasten off, leaving a tail for sewing.
Assembly and Finishing
- Mark the center 36 to 40 cm of the vine as the flower placement area.
- Arrange the eight blossoms evenly along this area, alternating blush pink and pale cream flowers. Space them so the overall look feels balanced but airy.
- Sew each blossom securely to the vine base using the long tail and tapestry needle. Attach firmly but avoid bulky knots.
- Position one leaf on each side of every flower’s base. Angle leaves slightly outward to mimic natural stems, then sew in place.
- Stitch one pearl bead between each neighboring flower to add subtle shimmer and refinement.
- Leave the first and last 8 to 10 cm of the vine free of any decoration to keep the ends clean.
- Finish by folding a satin ribbon end around each vine tip and sewing securely, or create small crochet loops with chain stitches to use hairpins for attachment instead.
- Weave all loose tails neatly behind motifs with the tapestry needle to avoid bumps.
- Gently curve the finished vine by hand so it naturally hugs the head’s shape.
Helpful Tips
- Use a fine tapestry needle with a large eye to easily weave in delicate threads without splitting.
- When working petals, keep your tension consistent to ensure all petals are similar in size and shape.
- If working with wire, use soft jewelry wire that bends easily but holds shape to avoid stiffness.
- Pin the arrangement of flowers and leaves on the vine before sewing to find the most balanced layout.
- Handle pearl beads carefully; small drops can break them or dull their shine.
Common Mistakes to Avoid
- Don’t crochet petals unevenly—double check counts for each petal to maintain symmetry.
- Avoid pulling wire ends out too far—they should be tucked well inside or taped over to prevent snagging hair.
- Don’t sew motifs loosely; the hair vine will lose shape and look sloppy if flowers and leaves wobble.
- Don’t skip leaving extra vine length free at ends; it allows easier attachment and a less cluttered appearance.
Customization Ideas
- Use different thread colors to match wedding palettes or seasonal themes (e.g., lavender, ivory, or mint).
- Substitute pearls with small crystal beads or tiny seed beads for more sparkle.
- Omit wire for a softer, more relaxed vine or add thicker wire to create a more dramatic curl.
- Experiment with flower size by increasing petal height—use a slightly larger hook or thicker thread.
How to Use or Display This Crochet Project
Wear this delicate hair vine as a bridal or special occasion accessory, weaving it through a styled braid or securing above an updo. It also makes a thoughtful handmade gift for bridal parties or flower girls. When not worn, drape it gently over a decorative jewelry stand or place in a keepsake box to preserve its shape and beauty.
Care Instructions
Hand wash gently with cool water and mild soap if needed. Avoid wringing to prevent misshaping the blossoms or vine. Lay flat on a towel to dry, reshaping flowers carefully. Store wrapped in acid-free tissue paper away from direct sunlight and moisture to protect delicate threads and beads.
Frequently Asked Questions
Q: Can I make the vine without using jewelry wire?
A: Yes! The wire is optional but helpful for gently shaping and holding the vine in place. Without wire, it will be more flexible and softer.
Q: Can I use thicker yarn instead of size 10 thread?
A: Thicker yarn will result in a larger, less delicate vine. Adjust hook size accordingly and expect a more substantial flower size and texture.
Q: How do I fasten the vine securely in hair?
A: The pattern provides options: sew satin ribbon ties for bow closure or create crochet loops for inserting small hairpins.
Q: Should I knot the sewing tails tightly when attaching motifs?
A: Knot securely but avoid bulky knots that create lumps. Wrap threads neatly and weave ends close to the vine base.
Q: How do I keep the pearls from falling off?
A: Use a fine tapestry needle and strong thread to sew pearls carefully between flowers with multiple stitches, then tie off firmly.
Final Thoughts
This Blossom Pearl Hair Vine is a beautiful way to practice fine crochet and assemble individual motifs into a graceful, wearable piece. It balances elegance and functionality, making it a lovely project for those wanting to craft something special for themselves or as a gift. Take your time with assembly, and don’t hesitate to adjust flower placement to your liking—handmade creations like this always feel a little more personal and refined with a subtle touch of your own style. Happy crocheting!



