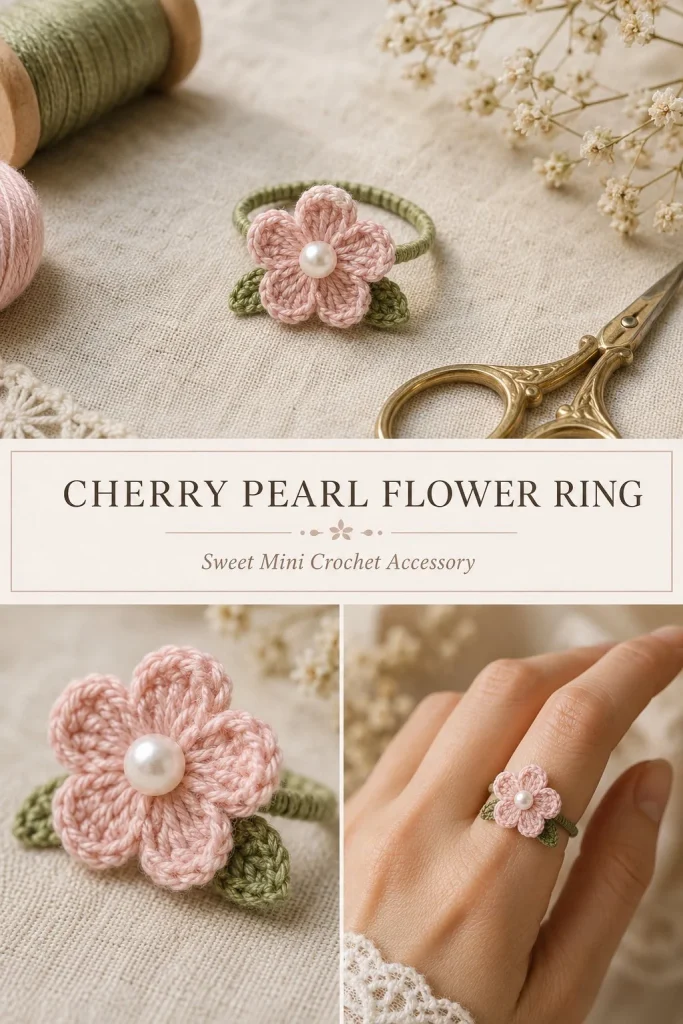
Creating a delicate crochet flower ring is a charming way to add a personal touch to your handmade jewelry collection. This project combines fine crochet techniques with simple shaping to produce a stylish, lightweight accessory that fits comfortably on your finger. The Cherry Pearl Flower Ring features a neat, slender band in green thread, crowned with a small pink flower adorned by a single pearl bead, and flanked by two softly shaped leaves. This pattern is approachable for beginners who have some basic crochet skills and want a quick, satisfying project without bulky materials or complex construction.
Working with fine size 20 crochet thread and a tiny 0.75 mm steel hook helps the delicate details come alive, but keep in mind that a steady hand and consistent tension make a big difference here. I’ve found that assembling and firmly sewing the small parts together keeps the ring stable while ensuring it sits comfortably. Plus, the pearl bead nestled in the flower center gives it a little sparkle that feels elegant but not fussy. Whether you’re making a thoughtful gift or a treat for yourself, this pattern balances subtle beauty with practical instructions that will guide you every step of the way.
Why You’ll Love This Crochet Pattern
- Creates a wearable, elegant accessory perfect for gifting or personal styling.
- Uses fine thread and a small hook to achieve detailed stitches and a dainty finish.
- Beginner-friendly with clear, step-by-step instructions suitable for intermediate beginners.
- Teaches important finishing skills, including working with a magic ring and attaching small embellishments securely.
- Adjustable length band allows for a custom fit tailored to the wearer’s finger.
- Lightweight design ensures comfort all day without bulk.
Finished Size
The completed ring band measures approximately 26-34 chain stitches in circumference to fit the wearer’s finger snugly, typically resulting in a band width around 3-4 mm and a flower diameter of about 2 cm including petals. Keep in mind your exact size may vary depending on crochet tension and the specific thread used.
Skill Level
Easy to intermediate beginner. This pattern involves working in rounds and uses fundamental stitches such as single crochet (sc), half double crochet (hdc), and double crochet (dc). Beginners with some prior experience crocheting in the round and working magic rings will find this a great project to develop precision and finishing skills.
Materials Needed
- Size 20 crochet thread in blush pink (for the flower center and petals)
- Size 20 crochet thread in olive green (for the ring band and leaves)
- Steel crochet hook size 0.75 mm
- One small 3 mm pearl bead (for the flower center)
- Fine tapestry needle for sewing and weaving in ends
- Sharp scissors
- Optional: Adjustable metal ring blank with perforated pad (if crocheting the band is not preferred)
- Optional: Strong jewelry thread (for attaching the flower securely to a metal ring blank)
Stitches and Abbreviations
- ch: chain
- sc: single crochet – insert hook, yarn over, pull through stitch, yarn over, pull through two loops
- hdc: half double crochet – yarn over, insert hook, yarn over, pull through, yarn over, pull through all three loops
- dc: double crochet – yarn over, insert hook, yarn over, pull through, yarn over, pull through two loops, yarn over, pull through last two loops
- sl st: slip stitch – insert hook, yarn over, pull through stitch and loop on hook in one motion
- MR: magic ring – adjustable ring foundation used to begin crocheting in the round
Gauge and Tension Notes
Gauge is not critical for this project, but keeping an even, consistent tension is important to maintain the ring’s structural integrity and small, tidy appearance. Working too tightly may make the flower petals stiff and hard to shape; too loose and the ring band might feel floppy or oversized. I find a light, controlled tension works best with size 20 thread and a fine hook.
Pattern Notes Before You Start
This ring is made of three crocheted components worked separately: the ring band, the flower center with petals, and two small leaves. The ring band is crocheted in joined rounds with green thread to fit the wearer’s finger comfortably. The flower is created in a magic ring in blush pink thread and includes a final petal round worked around the center. Leaves are worked flat with shaping along a small foundation chain. Pieces are sewn together firmly for stability, with a pearl bead stitched through the flower center before assembly. Color changes occur between components, requiring joining and fastening off accordingly. If you prefer, you can substitute a metal ring blank instead of crocheting the band but secure attachment with jewelry thread rather than relying solely on glue.
Step-by-Step Crochet Instructions
Ring Band (Green Thread)
- Chain length to fit the wearer’s finger snugly (typically 26-34 ch). Make sure the last chain is not twisted. Join the last ch to the first with a slip stitch to form a round.
- Round 1: Chain 1, single crochet (sc) evenly into each chain around. Join with a slip stitch.
- Round 2: Chain 1, single crochet in each stitch around again. Join with a slip stitch. Fasten off. The band should be about 3-4 mm wide.
Flower Center (Blush Pink Thread)
- Create a magic ring (MR).
- Work 10 single crochets into the magic ring. Pull tight to close the center. Join with a slip stitch to the first sc (10 sc total).
- Petal Round: Slip stitch into the next stitch, then into the following stitch, work the following petal pattern: chain 2, half double crochet (hdc), 2 double crochet (dc), hdc, chain 2, slip stitch (sl st) in the same stitch.
- Repeat the petal pattern to five times total (each petal uses 2 stitches), creating 5 petals evenly spaced around the flower center. Fasten off, leaving a 20 cm tail for sewing.
Leaves (Make 2 with Green Thread)
- Chain 5.
- Starting in the 2nd chain from the hook, work: slip stitch, single crochet, half double crochet, single crochet.
- In the last chain, work 3 single crochets to form the leaf tip.
- Working along the opposite side of the chain foundation, work single crochet, half double crochet, single crochet, slip stitch.
- Fasten off, leaving tails for sewing.
Assembly and Finishing
- Using a fine tapestry needle, thread the 3 mm pearl bead firmly through the flower’s magic ring center base so it nests securely.
- Position the flower centered on top of the crocheted ring band, placing the band’s join at the bottom of the finger for comfort.
- Place one leaf underneath each side of the flower base.
- Sew the flower, leaves, and both rows of the ring band together using the tail ends. Stitch through all layers at least six times to secure firmly while hiding stitches beneath the flower’s base to maintain a neat finish.
- If you prefer using a metal ring blank, sew through the perforated pad with sturdy jewelry thread for durability instead of relying on glue.
- Weave all loose tails neatly inside the band and trim carefully to avoid bulk.
Helpful Tips
- Keep your tension even to avoid the ring band being too tight or loose; it should fit snugly but comfortably.
- When working the petals, gently block or shape them by pinching them lightly between your fingers to finish with a soft curve.
- Use a fine tapestry needle to sew pieces together so that stitches remain invisible from the outside.
- Double stitch the flower and leaves onto the ring band for durability—rings may get daily wear and need extra stability.
- If the pearl bead slips easily, secure with a small knot or dab of fabric glue on the inside after sewing to keep it in place.
Common Mistakes to Avoid
- Joining the ring band chain with a twist—this creates an uncomfortable mobius band shape. Always lay your chain flat before joining.
- Working petals too tightly, which causes stiffness; aim for a light hand to keep petals soft and flexible.
- Not securing the pearl bead well, which can cause it to rotate or loosen with wear.
- Skipping the six stitches when sewing the layers—this can make the ring fragile and prone to unraveling.
- Cutting yarn tails too short before weaving in, risking them slipping out later.
Customization Ideas
- Use variegated or metallic crochet thread for the flower to add subtle shimmer.
- Swap the pearl bead for a small colored bead or tiny button to change the flower center look.
- Make the band wider by adding extra rounds of single crochet for a chunkier ring style.
- Crochet multiple flowers in a cluster for a statement ring design.
How to Use or Display This Crochet Project
This crochet flower ring makes a beautiful personal accessory to wear daily or for special occasions. It can be a thoughtful handmade gift for friends or family who appreciate delicate jewelry. Because the band is adjustable to fit comfortably, it’s ideal for gift-giving when exact sizes aren’t certain. You can also display a set of handmade rings in a small decorative dish or jewelry box as charming décor in your craft space or bedroom.
Care Instructions
Hand wash gently in lukewarm water with mild detergent. Avoid wringing or twisting to preserve the shape and delicate stitches. Lay flat to air dry. Store separately in a soft pouch or box to prevent snagging or flattening. Given the fine threads, avoid heavy wear and remove before activities like washing dishes, gardening, or exercise.
Frequently Asked Questions
Q: Can I make this ring larger or smaller?
A: Yes, adjust the starting chain length of the band to fit your finger snugly before joining. Add or subtract stitches evenly for size changes.
Q: What if I don’t have size 20 thread or a 0.75 mm hook?
A: Using slightly thicker thread and a larger hook will result in a bigger, less delicate ring but can still look charming. Just adjust stitch counts to fit your sizing and tension.
Q: Can I attach the flower to a metal ring blank instead of crocheting the band?
A: Absolutely. Use sturdy jewelry thread to sew through the metal blank’s perforations for a secure attachment rather than relying on glue.
Q: How do I keep the petals from curling or looking flat?
A: Light blocking after finishing and shaping petals gently with your fingers helps create a soft, natural curve.
Q: Is the pearl bead necessary?
A: The pearl adds a sweet, polished finishing touch, but you could substitute with any small bead or button that fits the magic ring center.
Final Thoughts
This Cherry Pearl Flower Ring is a delightful little project that pairs beginner-friendly crochet techniques with thoughtful finishing tips to produce a wearable treasure. Its delicate flower and leaves make it dainty yet durable enough for everyday wear or gifting. With attention to tension and assembly, you’ll find this pattern a satisfying way to sharpen your skills while creating a piece of jewelry that truly feels handmade and special. Enjoy crafting your own little blossom that brings a touch of crochet charm to your fingers.



