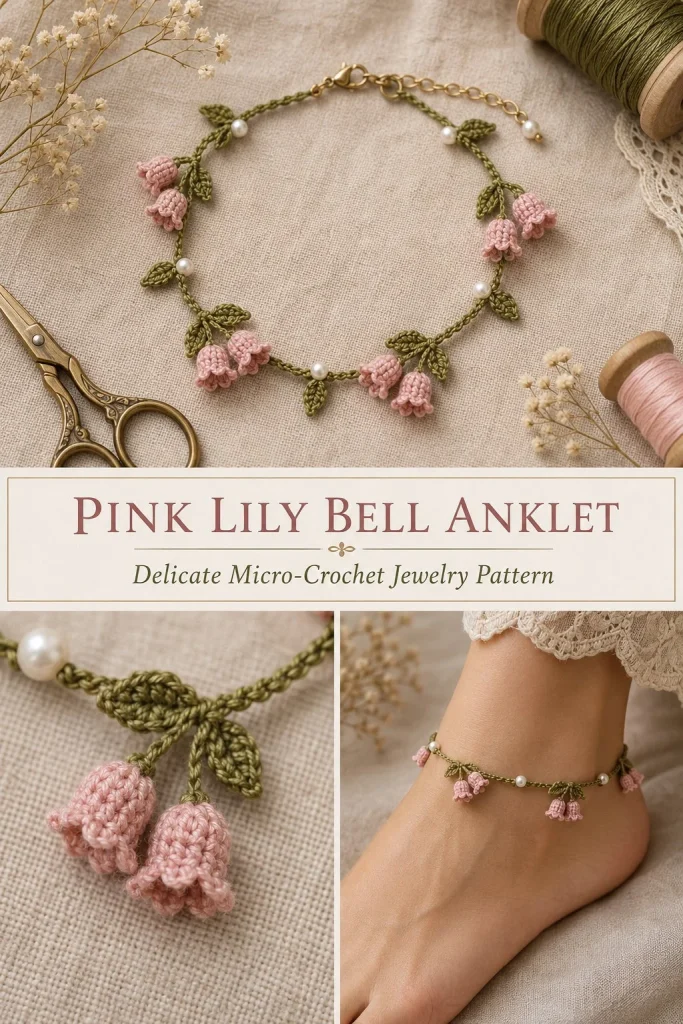
Wearing jewelry that feels special and handmade adds a quiet joy to everyday moments. The Pink Lily Bell Anklet is a delicate crochet accessory that combines a slender olive green cord with soft pink bell-shaped flowers and tiny leaves, finished with shimmering pearl accents. This project is perfect for crocheters seeking a charming, wearable piece that isn’t bulky or overwhelming. The stitch pattern is straightforward, making it accessible for beginners who want to try small motifs, while still offering satisfying texture with bell shapes and scalloped edges. You’ll appreciate how the flexible slip stitch cord hugs the ankle comfortably, and how the separately made leaves and flowers are carefully attached to keep the anklet light and natural-looking. This anklet makes a lovely gift or a personal indulgence for warmer seasons. I found that gently steam-blocking the leaves and bells really lifts the shape, making the little details stand out beautifully without flattening the pearls.
Why You’ll Love This Crochet Pattern
- Creates a delicate but durable handmade anklet that comfortably fits your ankle.
- Beginner-friendly construction with simple stitches and modular parts.
- Includes pearl bead accents for an elegant touch without complicated beading skills.
- Flexible cord base made with slip stitches ensures comfortable wear and neat shape.
- Leaves and bell flower motifs crochet quickly, ideal for a focused mini-project.
- Assembly techniques allow freedom of movement for leaves while securing bells in place.
Finished Size
The anklet fits ankles approximately 22 cm (8.7 inches) circumference, but you can easily adjust the length by chaining more or fewer stitches to match your size minus about 1.5 cm to allow for sewing and closure. Size may vary slightly depending on your crochet tension and yarn choice.
Skill Level
Advanced Beginner. The pattern uses basic stitches like chain, single crochet, half double crochet, double crochet, slip stitch, and simple increases. Separate motifs are sewn together, which is good practice for beginners comfortable with hand sewing crochet pieces.
Materials Needed
- Size 10 mercerized crochet thread in olive green and soft pink color.
- Steel crochet hook size 1.00 mm.
- Twelve small pearl beads (approximately 3 mm diameter).
- Fine tapestry needle for sewing pieces and weaving yarn tails.
- Sharp scissors.
- Optional: Small lobster clasp and two jump rings for metal closure or one pearl button for crochet button closure.
- Optional tools for finishing: small jewelry pliers (for metal findings), blocking mat, rustproof pins, or steamer.
Stitches and Abbreviations
- ch = chain
- sl st = slip stitch
- sc = single crochet
- hdc = half double crochet
- dc = double crochet
- inc = increase (work 2 stitches into the same stitch)
- MR = magic ring or magic circle
Gauge and Tension Notes
Gauge is not critical for fit but maintaining a consistent tension helps the anklet look neat and balanced. Use a firm but flexible tension on the slip stitch cord to keep it sturdy and slightly elastic. When making leaves and bells, avoid pulling too tightly so the motifs hold their shape nicely after blocking.
Pattern Notes Before You Start
This anklet is made of a slip-stitch cord base, six leaves, and twelve pink bell flowers. Leaves and bells are crocheted separately then sewn onto the cord. Pearls are sewn inside flowers and also between grouped leaves on the cord. The closure can be metal clasp-based or crochet-button loop. Blocking after assembly softens and shapes the motifs while preserving pearl shine. Seam sewing uses long thread tails and leaves the leaf tips free to move naturally.
Step-by-Step Crochet Instructions
-
Make the Anklet Cord:
- Using olive green thread, ch 78 (or adjust to your ankle circumference minus 1.5 cm).
- Starting in 2nd ch from hook, sl st across every chain to the end.
- This creates a firm and flexible band.
- Fasten off, leaving a 15 cm tail at each end for sewing and closure attachment.
-
Crochet Leaves (Make 6):
- Ch 7.
- Starting in 2nd chain from hook, work sl st, sc, hdc, dc, hdc, sc across.
- In the last chain, work 3 sc to form the leaf tip.
- Work back along the unused side of the chain with sc, hdc, dc, hdc, sc, sl st.
- Join and fasten off, leaving a 12 cm tail for sewing.
- Block the leaves to a narrow point for crisp shaping.
-
Crochet Pink Bell Flowers (Make 12):
- R1: Using pink thread, create a magic ring (MR).
- Work 5 sc into ring; pull tight and join (5 sts).
- R2: Ch 1, inc in each st around (10 sts).
- R3: Ch 1, sc in each st around (10 sts).
- R4: Sl st in next stitch, ch 2, dc in next st, ch 2, sl st in the same stitch as dc; repeat 5 times to form scallops.
- Fasten off, leaving a 12 cm tail.
- Shape by gently pushing the center inward to form the bell shape.
-
Sew Pearl Beads Inside Bells:
- Thread a pearl bead on the needle.
- Pass the thread through the magic ring center of each bell twice to secure the bead inside.
- Fasten off securely.
Assembly and Finishing
- Mark the center front of the olive green cord.
- Evenly space 6 leaves across the center 15–17 cm of the cord with about 2.5 cm between leaf centers.
- Sew each leaf on only at its base (about 3–4 mm) to allow leaf tips freedom of movement.
- Attach 2 pink bells by their thread loops at the base of each leaf so they hang side-by-side, with bells facing downward without heavy overlap.
- Place a pearl bead on the cord between each leaf group; sew through the cord and bead twice to secure the beads firmly.
- For closure, attach jump rings and lobster clasp to cord ends if metal closure is preferred.
- For crochet closure, ch 8 at one end, slip stitch back to form a sturdy button loop; sew a pearl button securely to the opposite end.
- Weave in all thread tails into dense stitches for at least 2 cm, reverse once, and trim ends cleanly.
- Lightly steam-block the entire anklet, avoiding direct contact with pearls to maintain their shine.
- Blocking will sharpen leaf points and bell shapes while helping the anklet lay nicely.
Helpful Tips
- When sewing leaves and bells, only attach at narrow base points to keep the pieces mobile and natural.
- Use a fine tapestry needle for neat assembly and secure bead placement.
- Practice the slip stitch cord on scrap before starting to get a smooth, even tension.
- Steam-block carefully, holding the steamer at a distance to avoid flattening pearls or stretching cord.
- If adjusting size, remember the cord needs a bit of negative ease (smaller than ankle circumference) to fit snugly.
- Double-check the placement of leaves and bells before stitching to balance weight and appearance evenly.
Common Mistakes to Avoid
- Crocheting the cord too loosely — if it’s floppy, the anklet won’t hold shape well.
- Sewing leaves tightly flat rather than only at the base — this restricts their natural movement.
- Not securing pearl beads firmly inside flowers — beads may slip out with wear.
- Forgetting to leave long thread tails for sewing all pieces, leading to short ends that are hard to finish neatly.
- Skipping the blocking step — motifs may appear limp or misshapen without it.
Customization Ideas
- Use different colors for the cord and flowers, such as navy blue with cream bells for a winter look.
- Experiment with shiny or variegated crochet thread for more texture.
- Add tiny seed beads on leaves for extra sparkle.
- Make the anklet longer or shorter by adjusting cord chain length and spacing of motifs.
- Swap pearl beads for small crystal beads or tiny bells for a cheery jingle effect.
How to Use or Display This Crochet Project
The Pink Lily Bell Anklet is a charming accessory perfect for summertime wear with sandals or barefoot. It makes a thoughtful handmade gift for friends or family who appreciate delicate jewelry. This anklet also pairs well with casual dressy outfits for outdoor events or beach outings. When not worn, it can hang as a decorative charm on a jewelry stand or be stored flat in a small fabric pouch to protect the pearls.
Care Instructions
Hand wash gently in cool water with mild soap; avoid harsh detergents or scrubbing. Rinse well and blot with a towel to remove excess water. Lay flat to dry to preserve shape. Store in a dry place away from direct sunlight to prevent color fading. Avoid steam or ironing directly on pearls to maintain their luster.
Frequently Asked Questions
Q: Can I make this anklet larger or smaller?
A: Yes! Adjust the starting chain length of the cord to fit your ankle circumference minus about 1.5 cm for sewing. Adjust spacing of leaves accordingly.
Q: Is this pattern suitable for beginners?
A: Definitely. It uses simple stitches and small motifs that are worked separately, making it easy to manage incrementally.
Q: How do I secure the pearl beads inside the bells?
A: Thread the bead on a tapestry needle and pass the thread through the magic ring center twice before fastening off to keep them secure.
Q: Can I substitute yarn instead of crochet thread?
A: You can, but the delicate bell shape and fine detail is best maintained with fine thread and a small hook like 1.00 mm.
Q: What if I don’t want to use metal closures?
A: The crochet button loop with pearl button closure is a beautiful alternative and fully adjustable.
Final Thoughts
This Pink Lily Bell Anklet is a sweet and refined little project that combines simple stitches with charming details to make an elegant accessory. Its modular construction means you can work at your own pace and enjoy each motif as you go. With a little care in assembly and blocking, the anklet will hold its dainty shape and highlight the lovely pearl accents. It’s a lovely way to add a touch of handmade beauty to your jewelry collection or surprise someone special with a thoughtful gift. Happy crocheting!



