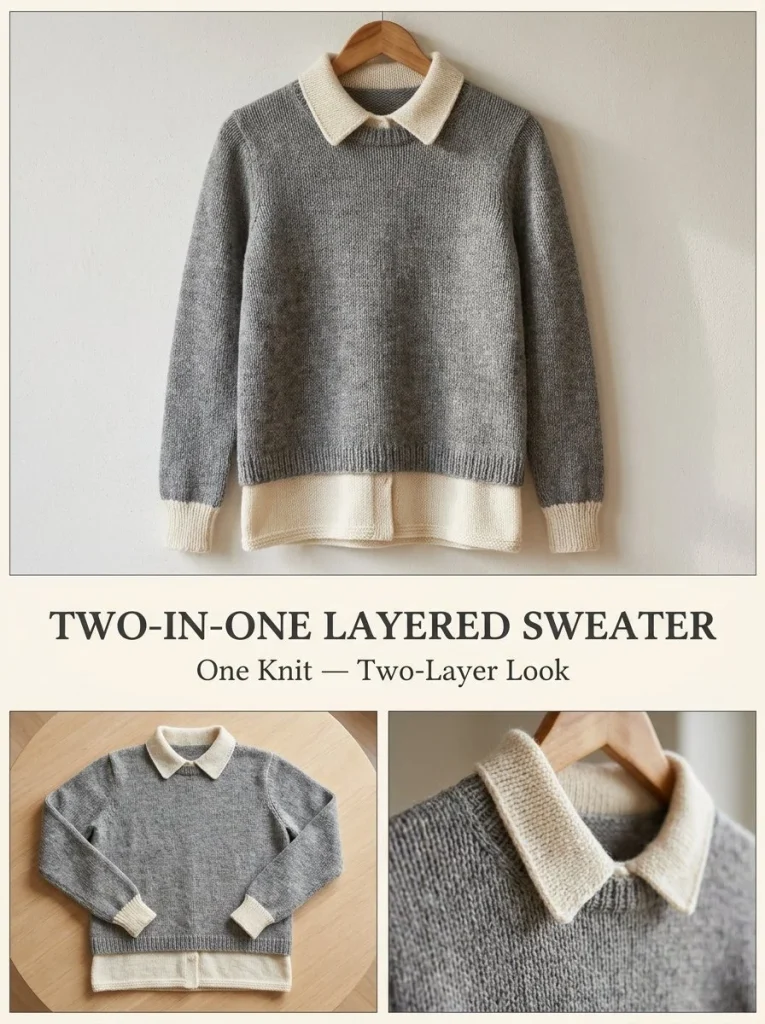
The Two-in-One Layered Collar Sweater is a stylish garment that brings together functionality and visual charm. This design features a unique combination of a gray sweater and a cream faux-collar, giving it a layered effect without the bulk. Perfect for chilly days, it offers both warmth and elegance, making it a versatile addition to any wardrobe. Additionally, the construction method not only incorporates traditional techniques but also allows for personal creativity in color choices and yarn selection.
In this article, we will guide you through the entire process, from selecting your materials to stitching the final details into your project. Whether you’re a seasoned crafter or a beginner, you’ll find tips and techniques to enhance your knitting skills. This project emphasizes a structured approach, breaking down the intricate layers and construction steps to ensure a comprehensive understanding.
Pattern at a Glance
Skill level: Intermediate
Terminology: Knitting
Construction: Top-down sweater, featuring ribbed cuffs, a faux hem, and a collar
Finished size: Approximately 44 in / 112 cm chest and 22 in / 56 cm gray sweater length, with an additional 1.5-2 in cream faux-shirt hem
Yarn weight: Worsted-weight
Needles: US 7 (4.5 mm) for ribbing; US 8 (5 mm) for the body
Main stitch: Stockinette and ribbing
Gauge: 18 sts x 24 rows = 4 in / 10 cm in stockinette
Motifs: None
Layout: Back and front panels with sleeves
Joining: Seams at the shoulders, sides, and sleeves
Finishing: Sewing on the collar and blocking
Materials
To complete this project, you will need the following materials:
- Yarn: Approximately 1200 yards of heather gray worsted-weight wool/merino, and 300 yards of soft cream.
- Needles: US 7 (4.5 mm) needles for ribbing and US 8 (5 mm) needles for the body.
- Tapestry needle: For weaving in ends and sewing seams.
- Stitch markers: Helpful for keeping track of progress especially at opening edges or to differentiate between stitches.
These materials are essential for achieving the desired finish and structure of the sweater while providing a comfortable fit.
Yarn and Color Notes
Choosing the right yarn is critical for both aesthetics and functionality. Wool/merino is preferred for its warmth, softness, and breathability. The heather gray provides a neutral base, allowing the cream to pop without overwhelming the design. Both colors work harmoniously together, offering an elegant contrast and rich visual appeal.
When selecting yarn, consider the texture. A smooth wool will create a cleaner finish, whereas a more textured fiber might yield a more rustic aesthetic. You can also substitute the colors depending on your preference, adding a pop of color with a bold or pastel shade for a more personalized touch.
Finished Measurements
The finished measurements for the Two-in-One Layered Collar Sweater are:
- Chest: Approximately 44 in / 112 cm
- Length: Approximately 22 in / 56 cm for the gray portion
- Cream faux-shirt hem: Extends 1.5-2 in / 4-5 cm below the gray hem
Note that final dimensions may vary based on individual tension and gauge. Always measure throughout the process to ensure an accurate fit.
Gauge
The gauge for this project is 18 stitches x 24 rows = 4 inches / 10 cm in stockinette stitch.
Importance of Gauge
Achieving the correct gauge is crucial, especially in garment construction, to ensure that the pieces fit together as intended. If your gauge is larger, your finished sweater will be bigger, while a smaller gauge will result in a tighter fit. Always knit a swatch before starting the project to ensure proper yarn and needle pairing. To check your gauge:
- Measure your swatch in stockinette stitch after blocking.
- Compare the number of stitches and rows to the gauge.
- Adjust needle size accordingly until you match the required gauge.
Abbreviations
In this pattern, you will encounter the following abbreviations:
- sts: stitches
- K: knit
- P: purl
- RS: right side
- WS: wrong side
Understanding these basic abbreviations can make following the pattern instructions much easier.
Important Pattern Notes
- Turning chains: Always maintain consistent turning chains between rows to avoid uneven edges.
- Right Side (RS) / Wrong Side (WS): Clearly identify which side is the RS and which is the WS as you work. The RS is the side that will be visible.
- Stitch markers: Place markers to indicate the beginning of your round or to differentiate between sections.
- Color changes: When changing colors, be sure to carry the yarn lightly up the side of the work to avoid long floats on the back.
Special Stitches and Techniques
This pattern utilizes a few key techniques that enhance both structure and style:
- Ribbing: The K1, P1 rib provides stretch and texture to the edges of the sweater.
- Stockinette Stitch: Creates a smooth, classic fabric.
- Decreasing: Essential for shaping the scoop neck and the collar.
These stitches add important functionality and design to your work.
Understanding the Construction
This garment consists of multiple components, starting with a foundational gray sweater and layered by cream accents. The construction is primarily top-down, which allows for ease in modifications during the knitting process. The key combines the back and front panels, shaping for the sleeves, and a refined collar, resulting in a wearable, layered look without additional bulk.
The Assembly Breakdown
- Back Panel: Start by casting on the specified number of stitches and work your way to the desired length.
- Front Panel: Similar to the back, but remember to leave space for the scoop neck.
- Sleeves: Knit separately and attach later.
- Cuffs & Collar: The cream accents are worked after the main body and provide finishing touches.
Understanding this structure will guide your knitting process and enhance your final project.
Complete Pattern Instructions
Foundation
Back Panel:
- Cast on 100 stitches using the smaller needles.
- Work in K1, P1 ribbing for 10 rows.
- Switch to larger needles and continue in stockinette stitch until the piece measures 22 inches / 56 cm.
- Bind off all stitches.
Front Panel:
- Cast on 100 stitches.
- Work in K1, P1 ribbing for 10 rows, then switch to stockinette stitch.
- Continue until the piece measures 17 inches / 43 cm.
- Bind off the center 24 stitches for the scoop neck.
- Work each side separately, binding off 4 sts once, 3 sts once, 2 sts once, then decrease 1 st at the neck edge 3 times.
- Continue until the front matches the back length and bind off the remaining 26-st shoulders.
Sleeves:
- Cast on 44 stitches using the smaller needles.
- Work in K1, P1 ribbing for 10 rows, then switch to larger needles.
- Increase 1 stitch at each side every 7th row for a total of 14 times until you reach 72 stitches.
- Work until the sleeve measures 18 inches / 46 cm and then bind off all stitches.
CREAM LAYER DETAILS:
Cuffs:
- With cream yarn and smaller needles, pick up 44 stitches around each sleeve edge.
- Work in K1, P1 ribbing for 14 rounds and bind off, ensuring that about 2 inches / 5 cm of cream shows.
Faux Shirt Hem:
- Using the larger needles, cast on 200 stitches.
- Work in stockinette stitch for 12 rows, then 4 rows in garter stitch before binding off.
- Sew this band to the inside lower edge of the sweater so it extends 1.5-2 inches / 4-5 cm below the gray hem.
Collar:
- Knit two cream pointed collar pieces: Cast on 34 stitches for each.
- Work in stockinette, decreasing 1 stitch at each edge every RS row until 4 stitches remain; bind off.
- Knit one cream back collar piece measuring 44 stitches x 12 rows.
- Block all pieces and sew them around the neckline, ensuring the two pointed fronts meet at the center.
Checkpoints
- After finishing the back, it should measure approximately 22 inches / 56 cm.
- The front should also match this length before proceeding to the neckline shaping.
- Ensure the sleeves measure 18 inches / 46 cm prior to sewing them to the body.
- The combined collar should create a sharp and polished look.
Assembly
After completing each panel and finishing the cuffs and collar, assemble your sweater by following these steps:
- Sew the shoulders together, matching the RS to RS.
- Set the sleeves into the armholes, ensuring the seam is aligned.
- Seam the side and sleeve seams.
- Attach the cream faux shirt hem and collar, ensuring everything aligns properly.
- Weave in any remaining ends.
Finishing
To complete the project, block your sweater lightly to enhance the drape and finalize the shape. Weave in all loose yarn ends carefully to ensure tranquility in your work. Consider giving a final gentle wash to soften the fibers and remove any tension marks from blocking.
How to Resize
To adjust for size, you can modify the cast-on stitches as necessary. For each added inch, increase your total cast-on stitches by approximately 5-6 stitches depending on how much ease you desire. For longer sleeves or body lengths, simply add a few more rows to the appropriate sections while keeping in mind the original structure.
Useful Variations
If you’d like to explore variations on this pattern:
- One-color version: Create a solid color look for a more minimalist style.
- Two-tone version: Experiment with different colored ribs and collars for a striking appearance.
- Longer length: Extend the body to create a tunic-length sweater.
- Child size: Use the same pattern and smaller dimensions to create a child-sized version.
Troubleshooting
Why Is My Project Getting Wider?
This may occur due to loose tension or incorrect gauge. Have a consistent stitch tension and check your gauge before starting.
Why Is My Edge Wavy?
Typically caused by changes between knit and purl stitches or an incorrect stitch count. Ensure that each section maintains the correct number of stitches.
Why Is My Fabric Curling?
Curling is common with stockinette stitch. Block your work, focusing on the edges, to encourage a flat finish.
Frequently Asked Questions
Can I use a different yarn weight?
Yes, but keep in mind that this will affect the gauge and overall size of the finished sweater.
Can I make it larger?
Absolutely! Consider adjusting the stitch counts and lengths in line with the resizing guidance mentioned above.
Is the pattern reversible?
The appearance of the sweater is primarily intended for the front side, especially with the collar design, so it is not reversible in style.
How should I block it?
Gently soak your finished pieces in lukewarm water, then lay flat on a towel to dry, shaping as necessary.
Final Thoughts
Creating the Two-in-One Layered Collar Sweater is an exciting way to enhance your knitting skills while producing a beautiful and practical garment. This project revolves around assembling two distinct layers and showcases how simple techniques can lead to stunning results. By following the steps outlined and adding your creative flair, this sweater can become a treasured item in your collection. Ready to embark on this journey? Happy knitting!
For more patterns that add character to your wardrobe, check out this blue edge collar scarf crochet pattern or this elegant camellia collar chain to accompany your new sweater!



