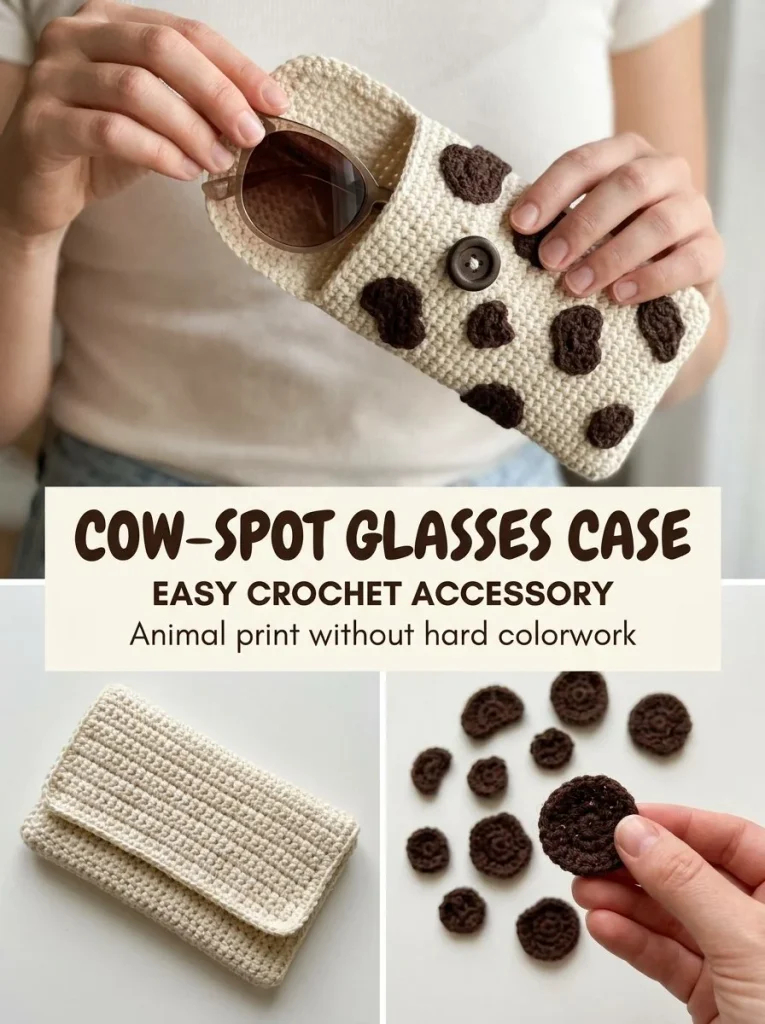
The Cow-Spot Crochet Glasses Case is an adorable and functional accessory that showcases both your crochet skills and your sense of style. This fun project is not only practical for protecting your glasses but also adds a chic, animal-print flair to your collection. With its combination of textures and colors, this case is sure to be a conversation starter!
Using worsted-weight cotton yarn adds durability and a soft touch to your finished piece. The construction features a simple yet effective foundation, allowing crocheters of all levels to create something unique. Whether you’re gifting this item or making it for yourself, it’s a delightful way to display your creativity.
Pattern at a Glance
- Skill level: Intermediate
- Terminology: US Crochet Terms
- Construction: Bottom-up with a folded flap
- Finished size: Approximately 4.5 inches wide by 15-17 inches tall (before folding)
- Yarn weight: Worsted-weight #4
- Hook: 4.5mm
- Main stitch: Single crochet
- Gauge: Not specified, but check for your desired fit
- Motifs: Irregular spots worked separately
- Layout: Rectangle folded to form a pouch with a rounded flap
- Joining: Seam sides and attach spots
- Border: None
Materials
To create your Cow-Spot Crochet Glasses Case, you will need:
- Yarn:
- Worsted-weight #4 cotton yarn in cream (main color)
- Small amount of espresso brown yarn for spots
- Hook:
- 4.5mm crochet hook
- Notions:
- 1 small dark button for closure
- Tapestry needle for sewing and finishing
Make sure you have everything ready before you start the project; this will help you stay focused and enjoy the process of crocheting your new accessory.
Yarn and Color Notes
When selecting yarn for your glasses case, a smooth, worsted-weight cotton is ideal because it offers a clean finish and durability. The cream serves as an excellent background for the espresso brown spots, giving it a fun and playful look reminiscent of animal prints. This pattern could also be experimented with using different colors; for example, try using bright colors or variegated yarns to make it truly one-of-a-kind.
Finished Measurements
The approximate dimensions of the finished glasses case are 4.5 inches in width and 15 to 17 inches in height before folding the bottom portion. This size is spacious enough to accommodate most glasses while still being compact and easy to carry.
Gauge
While a specific gauge is not provided, it’s essential to ensure your stitches are even and firm. A good tip is to crochet a small swatch to check how your yarn behaves and that your finished product will match the desired dimensions. If your gauge is too loose, the case may be floppy. Conversely, if it is too tight, it might not fit your glasses well.
Abbreviations
For this pattern, you will encounter the following abbreviations:
- ch: chain
- sc: single crochet
- sl st: slip stitch
- hdc: half double crochet
Important Pattern Notes
- Turning Chains: Ensure you account for your turning chain when starting new rows; your turning chains do not count as a stitch.
- Right Side/Wrong Side: The right side will be the side facing outward after assembly.
- Seaming: Be consistent in your seam allowance, especially around the sides to maintain a polished look.
Special Stitches and Techniques
This pattern primarily employs the single crochet stitch. The rounded flap is achieved by incorporating a series of slip stitches and half double crochets to create a softer edge. Understanding how to crochet irregular shapes for the spots is also vital; they are an essential feature of this project.
Understanding the Construction
The glasses case is created from a rectangle of crocheted fabric. The bottom part of the rectangle is folded upwards to form a pouch, while the upper section creates a rounded flap for easy access to your glasses. The sides are seamed to hold the structure, and the button is sewn on to provide a secure closure. After the main construction is finished, irregularly shaped spots are crocheted and sewn onto the body of the case, adding a touch of fun to the accessory.
Complete Pattern Instructions
Foundation
- Chain: Start by chaining 17 or enough chains to achieve a width of approximately 4.5 inches.
Row 1
- Single Crochet: Work a single crochet in the 2nd chain from the hook and continue doing so across the row.
Additional Rows
- Continue: Keep working single crochet rows until your rectangle measures approximately 15-17 inches in height.
Folding and Seaming
- Fold: Fold the bottom of your rectangle upwards by about 7 inches to create the pouch; leave the upper section as the rounded flap.
- Seam: Seam both side edges to secure the pouch.
Rounded Flap
- To Shape: For a softer rounded flap, crochet one row across the flap edge using the following stitches in sequence:
- Slip stitch in the first stitch
- Single crochet (sc)
- Half double crochet (hdc) across the center
- Mirror the sequence back to the opposite side
Closure
- Attach Button: Sew the button to the front flap.
- Chain Loop: Create a simple chain loop at the flap edge to fit the button snugly.
Spots
- Crochet Spots: Create 5-7 small irregular shapes from the brown yarn.
- For tiny spots, use a magic ring, work 5-7 single crochets, and fasten.
- For larger irregular spots, start with a magic ring with 6 single crochets and alternate between single crochets and increases on specified stitches as needed.
- Sew Spots: Flatten each spot and securely sew them on the front and back of the cream case with varied spacing for a playful look.
Checkpoints
After completing each significant step, check your progress:
- Your piece should now measure approximately 15-17 inches in height before folding.
- Ensure the colors are separated and your spots vary in size and shape for a natural effect.
Assembly and Joining
Align the right sides together before seaming. Ensure your seams are tight enough to avoid gaps that may affect the fit of your glasses. The button should line up perfectly with the chain loop you’ve created to allow easy opening and closing of the case.
Finishing
Weave in any loose ends with the tapestry needle, paying extra attention to the seam edges. Blocking may not be necessary for this project, but you can lightly steam the piece if desired to ensure it lays flat.
Resizing
If you want to resize the glasses case:
- Adjust the foundation chain accordingly before starting the rows; increase or decrease in increments of 2 to maintain even sides.
- Keep the height the same, but the width can be modified based on your preference.
Variations
Consider trying out different variations of this pattern:
- Create a one-color version using a solid yarn.
- Use a scrap-yarn approach for the spots to showcase your color stash.
- Modify the shape to a rectangular tote that complements the glasses case.
Troubleshooting
Why Is My Project Getting Wider?
If your case is bulging, you might be adding extra stitches—review your row count and stitch placement.
Why Are My Spots Shifting?
Ensure you are securely fastening the spots; the sewing method matters in keeping their positions intact.
Why Is My Edge Wavy?
Wavy edges could be due to inconsistent tension; practice keeping even tension across all stitches.
Why Is My Fabric Curling?
This may happen if your gauge is tighter than desired; consider relaxing your stitches or going up a hook size.
Frequently Asked Questions
Can I use a different yarn weight?
It’s best to stick to worsted-weight yarn for the intended dimensions and structure.
Can I make it larger?
Yes, just adjust your chain count and make sure to keep your stitches even.
Is this pattern suitable for beginners?
While an intermediate level is suggested, a determined beginner can also complete this if they are familiar with basic stitches.
How should I block it?
Lightly mist or steam the completed case to ensure a flat finish, being cautious around the button.
By following these detailed instructions, you will create a stunning Cow-Spot Crochet Glasses Case that you can proudly use or gift! For additional accessory ideas, check out related crochet patterns like the Blue Bow Bag Charm or explore fun fall projects like the Pumpkin Mug Cozy. Happy crocheting!



