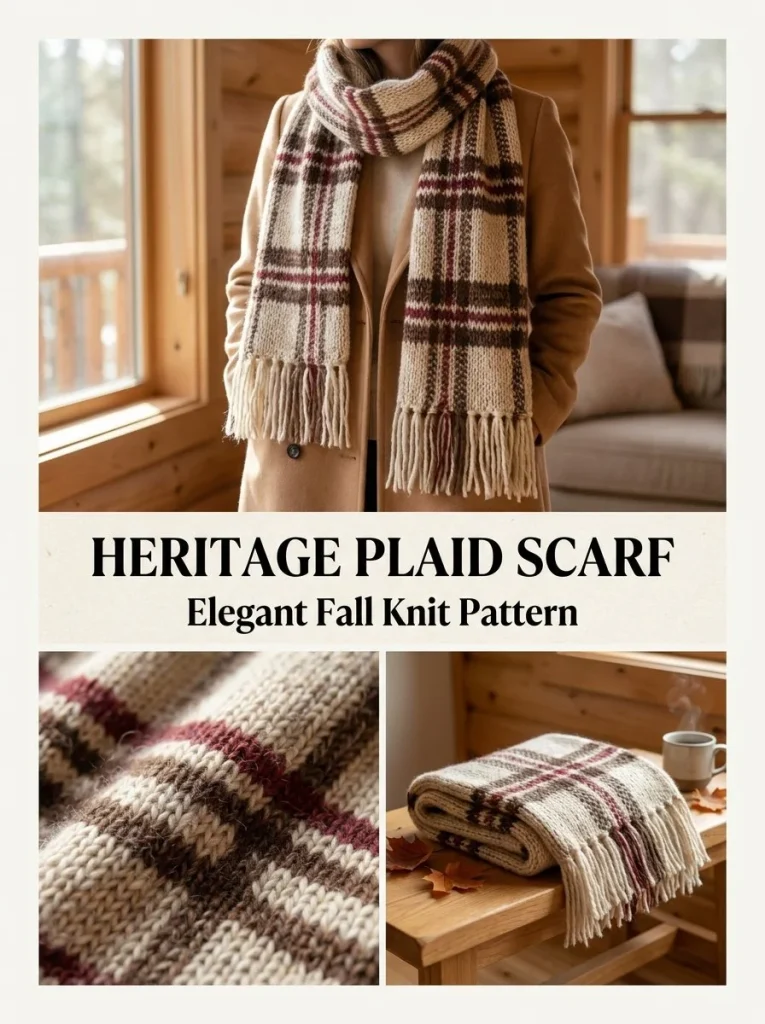
This elegant plaid long scarf combines warmth and style, making it a perfect accessory for chilly days. The continuous garter stitch provides a soothing texture that drapes beautifully, while the striped pattern adds visual interest. Designed using soft worsted-weight wool or merino yarn, this project is not only practical but also showcases a lovely balance of color. Whether you wear it wrapped around your neck or hanging loosely, this scarf can elevate any outfit. You may also find Acorn Brown Keyhole Scarf Knitting Pattern useful.
The scarf features a unique construction method featuring alternating stripes in oatmeal, chocolate brown, and muted cranberry. With a personalized touch of embroidery using duplicate stitch techniques, this piece offers the chance to express your creativity. Read on for everything you need to know to create your very own Heritage Plaid Long Scarf. If you’re seeking more crochet inspiration, be sure to check out this plaid crochet pattern.
Pattern at a Glance
- Skill level: Intermediate
- Terminology: US terms
- Construction: One-piece scarf worked in rows
- Finished size: Approximately 8 x 68 in (20 x 173 cm) before fringe
- Yarn weight: Worsted-weight
- Needles: US 8 / 5 mm straight or circular knitting needles
- Main stitch: Garter stitch
- Gauge: About 18 sts x 28 rows = 4 in / 10 cm in blocked garter stitch
- Fringe: Optional addition for flair
Materials
To create the Heritage Plaid Long Scarf, you will need the following materials:
- Worsted-weight wool or merino yarn:
- Approximately 430 yards of oatmeal (main color)
- 70 yards of chocolate brown
- 45 yards of muted cranberry
- Needles:
- US 8 / 5 mm straight or circular knitting needles
- Notions:
- Tapestry needle (for weaving in ends and duplicate stitching)
- Scissors
- Ruler or tape measure
Yarn and Color Notes
Choosing the right yarn is essential for achieving the desired texture and drape. Worsted-weight yarn is a versatile option that provides warmth without excessive bulk. Opt for merino wool for softness and superior insulation, or choose a blend that features wool to retain the warmth while ensuring comfort against the skin.
For this scarf, oatmeal serves as the base color, which reflects a classic, cozy feel. The contrasting chocolate brown and muted cranberry colors serve to enhance the plaid design, contributing a touch of sophistication to the overall aesthetic. When picking color combinations, think about how they will complement your wardrobe.
Finished Measurements
The finished scarf measures approximately 8 x 68 inches (20 x 173 cm) before adding the fringe. The length provides ample material to envelop your neck comfortably, while the width keeps it stylishly narrow. Adjusting the length and width is possible based on preference; adjustments can be made using the existing stripe sequence.
Gauge
Achieving the correct gauge is important for ensuring the final dimensions of the scarf are met. The gauge for this project is approximately 18 stitches x 28 rows = 4 inches (10 cm) in blocked garter stitch. Although exact gauge is not critical—especially since the fabric is meant to remain soft—if the stitches are too loose or tight, the scarf may not measure accurately or drape effectively.
When measuring gauge, it’s recommended to knit a small swatch of about 20 stitches wide and 30 rows long. Block the swatch by soaking it in water, gently pressing it to remove excess moisture, and laying it flat to dry. Once dried, measure the swatch to confirm whether it matches the specified gauge.
Abbreviations
- CO: Cast On
- K: Knit
- St(s): Stitch(es)
- BO: Bind Off
Important Pattern Notes
- When casting on, the first and last 3 stitches on each side should remain as edge stitches to create neat borders.
- Ensure your tension remains consistent throughout the knitting process for uniformity.
- When working the scarf’s body, maintain the established stripe sequence to achieve the desired plaid effect.
Special Stitches and Techniques
This scarf incorporates a duplicate stitch technique to create the plaid vertical lines, which makes it easy to customize the design. Duplicate stitch is performed by stitching over the existing knit fabric, allowing for intricate detail without altering the integrity of the original knitting.
Understanding the Construction
The Heritage Plaid Long Scarf is a straightforward project knitted in rows. The scarf’s body consists of alternating colorful stripes in a simple garter stitch. After the scarf has reached the desired length, decorative vertical lines are added using the duplicate stitch method, followed by the addition of fringe on the ends to finish the look.
Full Pattern Instructions
Foundation
- With oatmeal yarn, cast on 36 stitches.
- Knit every row for 10 rows.
Scarf Body
- Continue in garter stitch, working the first and last 3 stitches as neat edge stitches.
- Work the following sequence:
- 14 rows oatmeal
- 2 rows chocolate
- 8 rows oatmeal
- 2 rows cranberry
- 8 rows oatmeal
- 2 rows chocolate
- Repeat this 36-row stripe sequence until the scarf measures about 67 inches, ensuring that you end after an oatmeal section.
- Knit 10 final rows of oatmeal to finish the end border.
- Bind off loosely.
Plaid Vertical Lines
- First, block the scarf flat.
- Using chocolate yarn, thread it on a tapestry needle and work a vertical duplicate-stitch line from one end to the other along knit column 10.
- Repeat the duplicate-stitch line along column 27.
- With cranberry yarn, add one vertical duplicate-stitch line down the center between the two chocolate lines.
- Ensure the embroidery remains relaxed to allow the scarf to drape comfortably.
Fringe
- Cut 36 strands of oatmeal and 12 each of chocolate and cranberry, each measuring about 8 inches long.
- Group together 3 strands, fold them in half, and pull the fold through the end of the scarf.
- Pull the tails through the loop created to secure them.
- Space the fringe evenly across both short ends of the scarf and trim to about 3 inches.
Finishing
- Weave in all ends on the wrong side of the scarf.
- Steam or wet block gently to about 8 x 68 inches, making sure that the plaid lines remain straight.
Checkpoints
As you work on the scarf, here are a few checkpoints to keep in mind:
- After completing the scarf body, it should measure around 67 inches before binding off.
- Your tension should be consistent, ensuring evenness in the finished product.
- The embroidered lines should lie flat and not cause any puckering.
Resizing
If you wish to adjust the length of the scarf, you can simply work more or fewer rows within the established stripe sequence. Each stripe section is customizable, allowing you to easily adapt the scarf to your desired dimensions. For example, adding more rows of oatmeal can yield a longer scarf without altering other aspects of the design.
Variations
To customize your scarf further, consider the following variations:
- Opt for different colors that match your personal style.
- Change the stripe sequence to create unique patterns or skip the fringe for a cleaner finish.
- Experiment with various yarn textures for different effects and feels.
Troubleshooting
Why Is My Project Getting Wider?
This may happen if your tension is inconsistent or you’re inadvertently adding stitches. Maintain a consistent stitch count to keep the project aligned with the pattern.
Why Is My Edge Wavy?
A wavy edge can indicate that you’re pulling too tightly or working too loosely on the edge stitches. Focus on even tension for a flat edge.
Why Is My Fabric Curling?
Curling can result from not using a proper border technique. Keep the edge stitches consistent or add a light border stitch to help counteract this.
Frequently Asked Questions
Can I use a different yarn weight?
You can, but changing the yarn weight can affect the scarf’s final dimensions and drape. Make adjustments to your gauge accordingly.
Can I make it larger?
Yes, you can make the scarf larger by casting on additional stitches. Just ensure you maintain the same stripe pattern for consistency.
Is the pattern reversible?
While it has a distinct look, this pattern is not entirely reversible due to the color changes.
Do I need a special needle for this project?
No special needles are required; a standard US 8 / 5 mm needle will suffice.
Incorporating these detailed guidelines will help ensure that your Heritage Plaid Long Scarf turns out beautifully. Remember to enjoy the process and create a piece that is uniquely yours!



