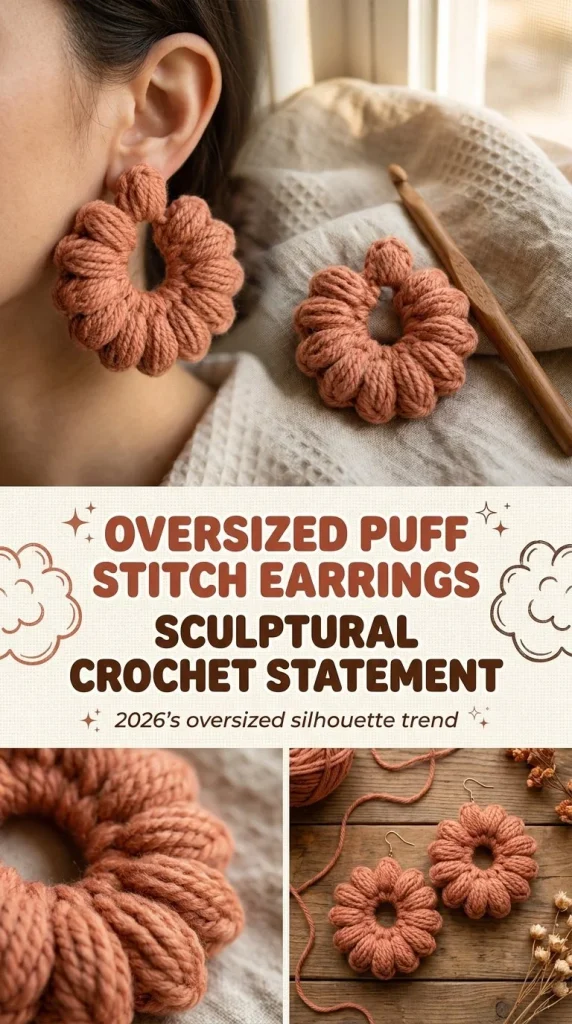
This project features oversized puff stitch statement earrings that are both sculptural and lightweight—perfect for making a bold, handcrafted fashion statement. These earrings showcase the puff stitch beautifully, creating a textured and eye-catching design that’s fantastic for beginners and intermediate crocheters alike. Because they work up quickly and use minimal materials, they’re a delightful gift idea or a fun accessory to brighten your own collection. I especially appreciate how the puff stitch here gives a pleasant 3D effect without compromising the shape; learning to control your tension just right can really make the puffs pop. If you enjoy exploring crochet accessories, you might also want to check out the beginner-friendly flower-inspired crochet hair comb pattern, which uses similarly gentle shaping techniques to create delicate wearable art.
Why You’ll Love This Crochet Pattern
- Creates bold, sculptural earrings with a textured puff stitch detail.
- Quick to make with minimal materials, ideal for beginner to intermediate crocheters.
- Lightweight design that sits comfortably on the ears all day.
- No stuffing needed, keeping finishing simple and neat.
- Practical skill-building: mastering puff stitches improves overall crochet texture work.
- Versatile stitch pattern that can inspire other unique crochet jewelry or accents.
Finished Size
Each earring measures approximately 1.75 inches (4.5 cm) in diameter. Final size will vary depending on yarn thickness, hook size, and personal tension. Using a heavier worsted-weight yarn with a 4mm hook will yield earrings close to this size; adjusting these materials can help you customize the bulk or delicacy of the finished piece.
Skill Level
Easy to Intermediate Beginner. The pattern uses simple rounds and basic stitches, but the puff stitch requires some attention to tension and loop control that improves with practice. If you’re confident with single crochet and basic magic ring starts, this is a great project to move into slightly more textured stitches.
Materials Needed
- Terracotta (or preferred color) worsted-weight yarn. Cotton or acrylic works well for structure.
- 4mm crochet hook (G/6 US size).
- 2 earring hook findings (ear wires).
- 2 small jump rings.
- Tapestry needle for weaving in ends.
- Scissors.
Stitches and Abbreviations
- ch = chain: a basic foundation stitch.
- sc = single crochet: insert hook into stitch, yarn over, pull through, yarn over, pull through both loops.
- yo = yarn over: wrap yarn over hook once.
- puff stitch = (yo, insert hook, pull up loop) repeated 4 times in the same stitch, yarn over, pull through all 9 loops on hook: forms a raised puff texture.
- magic ring: an adjustable ring start for crocheting in rounds.
Gauge and Tension Notes
Gauge is not critical here since this is an accessory rather than wear-it-fit clothing. However, maintaining consistent tension is important to keep the puff stitch puffs even and the round smooth. Avoid crocheting too tightly, which makes the puffs small and stiff, or too loosely, which can lose shape. Aim for a balanced tension that allows the puffs room to puff but holds the round firm.
Pattern Notes Before You Start
This crochet pattern is worked entirely in rounds starting from a magic ring, creating a circular statement earring. Each earring is made separately and finished off before assembly. No sewing is required other than attaching jump rings and ear hooks. The puff stitches create alternating raised bumps with single stitches in between to help maintain flexibility and shape. There are no color changes in the base pattern, though feel free to experiment once comfortable with the construction.
Step-by-Step Crochet Instructions
- Start with a magic ring. Ch 1, then work 6 sc into the ring (6 stitches total).
- Round 2: Work 1 puff stitch in the next stitch (yo, insert hook, pull up loop; repeat this 4 times total, then yo and pull through all 9 loops on hook), then 1 sc in the next stitch. Repeat from * to * around (3 puff stitches alternating with 3 single crochets). (6 stitches total, with 3 puffs and 3 sc.)
- Round 3: Sc evenly around each stitch, including into the tops of the puff stitches, to close out the round (6 sc).
- Fasten off leaving a tail approximately 6 inches (15 cm) for assembly.
- Repeat steps 1–4 to make a second matching earring.
- Thread a tapestry needle with the tail to weave in securely into the back of the last round stitches, hiding it neatly.
- Use the tail at the top of each earring to attach a small jump ring. Connect each jump ring to an earring hook.
Assembly and Finishing
Weave the tails securely in the back to prevent unraveling but keep the front clean to highlight the puff stitches. Slip the jump rings through the top loops gently—this helps the earrings hang naturally without twisting or pulling the fabric. Pairing your terracotta yarn with gold or brass findings adds a beautiful natural warmth. Avoid using heavy metal findings, as lightweight materials help maintain ear comfort.
Helpful Tips
- When working puff stitches, keep your tension looser than single crochet stitches to maintain puff fullness.
- Use stitch markers if you want to keep track of rounds more easily, especially with puff stitches that may obscure counting.
- Block your earrings gently if needed by pinning them to a flat surface and lightly misting with water—this helps puff stitches settle evenly.
- If your magic ring is too loose, pull the tail tight and weave it firmly to avoid gaps at the center.
- Try gently shaping the puffs with your fingers after finishing to enhance their sculptural impact.
Common Mistakes to Avoid
- Pulling loops too tight in the puff stitch, causing them to flatten. Take your time to keep loops even.
- Miscounting stitches around rounds due to puff stitches obscuring stitch definition—use stitch markers to help.
- Attaching jump rings too low or too tight, which can cause uneven hanging or distortion. Place them at the very top loop and allow some freedom of movement.
- Not weaving in tails securely, which can lead to unraveling since earrings get frequent handling.
- Skipping the single crochet stitches between puffs, which keeps the fabric balanced and flexible.
Customization Ideas
- Blend two contrasting yarn colors for round 2 puff stitches and round 3 sc stitches to add subtle color shifts.
- Utilize a soft or slightly fuzzy yarn to create a cozy textured effect perfect for autumn or winter wear.
- Change the yarn weight and hook size to make oversized or mini versions for different statement looks.
- Add small beads or metallic thread into your yarn for a touch of sparkle without changing the basic pattern. This same pattern concept can also inspire other earring designs such as the delicate bluebell drop earrings pattern, offering another fun way to explore crocheted accessory textures.
How to Use or Display This Crochet Project
These oversized earrings make fantastic accessories for casual or dressy occasions. Their bold texture draws attention while remaining lightweight and comfortable. They’re a lovely gift for any crochet lover or statement jewelry fan. Display them on a decorative earring holder or gift box to highlight their handcrafted charm.
Care Instructions
Hand wash with cold water and mild detergent to avoid stretching or felting. Lay flat to dry, reshaping gently while damp to maintain puff stitch structure. Avoid machine washing or drying to prolong longevity. Store in a cool, dry place, ideally flat or hanging to prevent crushing the puff textures.
Frequently Asked Questions
Q: Can this pattern be made with other yarn weights?
A: Yes, but adjust hook size accordingly and expect a size change. Thicker yarns yield chunkier earrings; lighter yarns yield smaller, more delicate versions.
Q: Is the puff stitch difficult for beginners?
A: It can be tricky initially, but with slow, even tension and careful yarn overs, it becomes easier. Practice on scraps first if unsure.
Q: Can I make these earrings without a magic ring?
A: The magic ring helps create a neat, closed center, but you could start with 2 or 3 chained stitches formed into a loop—just watch for gaps in your starting round.
Q: How do I keep puff stitches even?
A: Use consistent tension and count loops carefully. Pull yarn gently but fully through all loops at the end of each puff stitch.
Q: Can I add bead embellishments to these earrings?
A: Yes, threading small beads over yarn before crocheting or stitching beads on after finishing is an easy way to add sparkle.
Final Thoughts
These oversized puff stitch earrings are a wonderful way to add handcrafted flair to your accessory collection. The sculptural texture delights the eye while the simple construction makes them accessible even to newer crocheters looking to stretch skills. I hope this project inspires you to experiment with texture and shape in your crochet jewelry, bringing a bold, cozy accent to your style.



